3.5. Create a Project in Nuclei Studio VSCode
This chapter describes how to create and manage projects in Nuclei Studio VSCode.
3.5.1. Workspaces and Projects
In Nuclei Studio VSCode, a workspace is a plain container directory that holds project folders. The first time the extension runs, ~/Documents/nucleistudio-vsc-workspace is used as the default workspace. Click Switch Workspace in the WELCOME panel to switch between workspaces: the QuickPick shows the current workspace, the recently used workspaces, Browse... for choosing an existing directory, and New Workspace... for creating a new one. Switching the workspace also re-points the VS Code workspace folder to the Nuclei Studio workspace directory.
Note
If the folder opened in VS Code differs from the Nuclei Studio workspace, the WORKSPACE view shows a Switch to Nuclei Studio VSCode workspace entry; click it to switch.
Each workspace has exactly one active project at a time. Click a project in the WORKSPACE view (or right-click it and choose Set Active) to make it the active project; its name is shown in the title of the PROJECT view. Build and debug always target the active project.
A project created by Nuclei Studio VSCode is Eclipse CDT compatible: the project folder contains .project and .cproject files, a <project>.nuproject file recording the NPK packages it depends on, and .launch debug configuration files, so the project can also be opened in Nuclei Studio IDE.
3.5.2. Create a Project with the New Project Wizard
This is the recommended way to create a project. It requires the corresponding NPK packages to be installed first; see NPK Package Management in Nuclei Studio VSCode.
Click Create Nuclei RISC-V C/C++ Project in the WELCOME panel to open the wizard.
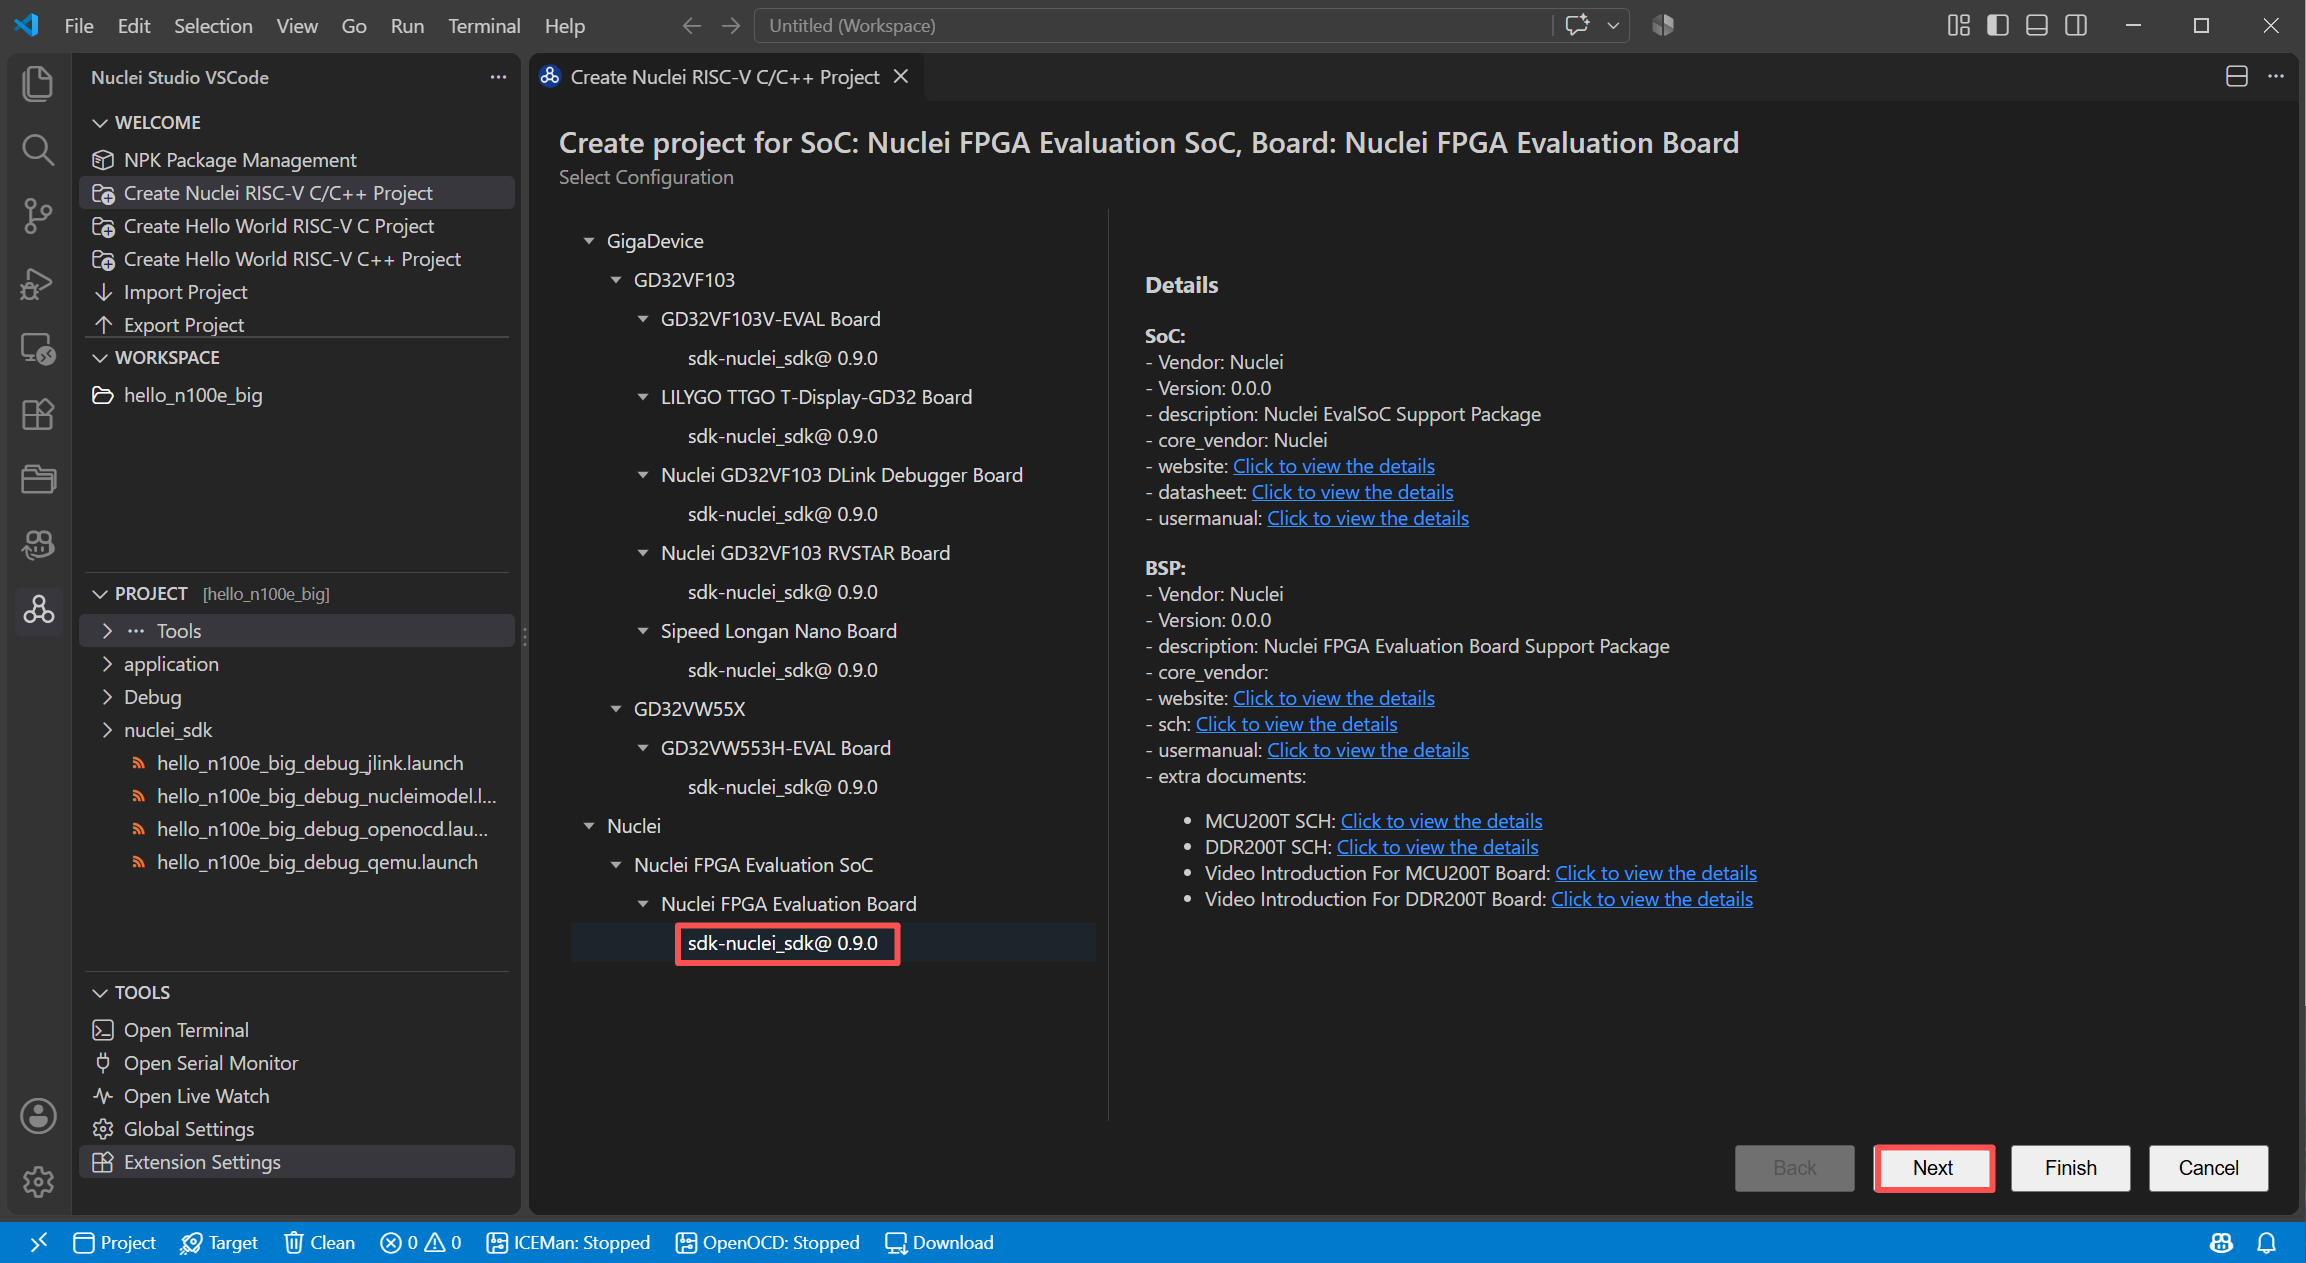
On the first page, choose the development board: the left pane shows the installed packages organized as Vendor -> SoC (SSP) -> Board (BSP) -> package name and version, and the right pane shows the details of the selected SoC or board, such as the vendor, version, description, and links to the datasheet and user manual.
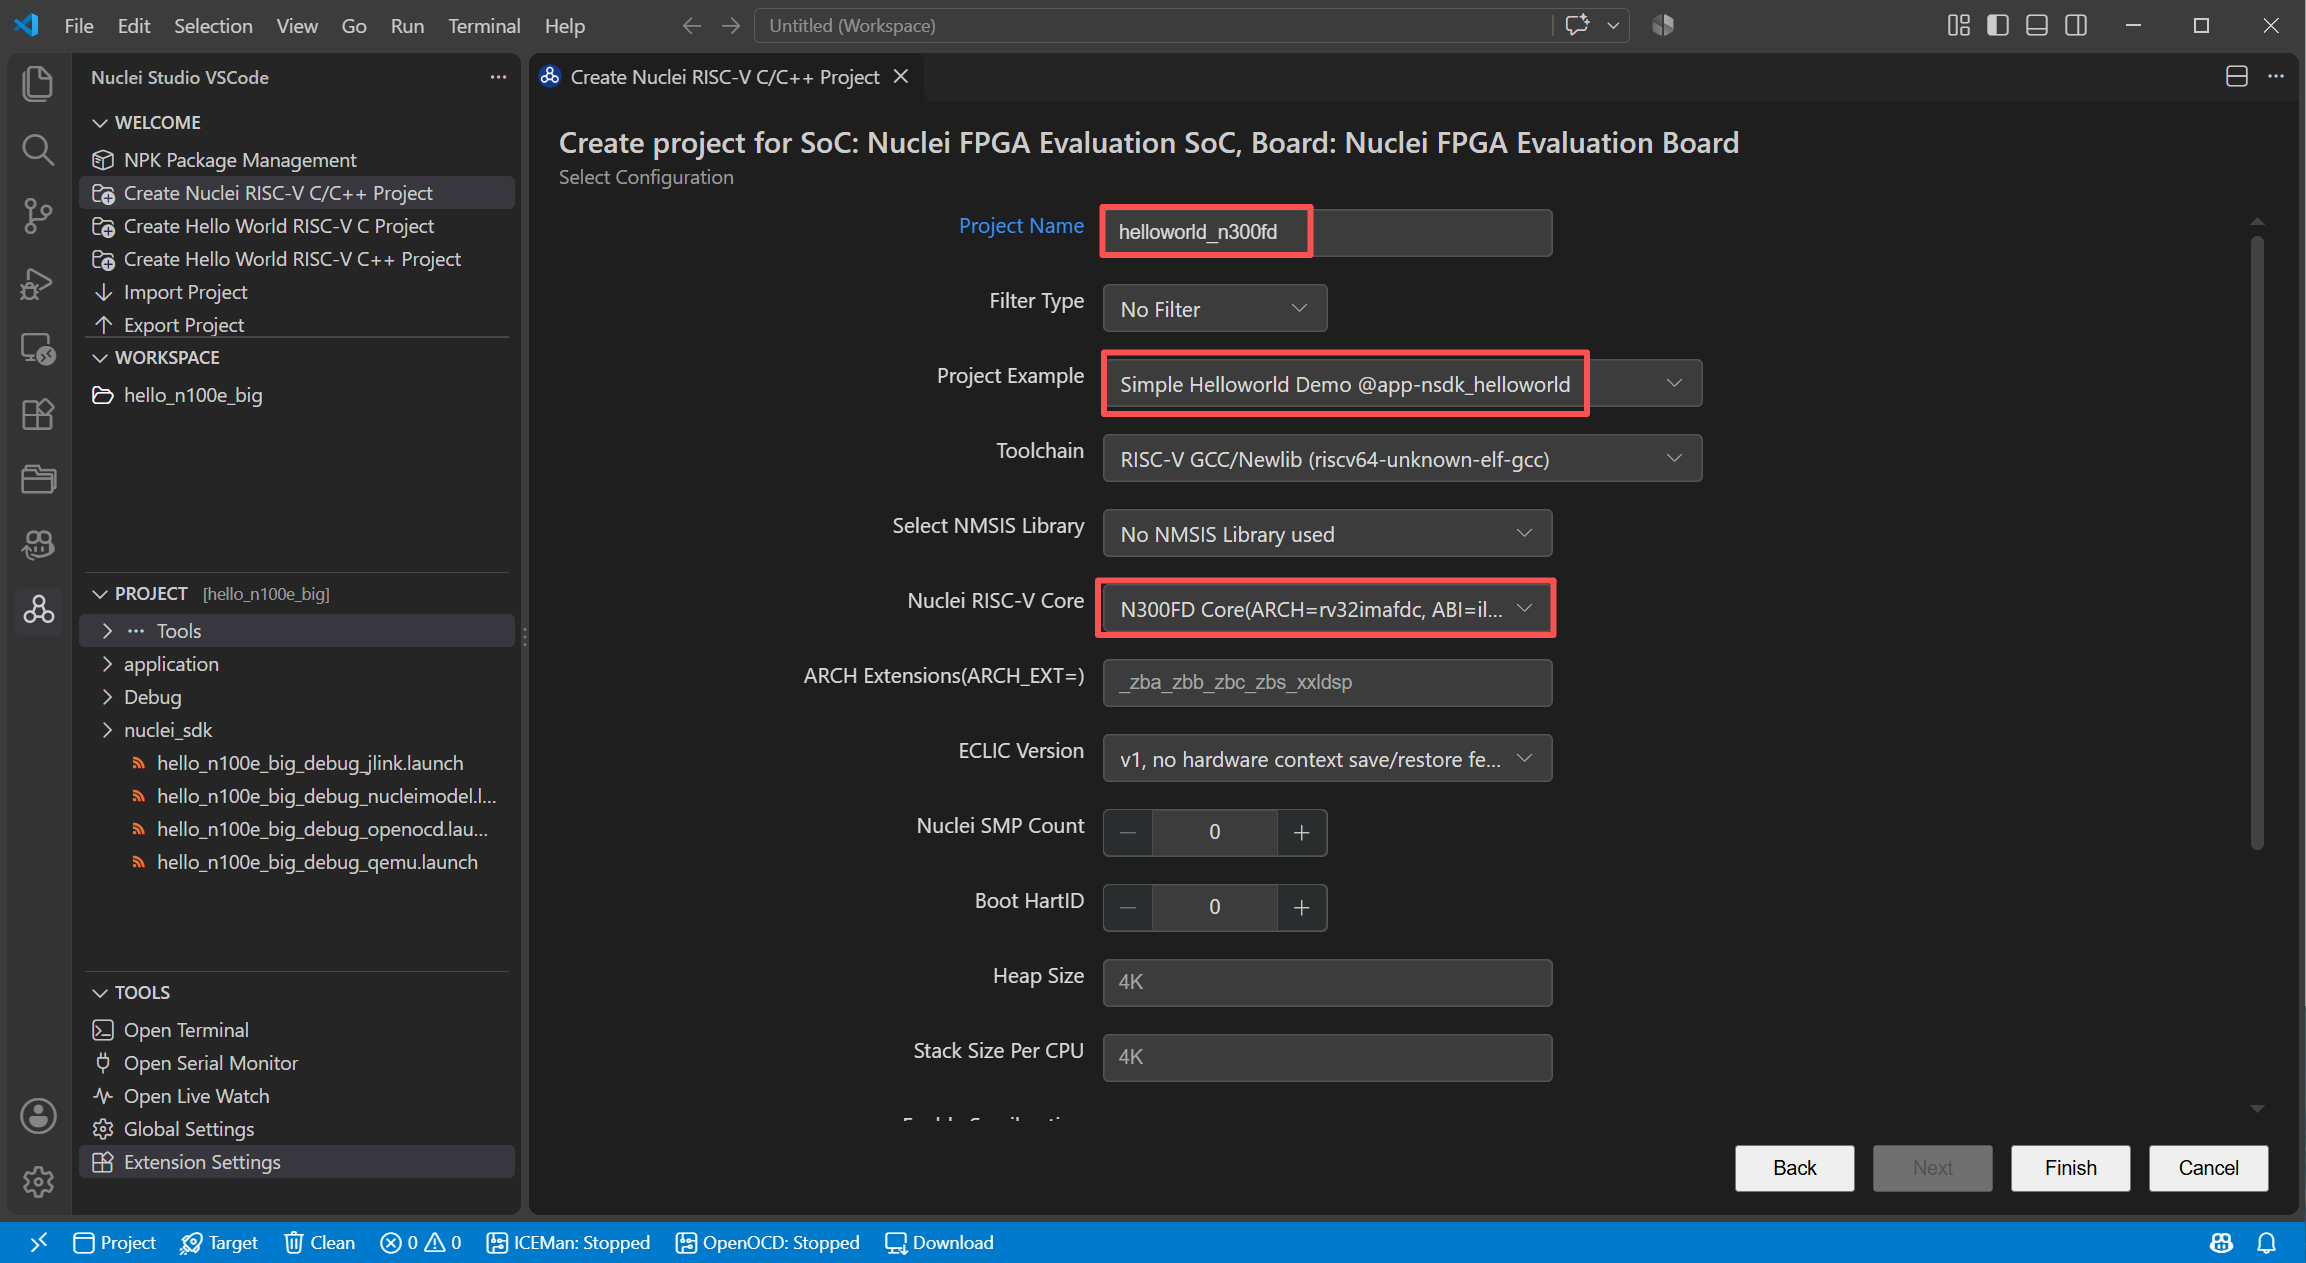
On the second page, configure the project:
Project Name: the name of the project; it is validated against the projects already in the workspace.
Filter Type and Project Example: filter and select an application example from the installed NPK packages that are compatible with the selected board, such as the Coremark Benchmark.
Version: shown when multiple versions of the example exist.
Toolchain: select the toolchain used to build the project, such as RISC-V GCC/Newlib or RISC-V Clang/Newlib.
The remaining configuration items are provided by the selected NPK package and vary by SDK.
Click Finish to create the project. The project is created in the current workspace and set as the active project, and its main source file is opened automatically.
3.5.3. Create a Hello World Project
Click Create Hello World RISC-V C Project or Create Hello World RISC-V C++ Project in the WELCOME panel to create a minimal example project without installing NPK packages. The wizard has 3 pages:
Basic properties: project name, author, copyright notice, the greeting printed by the program, and the source folder name.
Configurations: the build configurations to create (
DebugandRelease); more configurations can be added later.Toolchain: the toolchain used to build the project; the path is filled in automatically from the extension settings.
The generated project contains a main.c (or main.cpp) that prints the greeting.
Note
The generated Hello World project is a build-only example: it is linked without a board support package, so do not run it on a physical board directly.
3.5.4. Import a Project
Click Import Project in the WELCOME panel (or the import button in the WORKSPACE view title bar) to import an existing project into the current workspace. Two methods are provided:
Import Project Folder: import a project folder in place. The folder (or one of its subfolders) must contain the
.projectand.cprojectfiles; projects created by Nuclei Studio IDE can be imported this way.Import ZIP Package: extract a packaged project into the current workspace; a confirmation is shown before existing files are overwritten.
The imported project is set as the active project.
3.5.5. Export a Project
Click Export Project in the WELCOME panel (or the export button in the WORKSPACE view) to copy the files of the selected projects to a target directory. In the Export dialog, check the projects and files to export, choose the target directory, and set the options as needed (overwrite existing files without warning, create directory structure for files, create only selected directories, resolve and export linked resources).
3.5.6. Manage Projects
The WORKSPACE view and its context menus provide the common project management actions:
Set Active: make the selected project the active project.
Rename: rename a project. Only the project name is changed; the project folder on disk keeps its original name.
Delete: delete a project. You can choose
Remove from List Onlyto keep the project files on disk, orDelete Permanently (Including Files).Refresh Projects: refresh the project list; projects whose folders no longer exist are removed from the list.
Convert GCC 10 Project to GCC 13: convert a project created with the GCC 10 toolchain to the GCC 13 toolchain; see Advanced Usage of Nuclei Studio VSCode.