2.7. Create a Project in Nuclei Studio
This chapter uses the Nuclei FPGA Evaluation Board with the N300FD (rv32imafdc) processor core as an example to describe the common ways to create a project in Nuclei Studio.
There are several common ways to create a project in Nuclei Studio IDE:
Automatically create a project using a Nuclei Package (NPK) template project:
This is the simplest and quickest way. The template project feature currently relies on the NPK feature of Nuclei Studio. After importing the corresponding SDK NPK Zip package, you can create template projects in Nuclei Studio. Nuclei System Technology provides NPK Zip packages for Nuclei SDK, HBird SDK, and SoC IP SDK, all of which can be imported into the IDE to create and use projects.
Import an existing project directly to create a new project:
This is the most common way. For example, user A can package the folder of an existing project for sharing, and user B can import the project directly on another computer, then use it as-is or continue developing and modifying it on that basis.
Manually create a project without a template:
This is the most tedious way: in addition to creating the project, you must set various options and paths manually. It is rarely used in practice, but the detailed walkthrough of this method teaches you how to configure the various options and paths.
Create a project based on an existing Makefile:
This method is suitable for projects that already use a Makefile or other build tools. It lets you build, clean, and debug the project in the IDE — a good debugging environment — without modifying the build system.
The following sections introduce each of these methods.
2.7.1. Automatically Create a Project Using an NPK Template Project
This section describes how to use a template to automatically create a simple Hello World project in Nuclei Studio IDE.
To create a new project, select File -> New -> New Nuclei RISC-V C/C++ Project in the menu bar.

You can also select New Nuclei RISC-V C/C++ Project in the Project Explorer view.
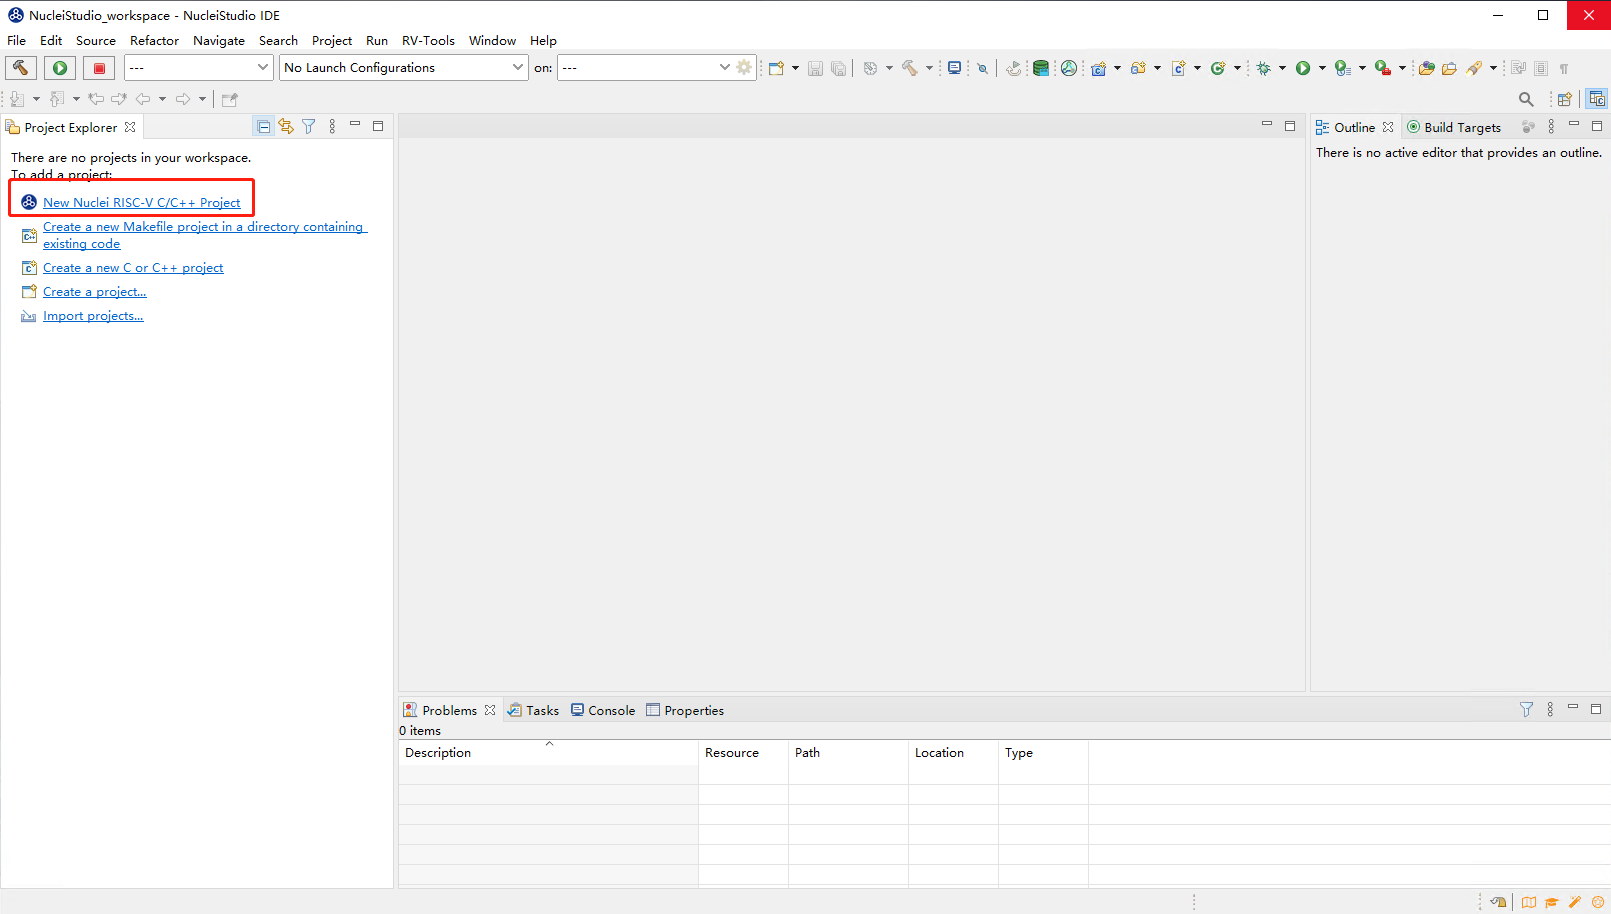
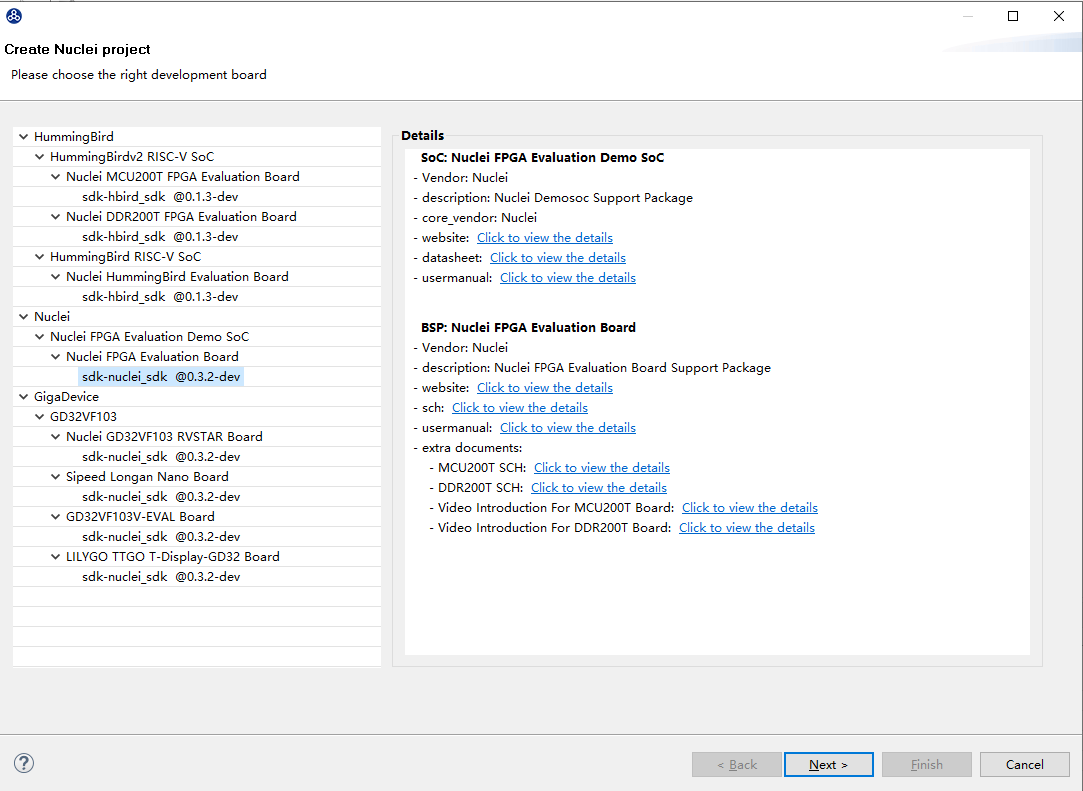
Select the project type in the pop-up window. Here we use a Nuclei FPGA board with the N300FD core and the nuclei_sdk@0.8.0 SDK for test development. Select the SDK under the corresponding Board, and click Next to proceed to the next step.
Set the following parameters in the pop-up window.
Project name: the project name. Here it is set to
1_helloworldProject Example: select
Simple Helloworld Demo.Toolchains: we use
RISC-V GCC/Newlib.
Note
This page is automatically parsed and generated from the NPK Configuration field. Different SDKs, different boards, or different examples may produce different option pages.
Our core is N300FD, so select N300FD for Core.
The HummingBird board supports three download modes, briefly introduced below; here we select the ILM mode.
ILM
In ILM download mode, the program is downloaded directly into the MCU’s ILM and executed from ILM. ILM consists of SRAM, so its contents are lost when power is off.
FLASH
In FLASH download mode, the physical address of the program’s code section is constrained to the Flash region, while the logical address of the code section is constrained to the ILM address region. This means the program is downloaded directly into the MCU’s Flash, but after power-on a boot program moves the code section into ILM, and execution starts from ILM. The program is flashed into Flash, so it is not lost when power is off.
FLASHXIP
In FLASHXIP download mode, the program’s code section is constrained to the Flash region, which means the program is downloaded directly into the MCU’s Flash and executed directly from Flash. The program is flashed into Flash, so it is not lost when power is off.
Configure the other options as needed, then click Finish to complete project creation.
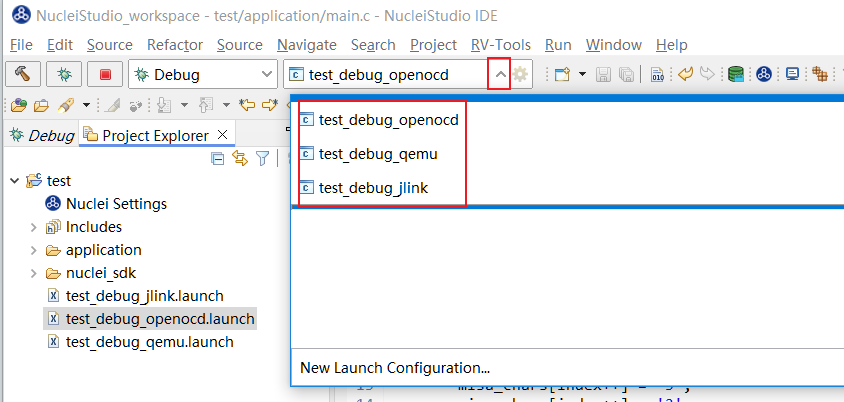
The Hello World project has now been created automatically using the template.

Build the project directly using the menu bar Project -> Build Project or the  button.
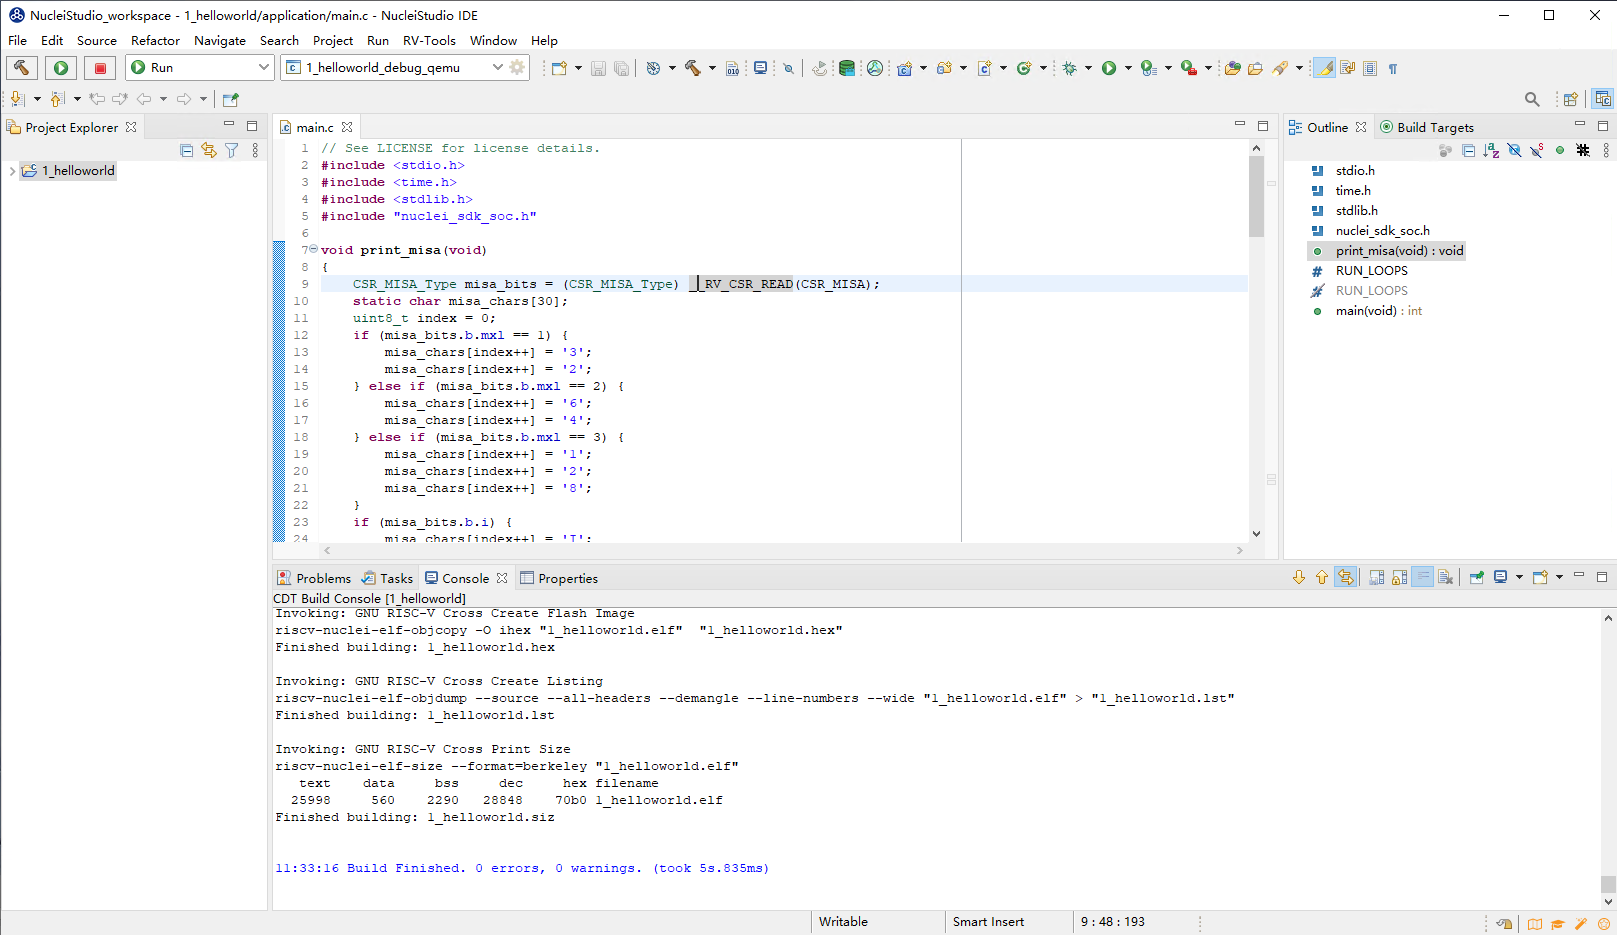
During the automatic generation of the Hello World project, the corresponding OpenOCD configuration is synchronized. After the project is built, right-click the project Hello World in the project list and click Debug As -> Debug Configurations to open the debug configuration panel. Debug and Run use the same configuration files, so they can also be opened via Run As -> Run Configurations.
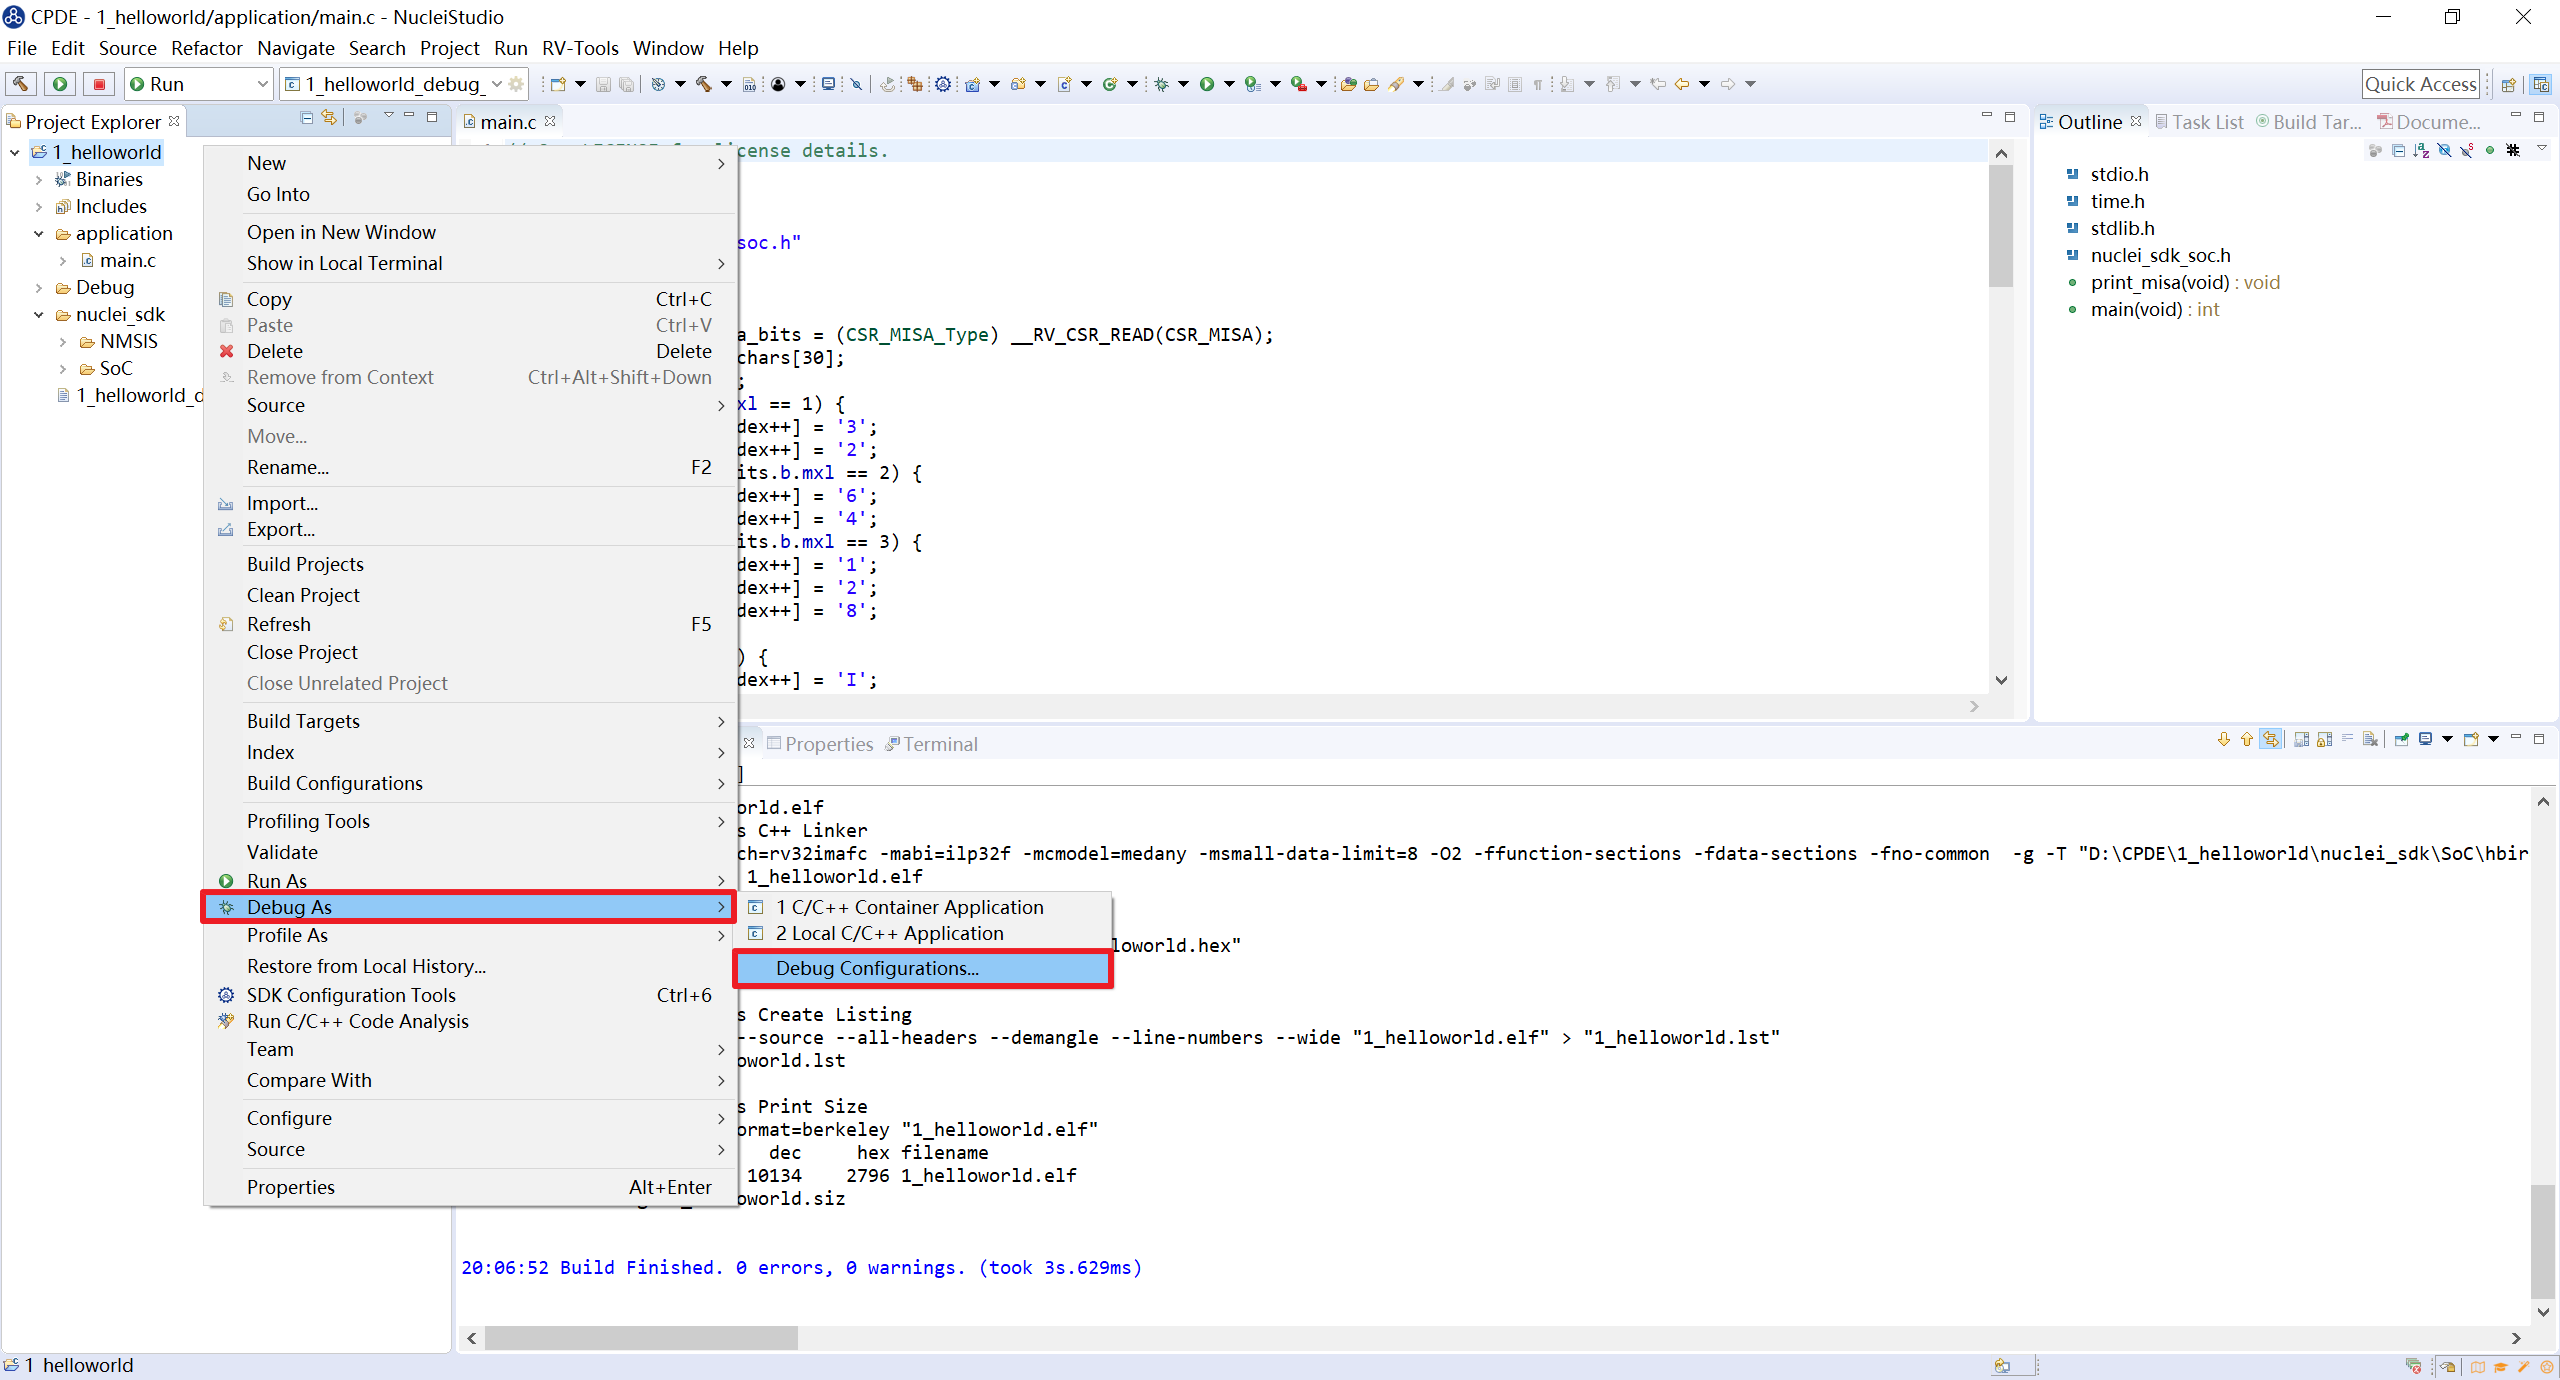
The configuration file Hello World_Debug_OpenOCD used for debugging is generated automatically. For details on how to use the Nuclei HummingBird debugger together with OpenOCD to download and debug, see Debugging and Running a Project with the HummingBird Debugger and OpenOCD.

2.7.2. Import a Project via an Application Association File
This section describes how to import a Hello World project into the IDE through the association file of Nuclei Studio IDE. Nuclei Studio IDE 2022.12 added support for application file association. The IDE launch path can be registered in the system registry, after which specific files can be used to launch the IDE, import projects, and so on, which greatly simplifies sharing and quickly importing projects for Nuclei Studio IDE users.
2.7.2.1. Register Nuclei Studio IDE in the Registry
In Nuclei Studio IDE 2022.12 and later versions, the installation package includes two additional files, install.bat/install.sh. On Windows, double-click install.bat. Because this needs to write to the registry, user authorization is required; after authorization, the installation succeeds. On Linux, run the install.sh file in a shell.
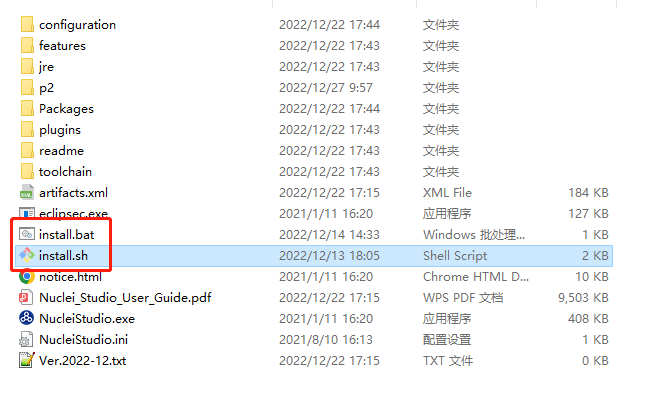
After the install.sh file runs, a user authorization screen appears; agree to the authorization.

2.7.2.2. Import a Project via an Application Association File
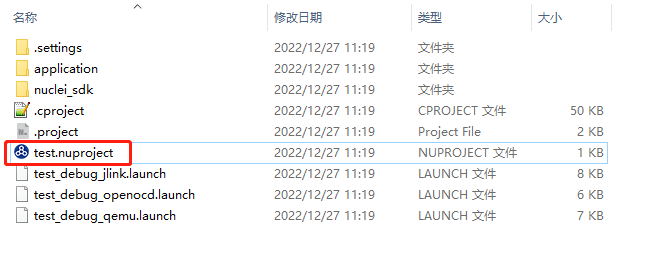
Use Nuclei Studio IDE 2022.12 or later to create a project test. The project contains an application association file, test.nuproject. If the IDE launch path has been written to the registry, double-clicking the test.nuproject file automatically starts Nuclei Studio IDE and imports the test project into the IDE.
2.7.3. Import an Existing Project Directly to Create a New Project
This section describes how to use the IDE to import an existing project directly and create a new project from it. This document takes the N307 project package as an example. The project package is available at (https://github.com/riscv-mcu/Nuclei-Studio_IDE-Project-Package). For other project packages, contact Nuclei.
In a Windows-based Nuclei Studio IDE development environment, if you use Manually create a project without a template, you also need to load the nuclei-sdk folder from this project package. For details, see Manually Create a Project Without a Template.

After downloading and extracting the nuclei-eclipse_demo.rar archive, the contents are as follows:
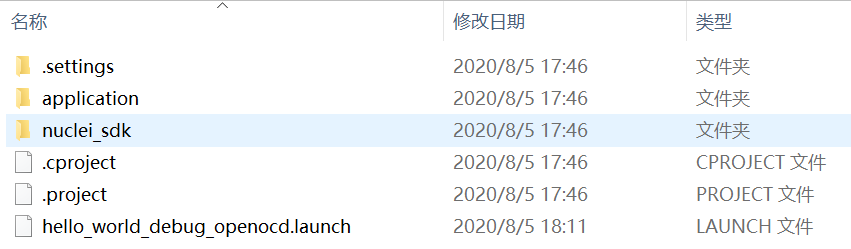
The project description files
.setting,.project, and.cprojectThe project Debug settings files
*.launchThe nuclei_sdk folder
This folder contains part of the SDK source code.
The application folder
This folder contains the main function source code of the hello_world sample program.
Next, import the downloaded project package as follows:
Select
File -> Importin the menu bar.As shown in the figure, select
Existing Projects into Workspaceand clickNext.
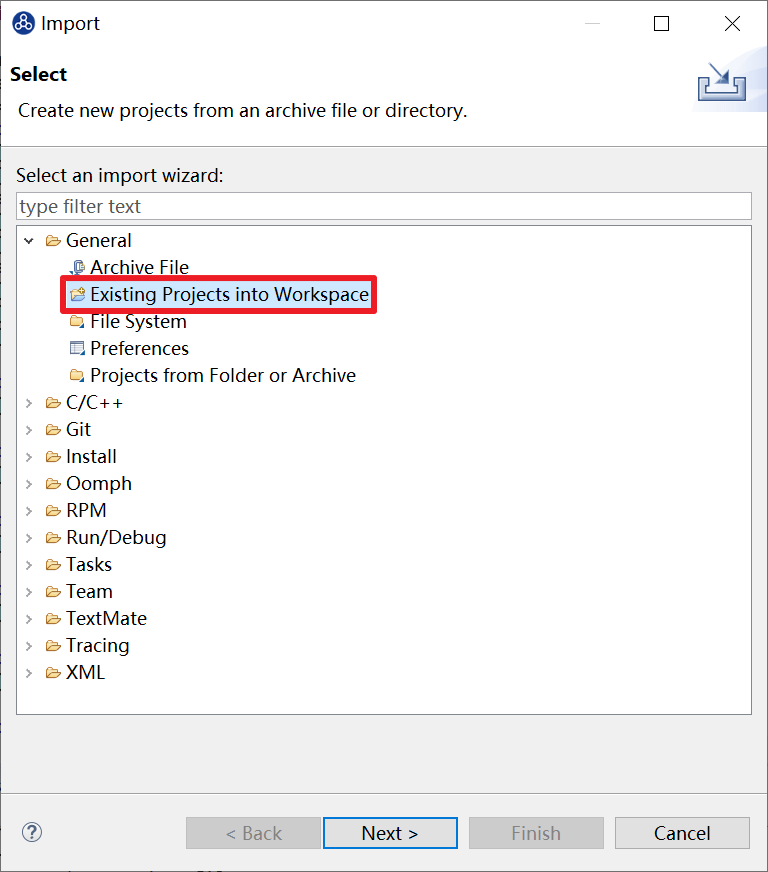
Click
Browseand select the path of the project to be imported, as shown in the figure.

The IDE recognizes the project to be imported. Click
Finish.

The directory structure of the imported project appears in the IDE’s Project Explorer as shown in the figure. The existing project uses the N307 build options by default, and the Nuclei SDK only contains the files used by helloworld. For more Nuclei SDK source code, visit GitHub (https://github.com/riscv-mcu/hbird-sdk).

2.7.4. Manually Create a Project Without a Template
This section describes how to manually create a user-defined Hello World project in Nuclei Studio IDE. The board is the Nuclei FPGA Evaluation Board and the core is N307. In addition to creating the project, this method requires manually setting various options and paths.
Note
Not recommended. Use the NPK template method to create a project instead.
2.7.4.1. Manually Create a Project
In the Nuclei Studio main menu bar, select File -> New -> C/C++ Project.
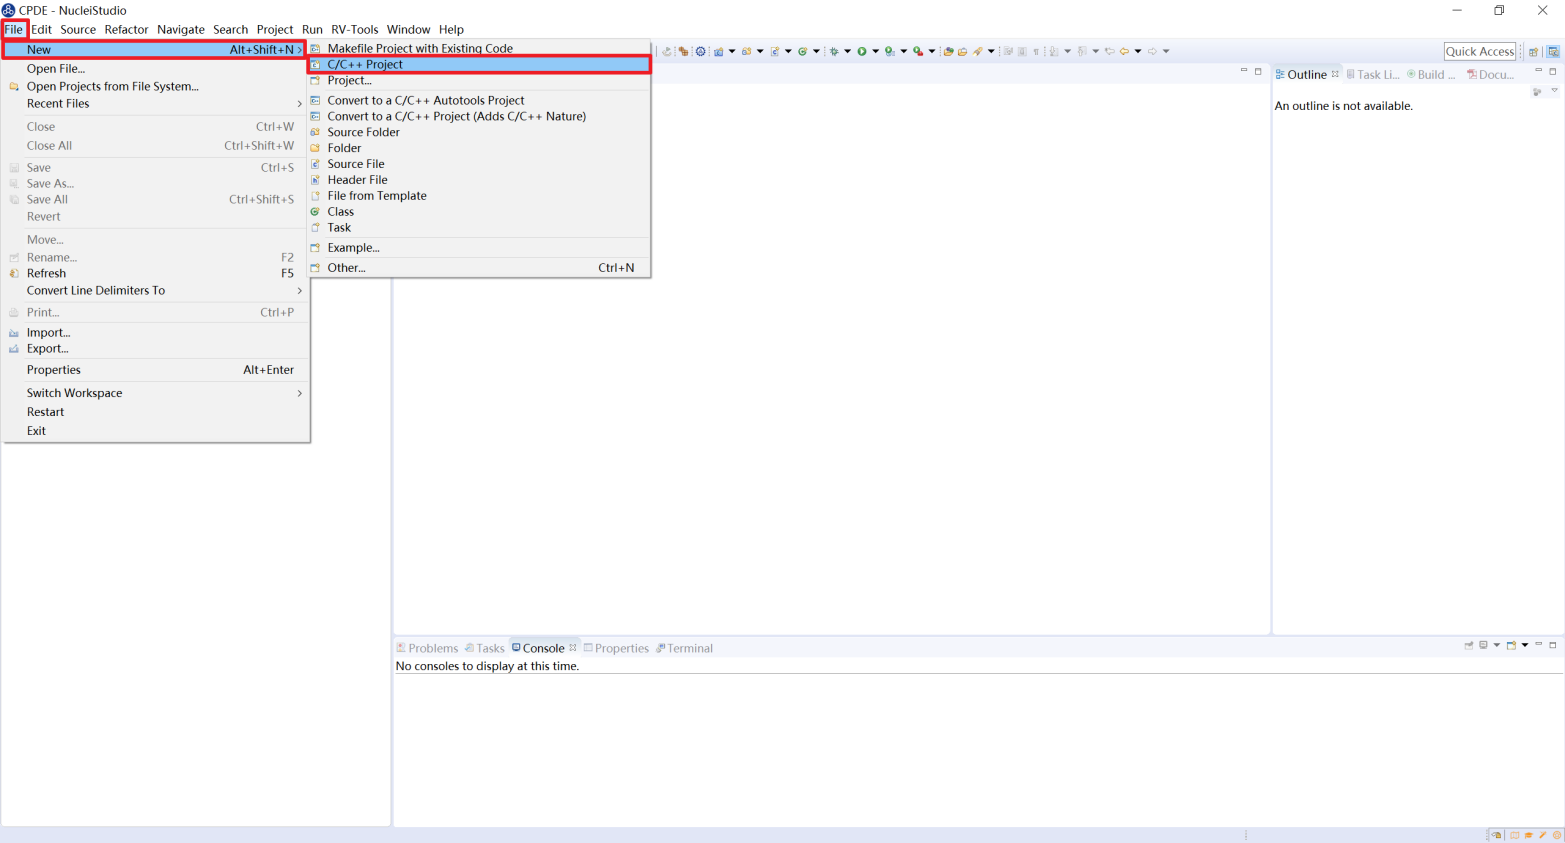
Then set the following parameters in the pop-up window.
Project name: the project name.
Use default location: if this option is checked, the default Workspace folder is used to store this project.
Project type: select
Hello World RISC-V C Project.

Then click Next to proceed to the next step, and set the basic information of the Hello World project in the pop-up window. Leave the Source option empty and click Next directly to proceed.
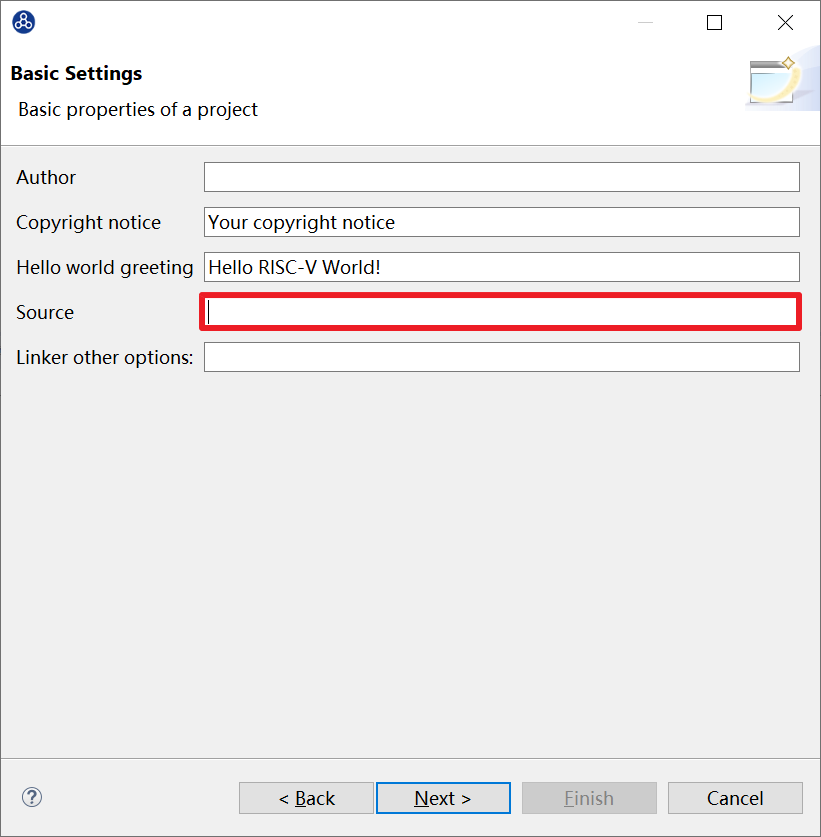
Set the Debug or Release attributes of the project in the pop-up window. Use the default settings in this step without any modification, and click Next directly to proceed.
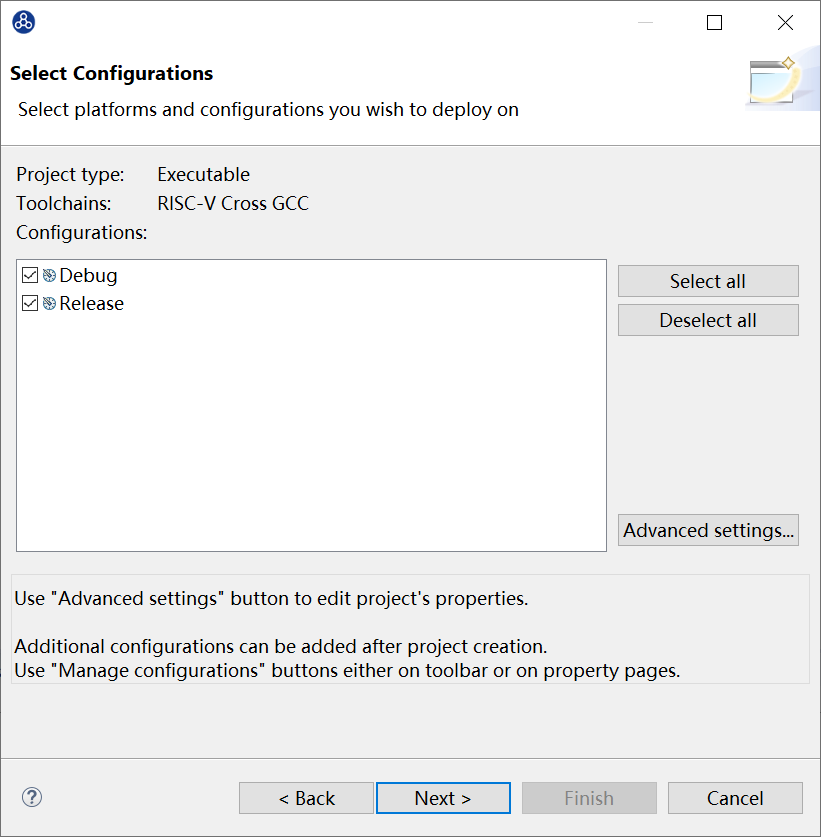
Set the RISC-V toolchain used by the project in the pop-up window. Do not configure anything here; click Finish directly. The HelloWorld project is now created.
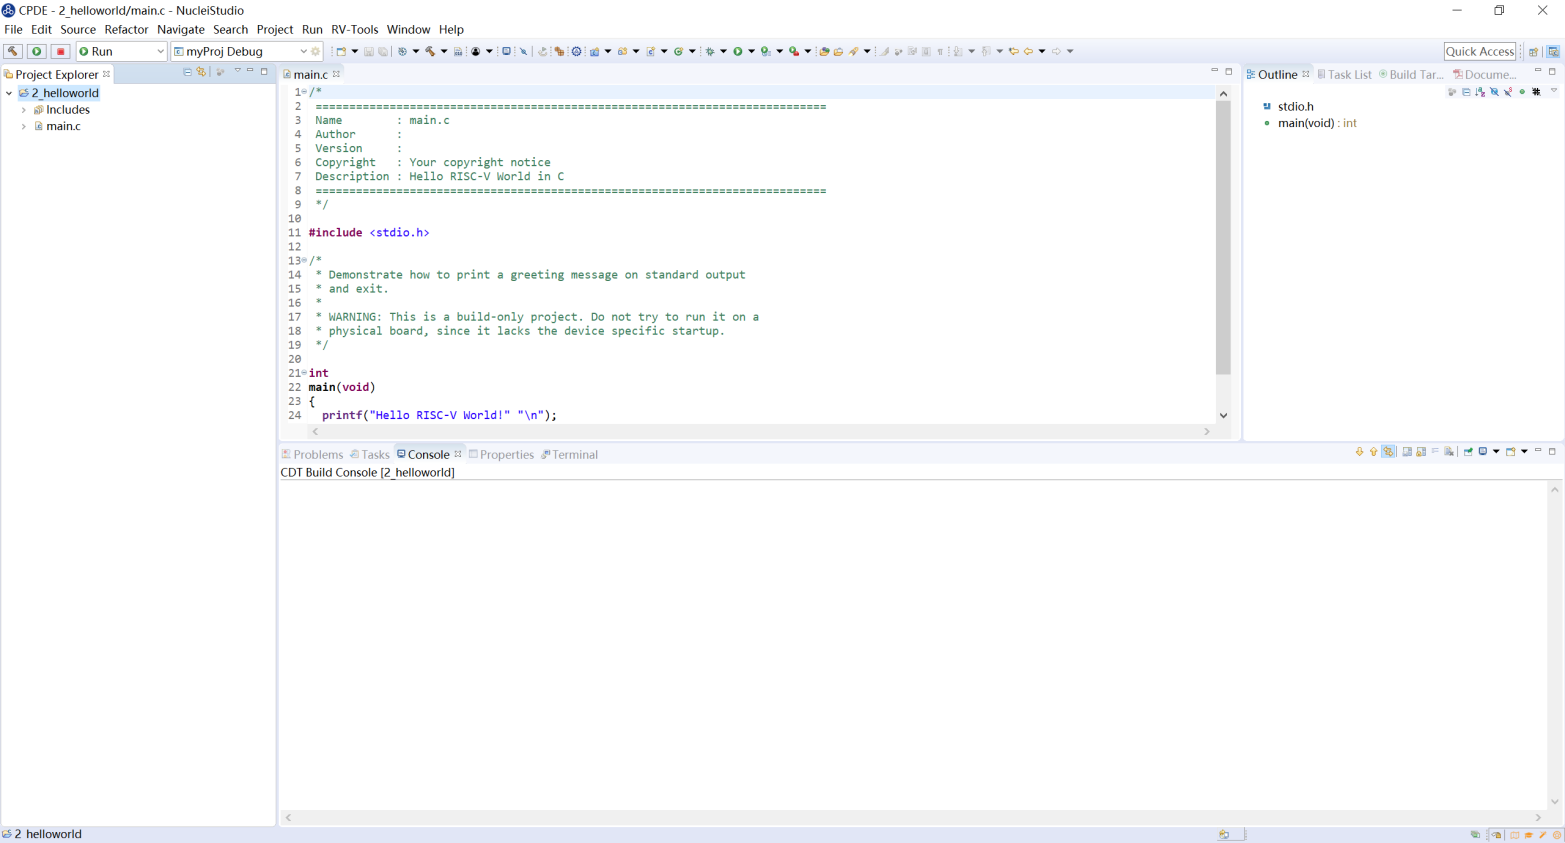
After creation, the Hello World project is displayed as follows.
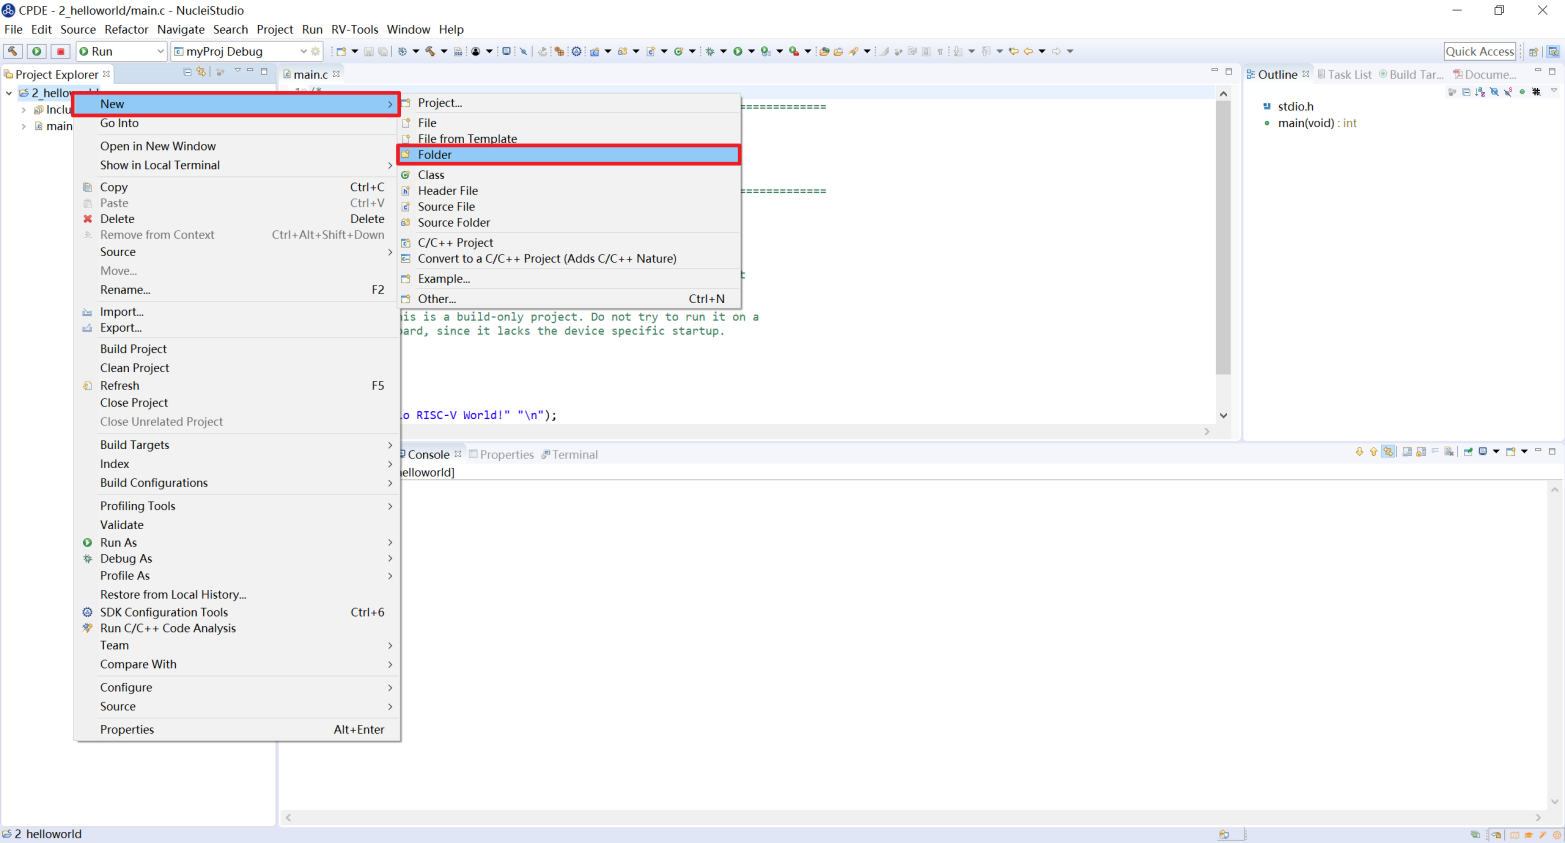
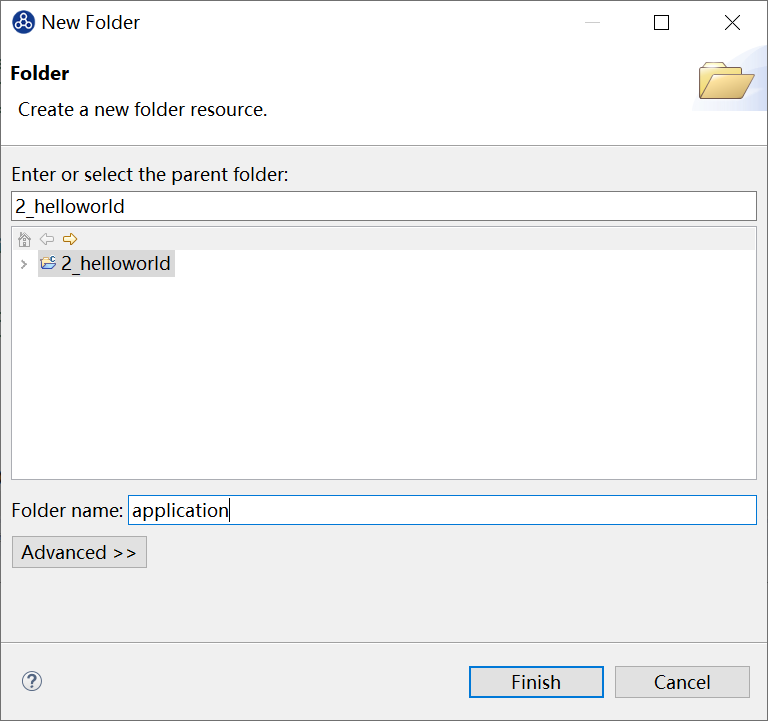
Create a new application folder. Right-click the project and select New -> Folder, enter application, and click Finish. Then drag main.c into the application folder to organize the files.
2.7.4.2. Configure nuclei_sdk for the Project
This section describes how to add nuclei_sdk to the project. The details of the SDK are not covered here; refer to https://doc.nucleisys.com/nuclei_sdk/index.html. If you need to use other SDK source files, obtain the full Nuclei SDK source code (version 0.3.9 is used here as an example) from GitHub: https://github.com/Nuclei-Software/nuclei-sdk/releases. This section only describes the steps to add the files needed by helloworld in nuclei_sdk to the project. If you use a newer version of the SDK, the corresponding directory structure may have changed; adjust accordingly.
Open the 2_helloworld project in Nuclei Studio, and add the nuclei_sdk source files as follows.
In the Project Explorer, select the 2_helloworld project, right-click, and select Properties to open the project settings page.
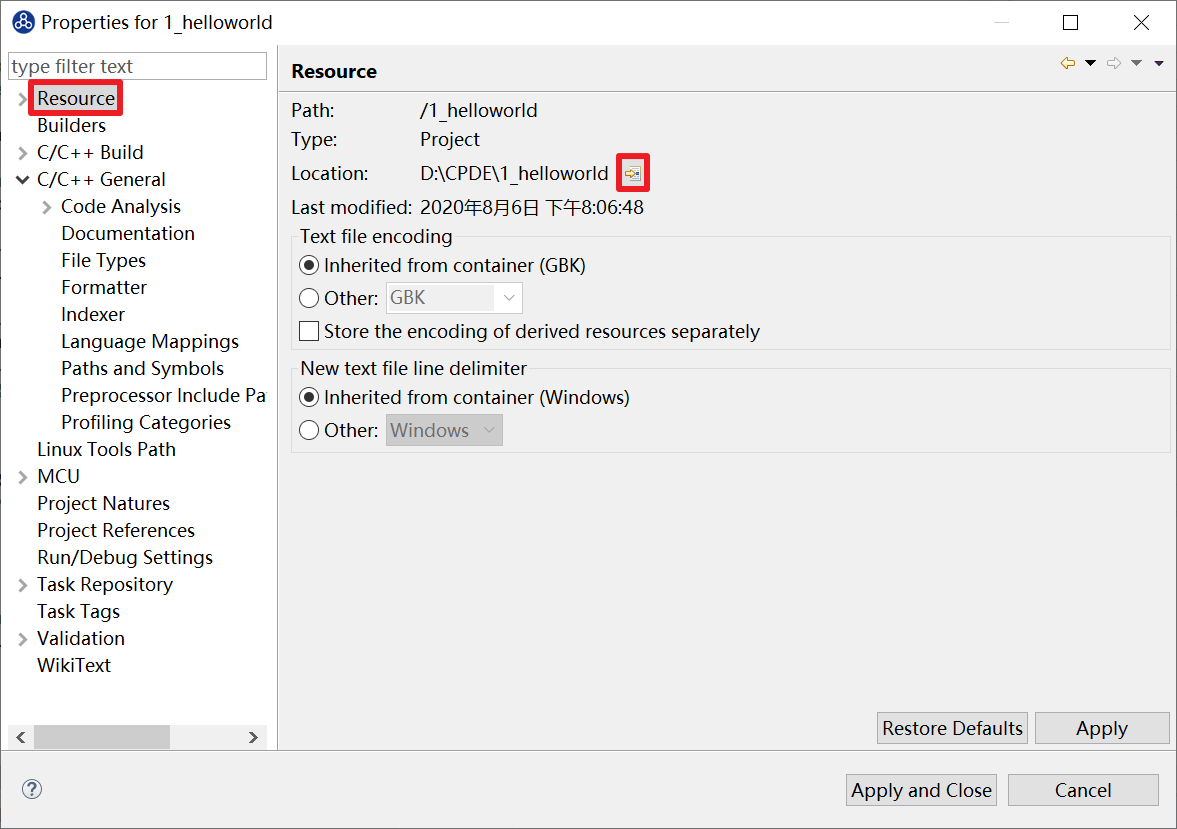
In the pop-up window, click Resource, and in the Location column on the right, click the arrow icon  on its far right. A file window pops up at the folder location of the
 2_helloworld project.
Copy the nuclei_sdk folder from the nuclei-eclipse_demo.rar archive into the directory of the 2_helloworld project.

Return to Nuclei Studio, select the 2_helloworld project in the Project Explorer, right-click, and select Refresh.
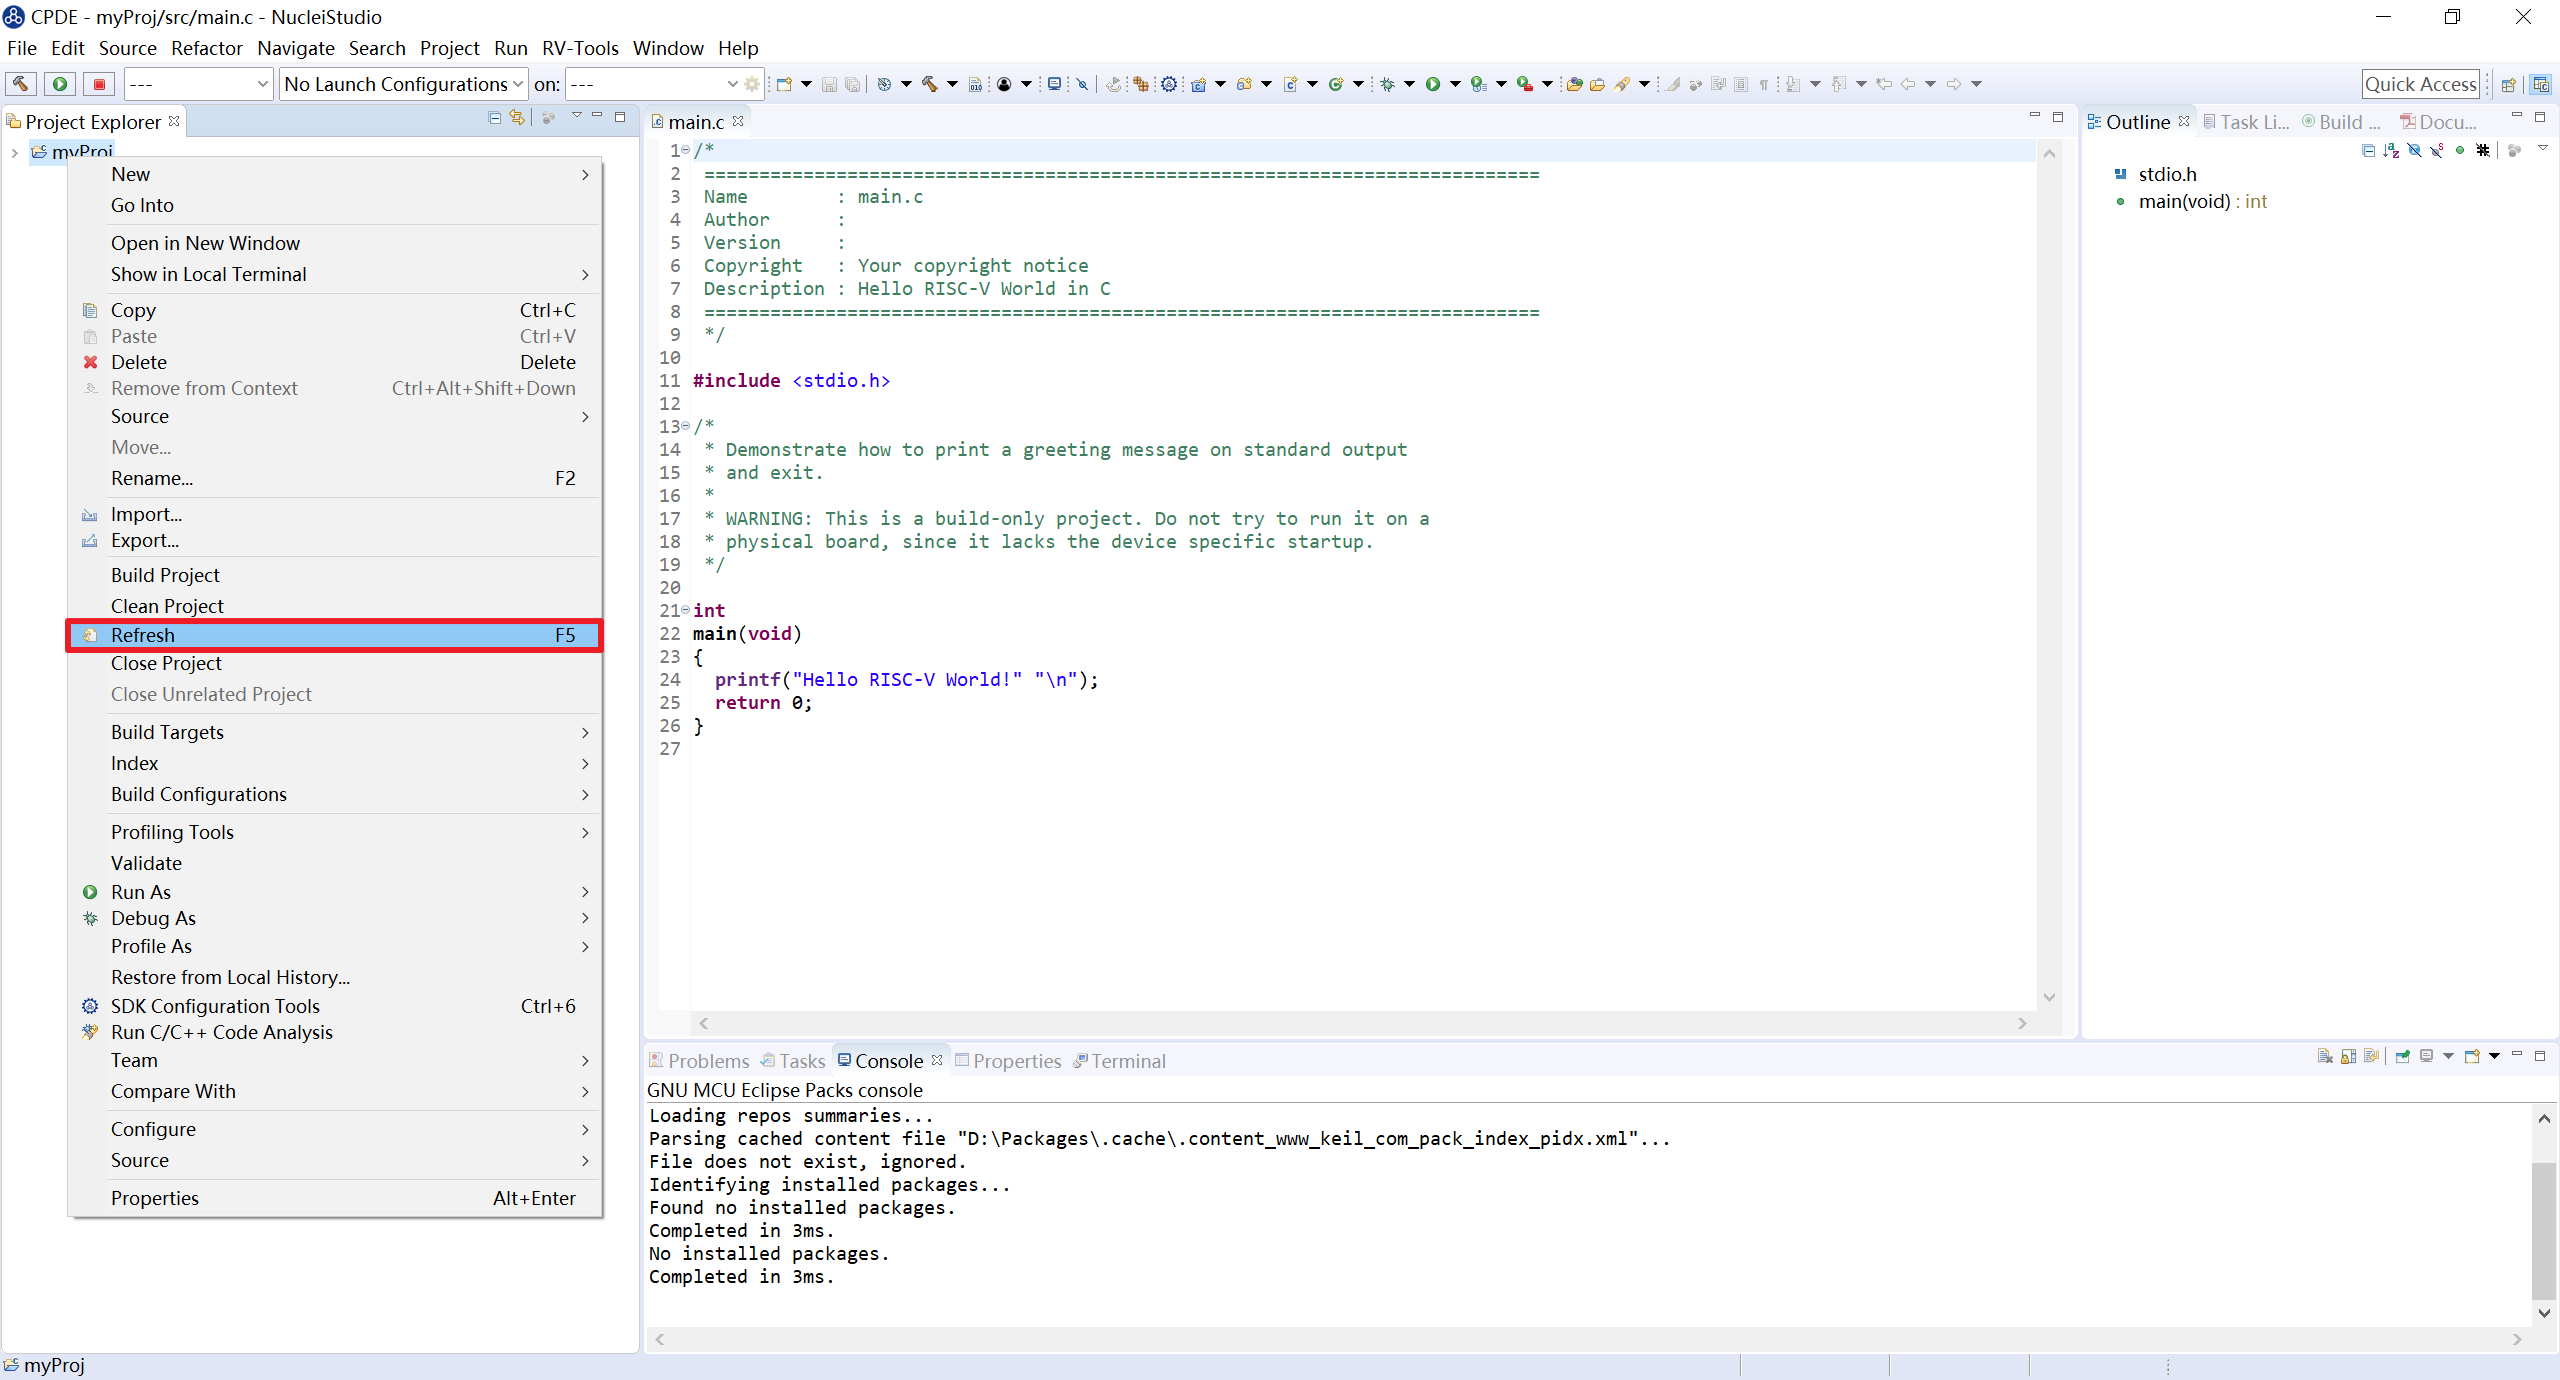
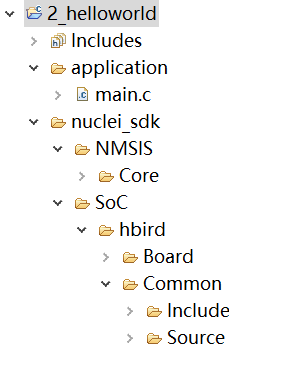
After refreshing, the nuclei_sdk folder appears under the 2_helloworld project. The import of the nuclei_sdk source files is now complete.
2.7.4.3. Configure the Compile and Link Options of the Project
To compile the project source code correctly, you need to configure the compile and link options.
Note
The compile and link options set in this section are common options of the GCC toolchain and have the same meaning as the options of the same name used in a Linux environment. They are not described in detail in this section.
Configure the compile and link options as follows:
In the Project Explorer, select the hello_world project, right-click, and select Properties.
In the pop-up window, expand the C/C++ Build menu, click Settings, and configure the options in the Tool Settings column on the right.
Select Target Processor. Our core is N307, so check the configuration options as shown in the figure.
Architecture: select
RV32I.Multiply extension (RVM): check this option.
Atomic extension (RVA): check this option.
Compressed extension (RVC): check this option.
Integer API: select
ILP32.Floating Point ABI: select
single precisionCode model: select
Medium Any.Click the
Applybutton in the lower-right corner.

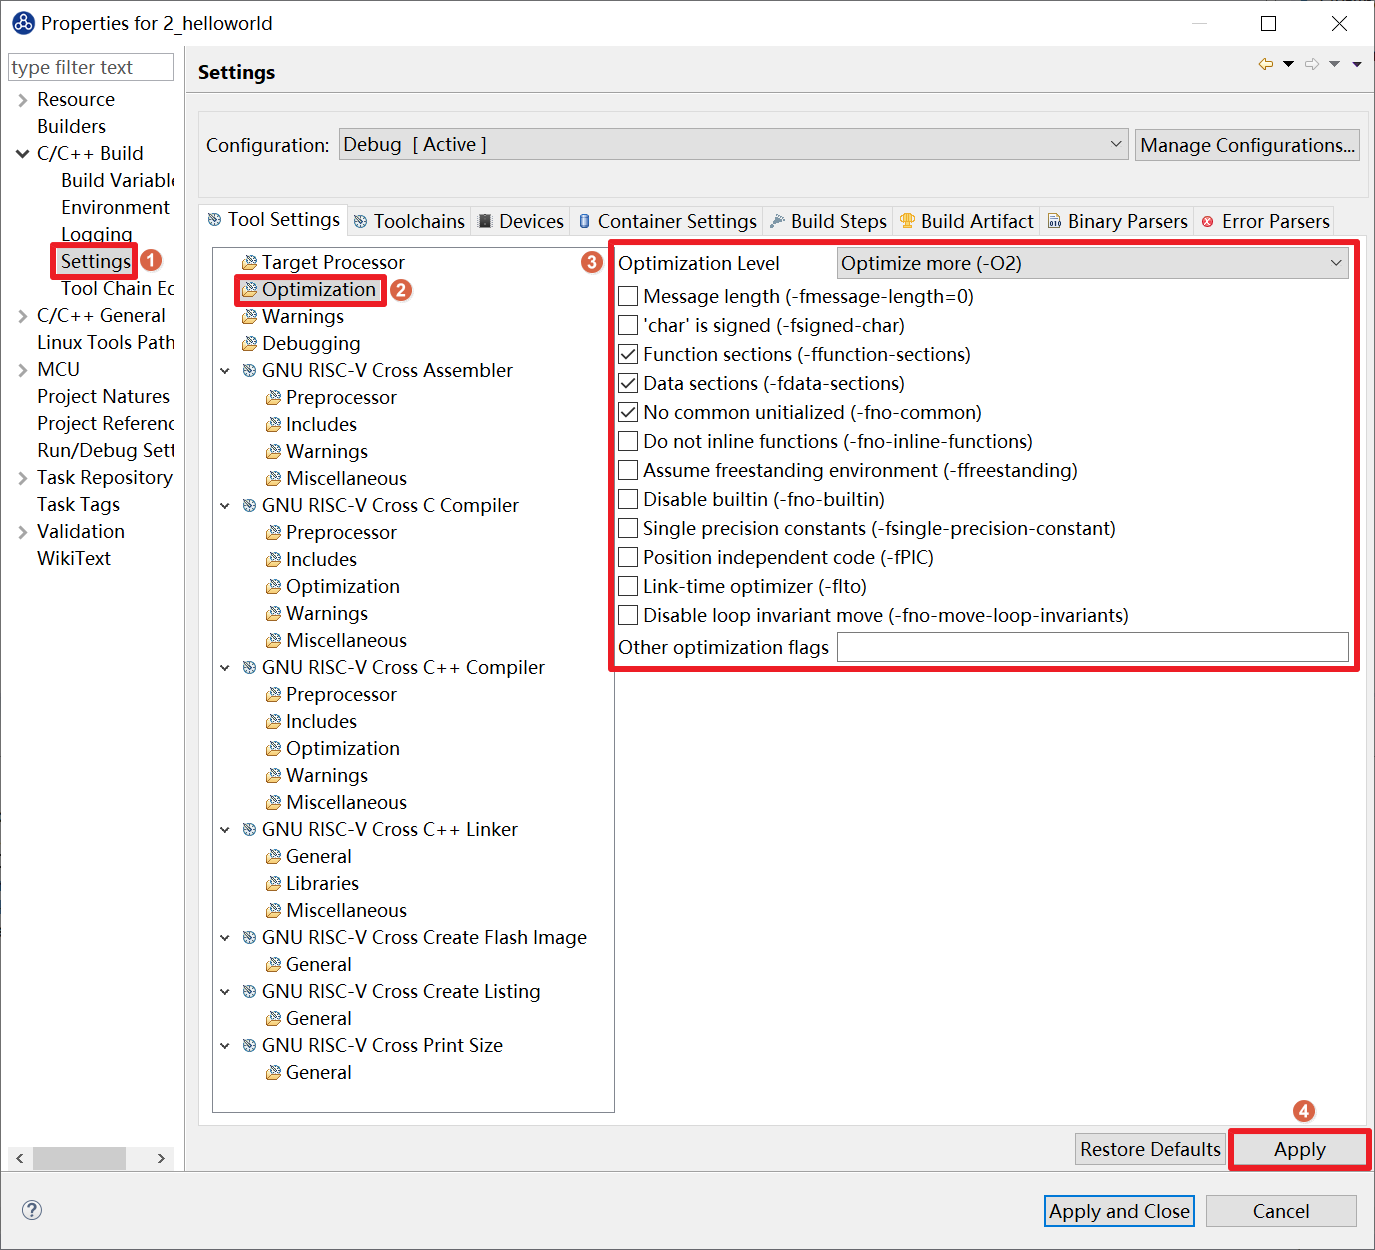
Select Optimization and check the configuration options as shown in the figure.
Optimization Level: select
Optimization Most (-O2).
Note
Nuclei Studio 2024.06 adds -Oz, which is used to optimize the size of the compiled program.
Check the following options:
Function Sections (-ffunction-sections)
Data Sections (-fdata-sections)
No common uninitialized (-fno-common)
Note
The above options are common GCC compile optimization options. Refer to the GCC manual for their meanings.
Click the Apply button in the lower-right corner.
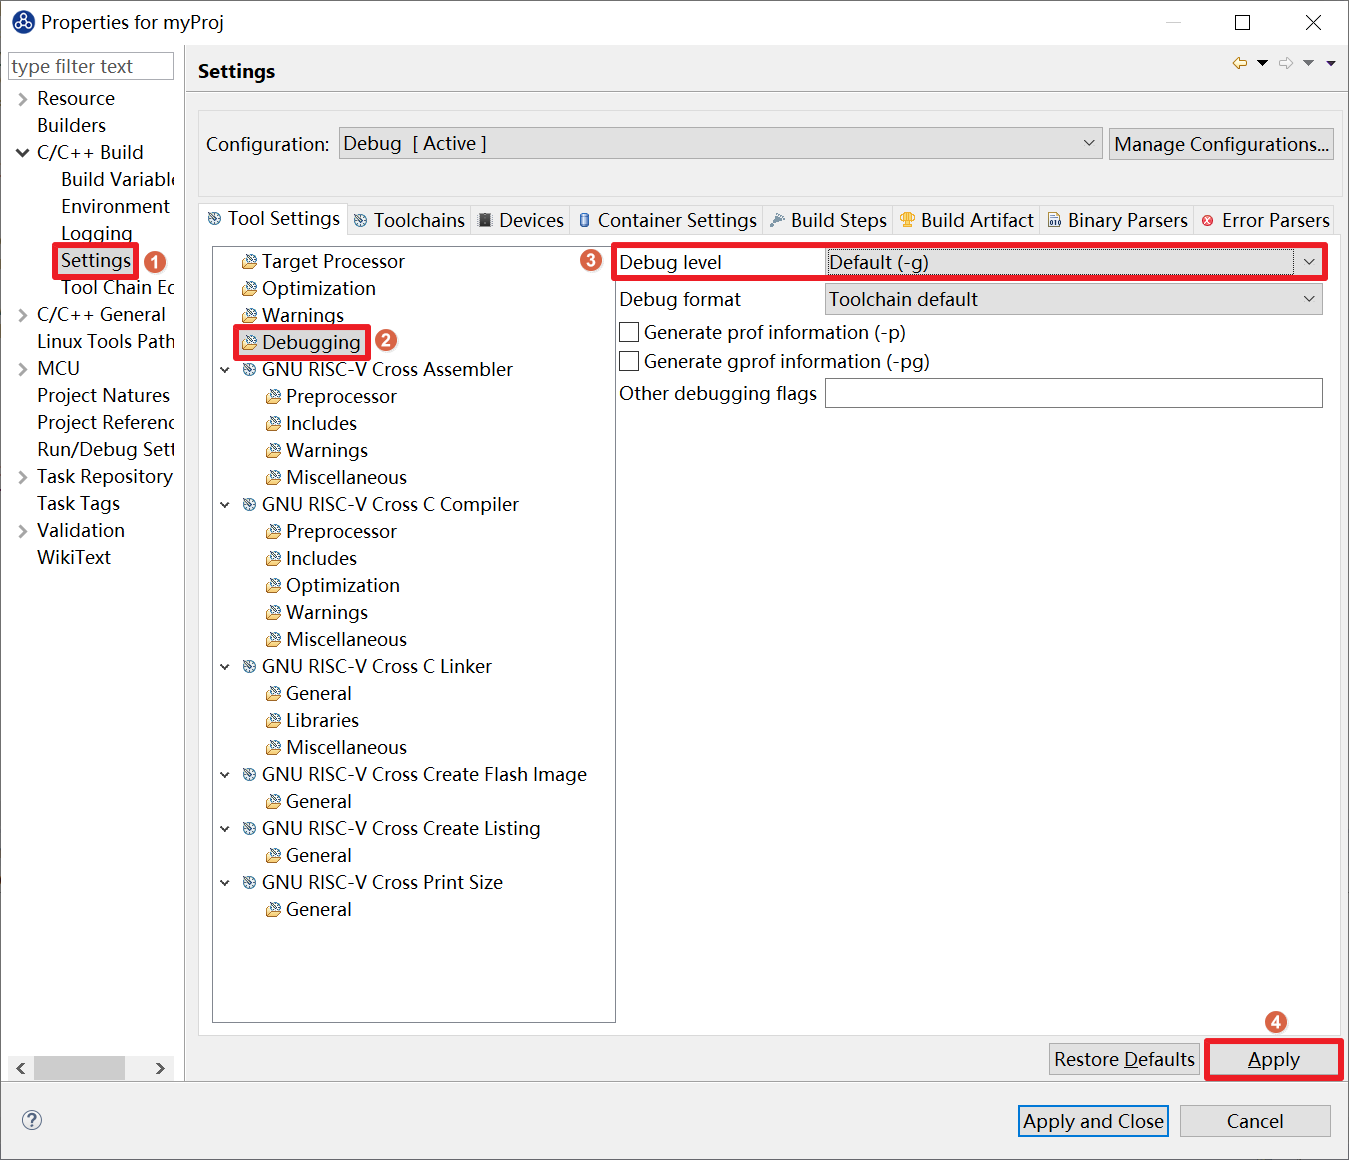
Select Debugging and check the configuration options as shown in the figure:
Debug Level: select
Default (-g).Click the
Applybutton in the lower-right corner.
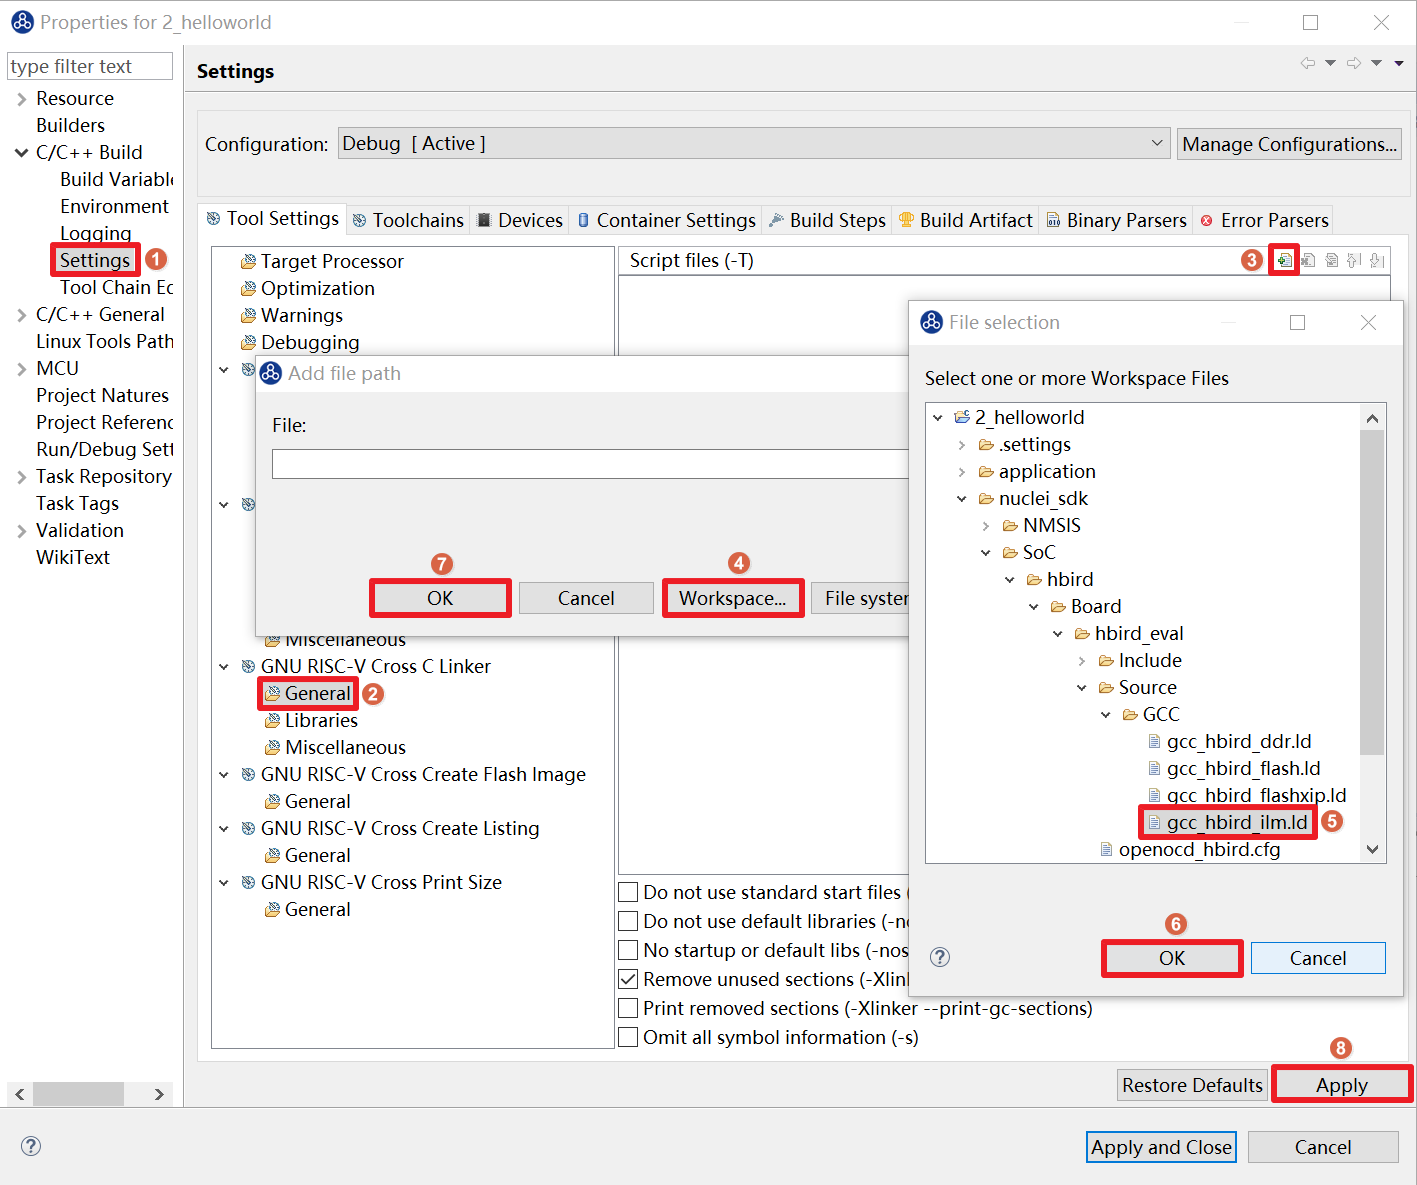
Select General under GNU RISC-V Cross C Linker. Set the linker script required by the linker as follows.
Click the plus button in the upper-right corner.
Click the
Workspacebutton in the pop-up window.Here we use the HummingBird evaluation board, so select the
gcc_hbird_ilm.ldfile corresponding to the ILM download mode. In the pop-up window, select thegcc_hbird_ilm.ldfile under thenuclei_sdk/SoC/hbird/Board/hbird_eval/Source/GCCfolder of the Nuclei Studio package. For other download modes, switch the file here. Each file is introduced in detail below; choose according to your actual situation.
The
gcc_hbird_ilm.ldscript constrains the program’s code section to the ILM address region, which means the program is downloaded directly into the MCU’s ILM and executed from ILM. ILM consists of SRAM, so its contents are lost when power is off.The
gcc_hbird_flash.ldscript constrains the physical address of the program’s code section to the Flash region and the logical address of the code section to the ILM address region, which means the program is downloaded directly into the MCU’s Flash, but after power-on a boot program moves the code section into ILM, and execution starts from ILM.The
gcc_hbird_flashxip.ldscript constrains the program’s code section to the Flash region, which means the program is downloaded directly into the MCU’s Flash and executed directly from Flash. The program is flashed into Flash, so it is not lost when power is off.Select a suitable linker script according to your needs. This section uses
gcc_hbird_ilm.ldas an example.After the settings are complete, click the
Applybutton in the lower-right corner.
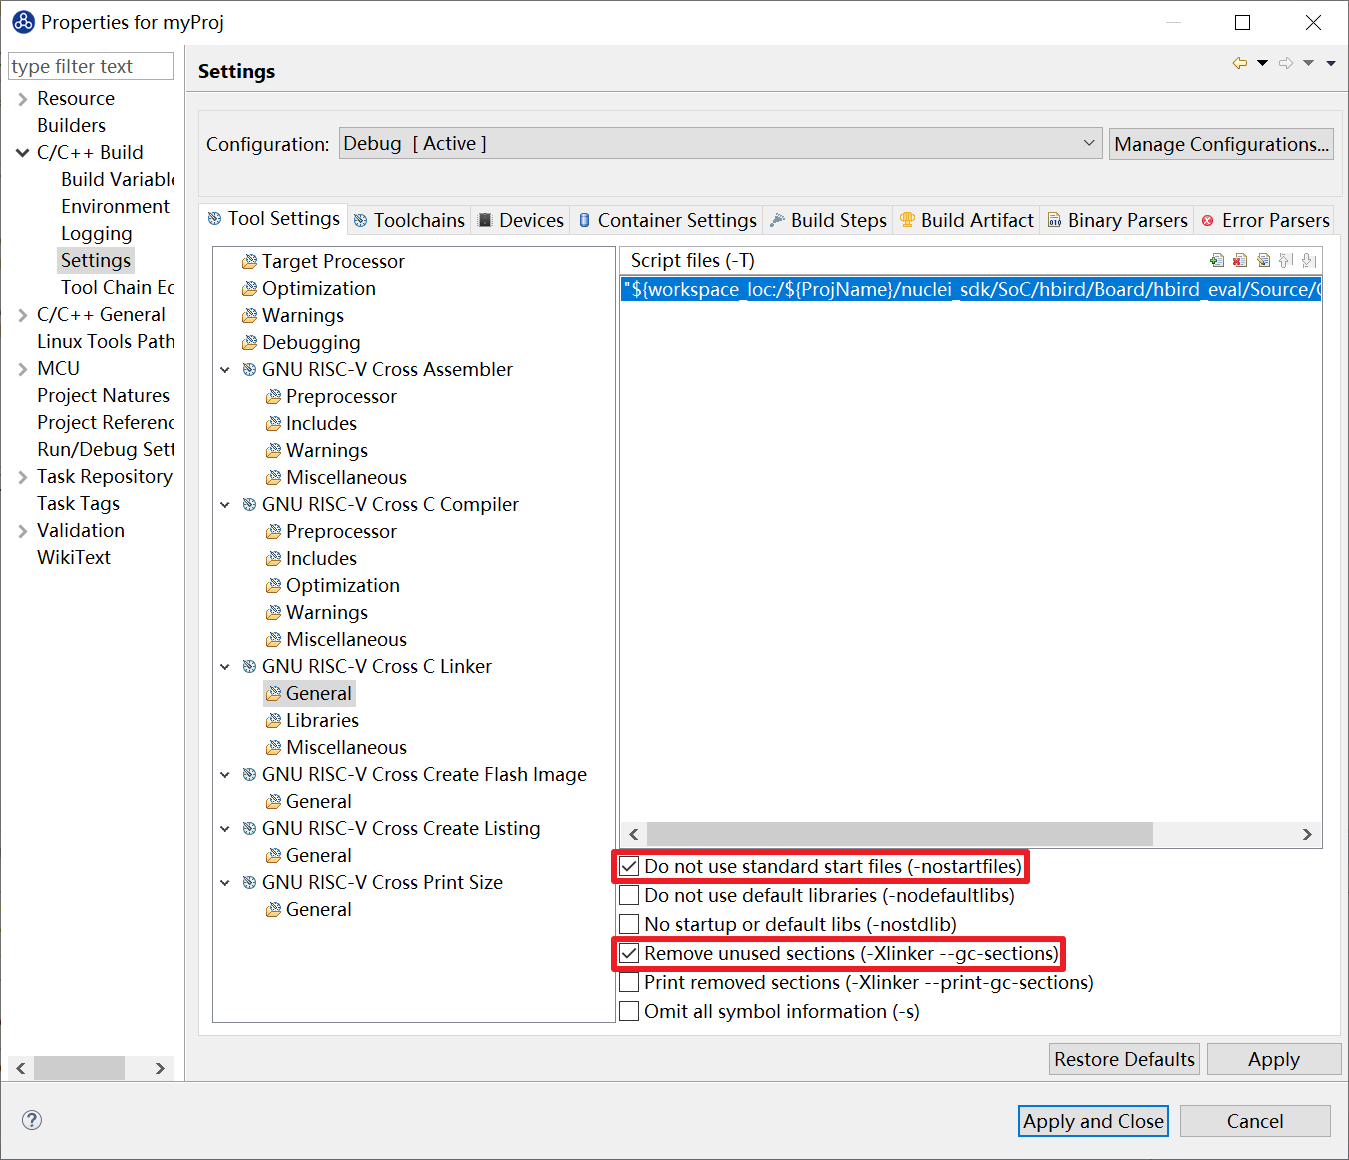
Check the configuration options as shown in the figure below.
Do not use standard start files (-nostartfiles).
Remove unused sections (–gc-sections).
Click the
Applybutton in the lower-right corner.
Note
The above options are common GCC link options. Refer to the GCC manual for their meanings.
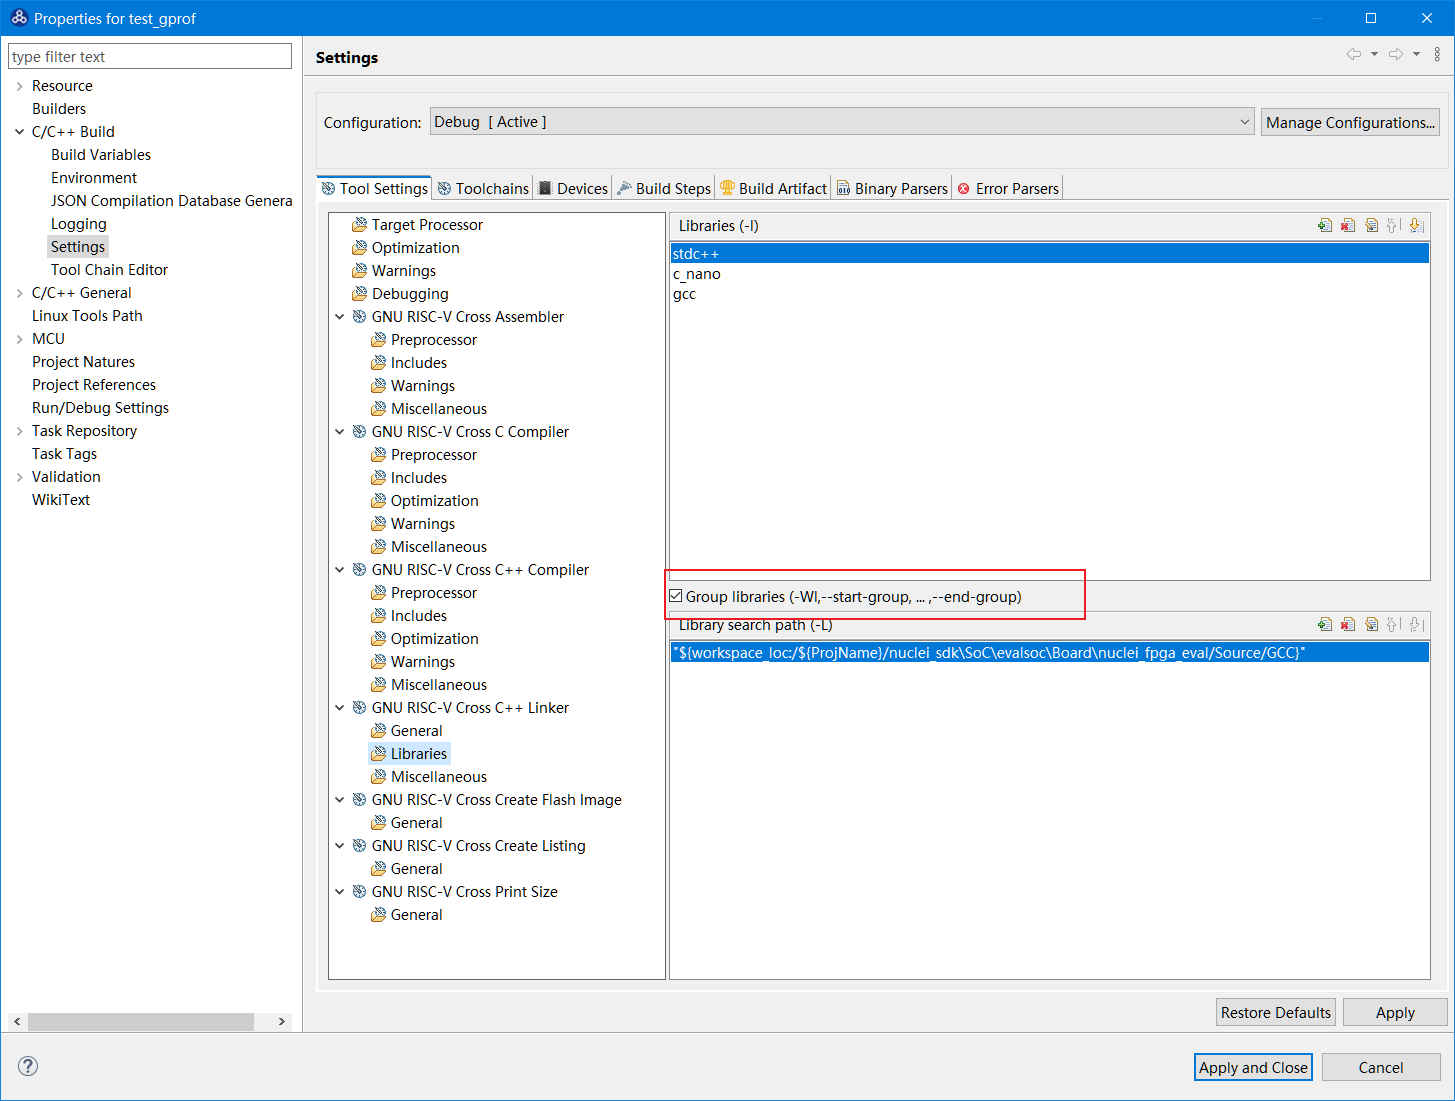
Note
In Nuclei Studio 2024.06, Libraries supports the Group feature. If the Group feature is checked, all Libraries are linked with -Wl,--start-group ... --end-group, which can resolve inter-dependency problems within Libraries.
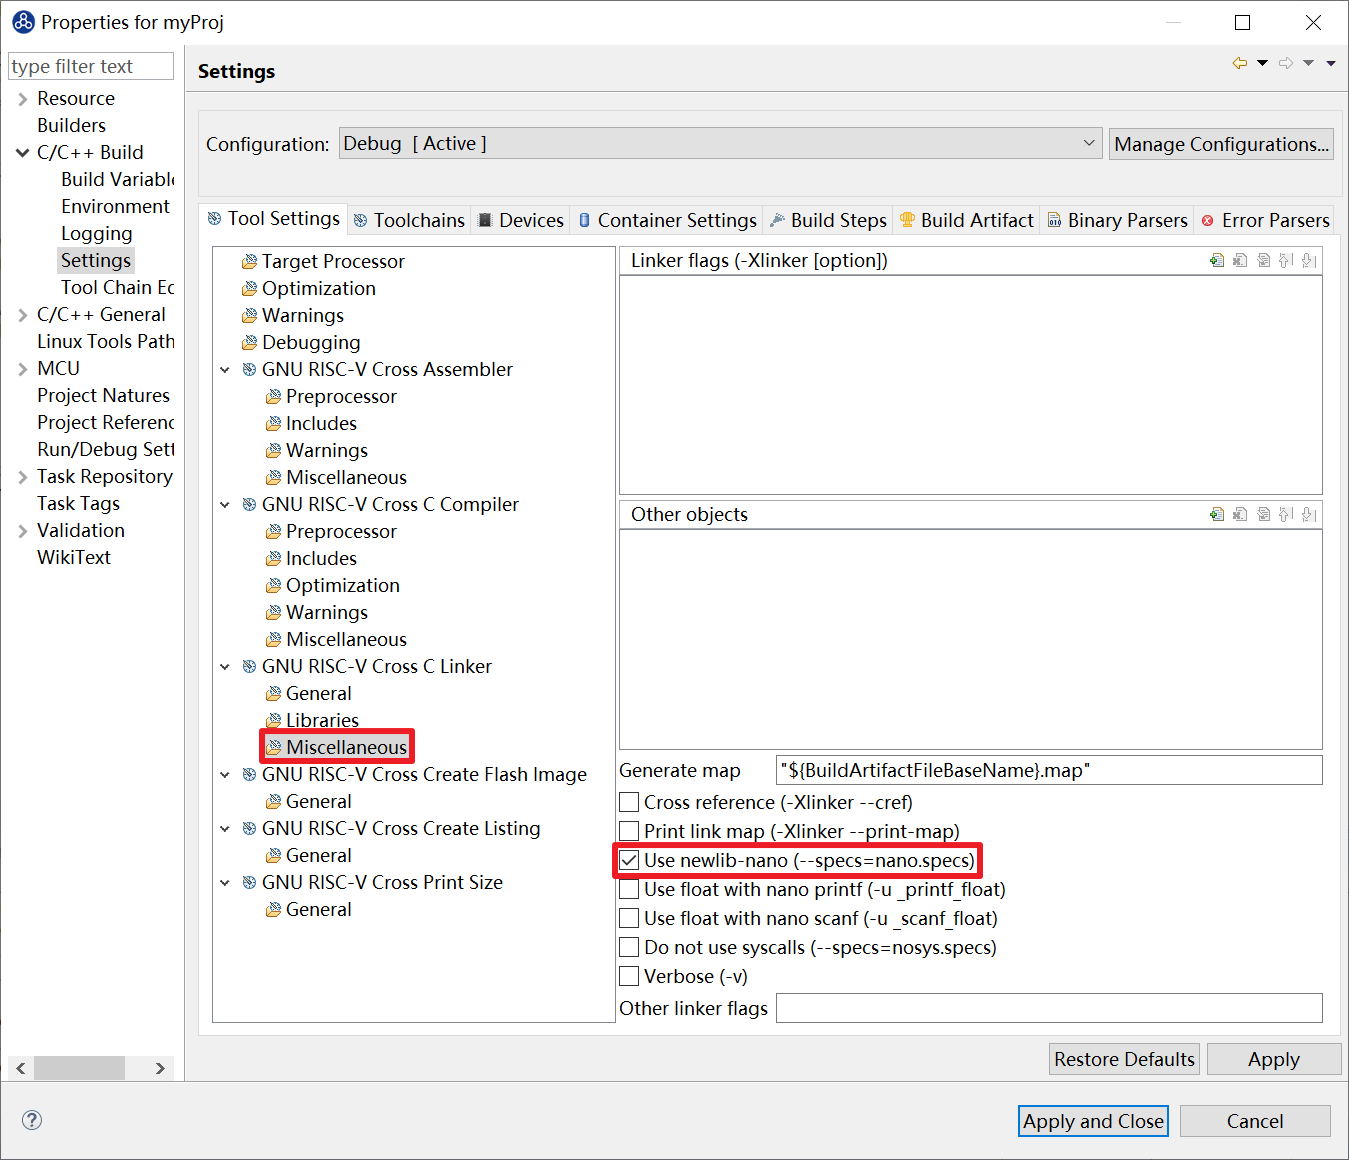
Select Miscellaneous under GNU RISC-V Cross C Linker, and check the configuration options as shown in the figure below.
Check
Use newlib-nano.Because the Hello World program’s printf does not need to print floating-point numbers, do not check
Use float with nano printf.Click the
Applybutton in the lower-right corner.
2.7.4.4. Configure the Include Paths and Files of the Project
To compile the source files in the nuclei_sdk folder correctly, you need to configure the include paths and include files of the project as follows.
In the Project Explorer, select the hello_world project, right-click, and select Properties.
In the pop-up window, expand the C/C++ Build menu, click Settings, and configure the options in the Tool Settings column on the right.
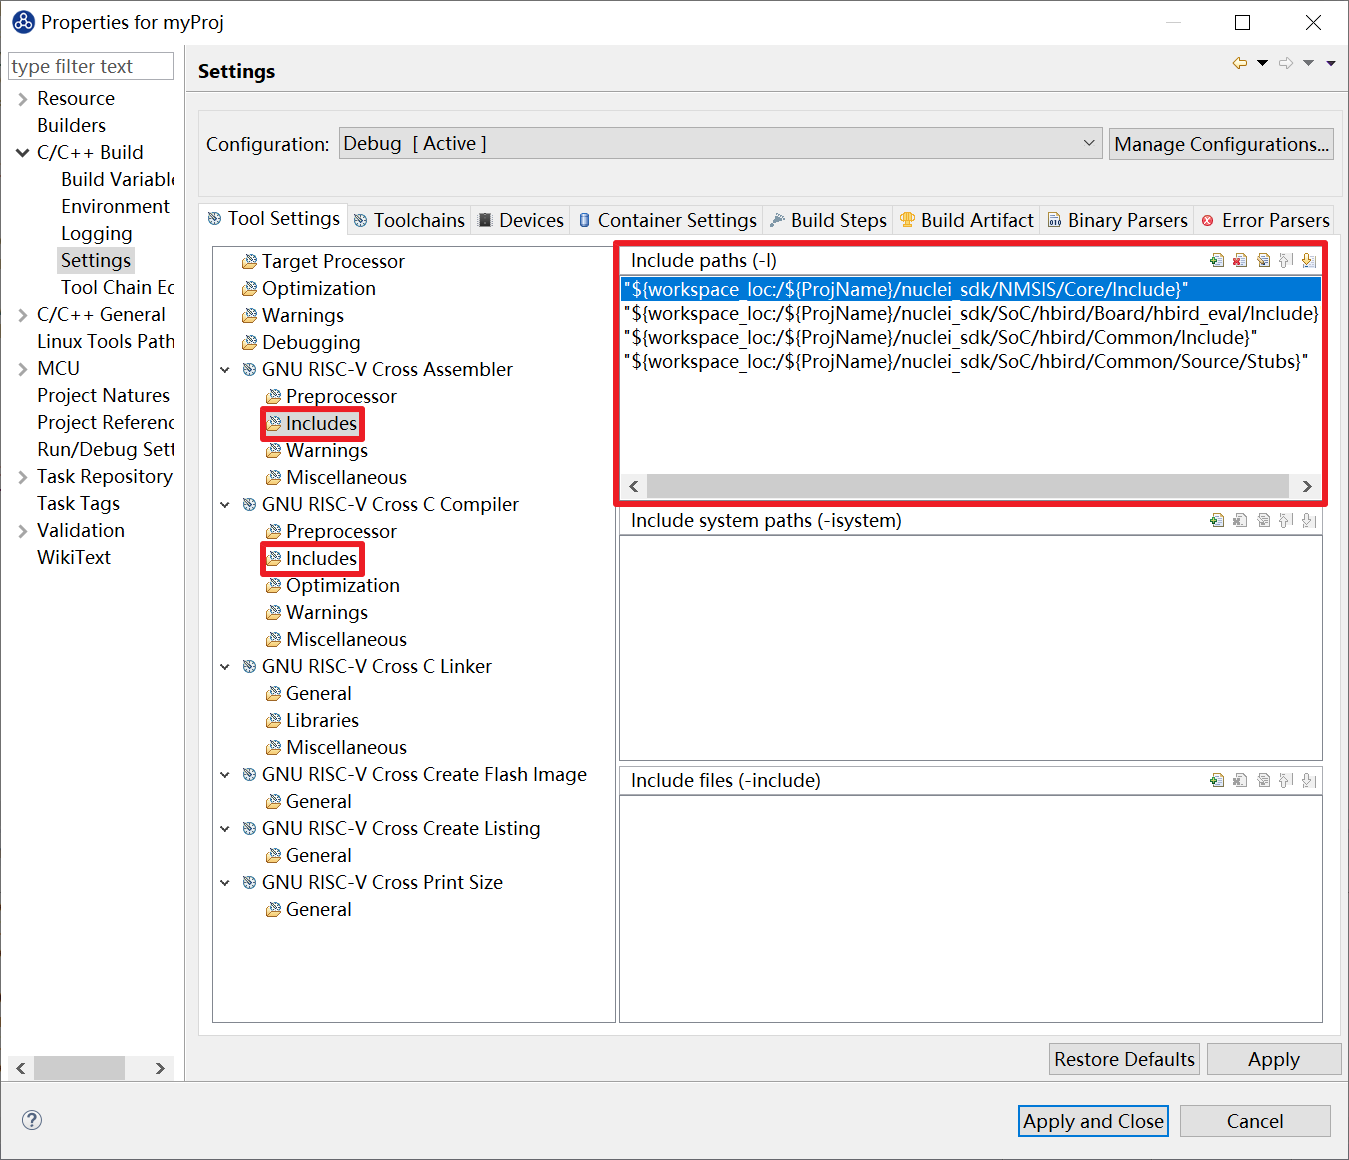
Select Includes under GNU RISC-V Cross C Assembler, and configure the include files as shown in the figure.

Click the plus button in the Include paths column.
Click
Workspacein the pop-up window to open the Folder selection window.In the Folder selection window, select the NMSIS>Core>Include folder under the nuclei_sdk directory of the project.
Click
Applyin the lower-right corner to complete the configuration.
Using the same method, add the SoC>hbird>Board>hbird_eval>Include, SoC>hbird>Common>Include and SoC>hbird>Common>Source>Stubs folders under the nuclei_sdk directory as include paths, and use the same method to set the include paths for the Includes column of GNU RISC-V Cross C Compiler. The result after the settings are complete is shown in the figure below.
2.7.5. Create a Project Based on an Existing Makefile
This section describes how to use an existing Makefile to create a Hello World project in Nuclei Studio IDE. The board is the Nuclei FPGA Evaluation Board and the core is N307. Download the Nuclei SDK first; the GitHub link is: https://github.com/Nuclei-Software/nuclei-sdk. In addition to creating the project, this method requires manually setting various options and paths. Here we take helloworld as an example.
2.7.5.1. Manually Create a New Project
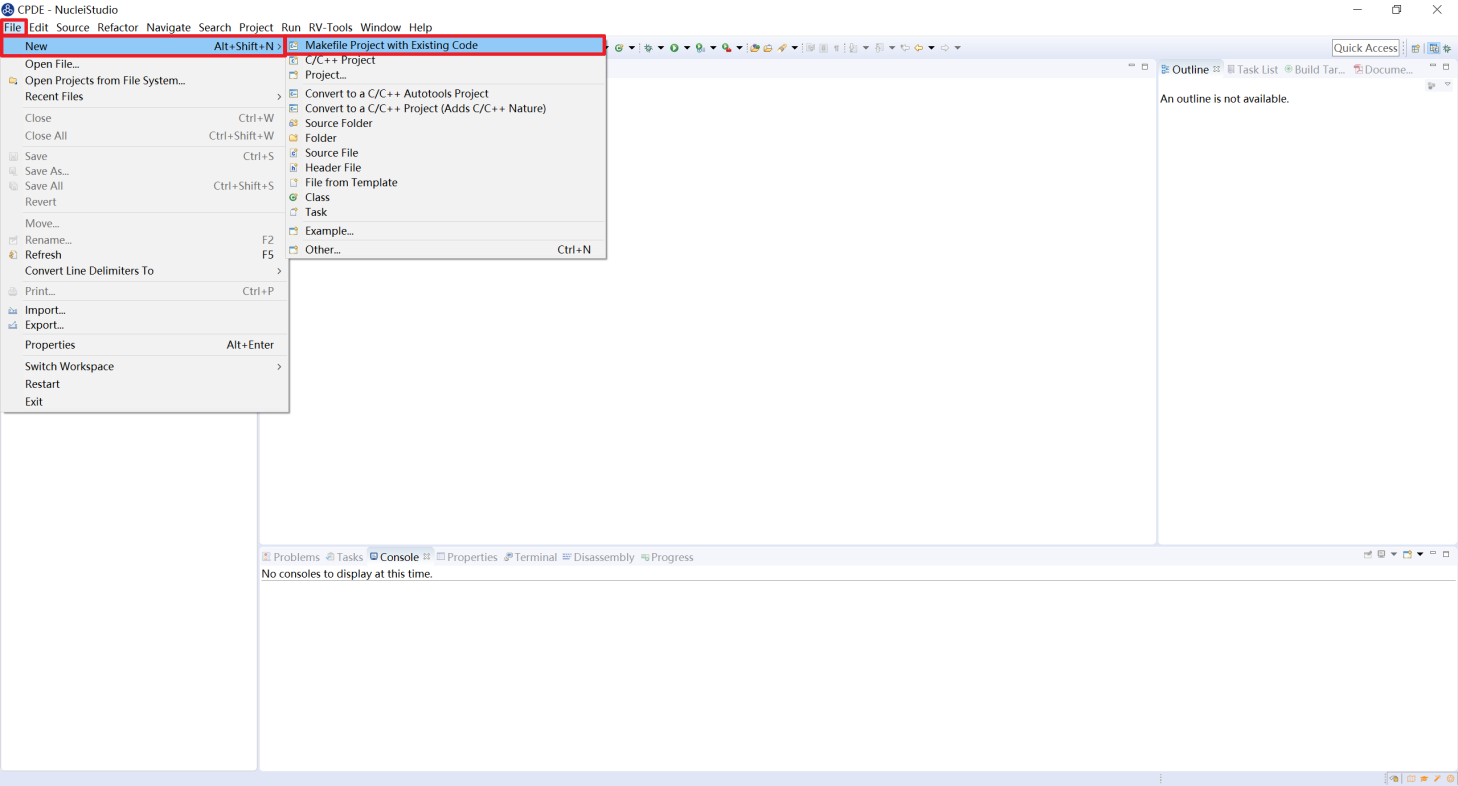
Select File -> New -> Makefile Project with Existing Code in the menu bar.
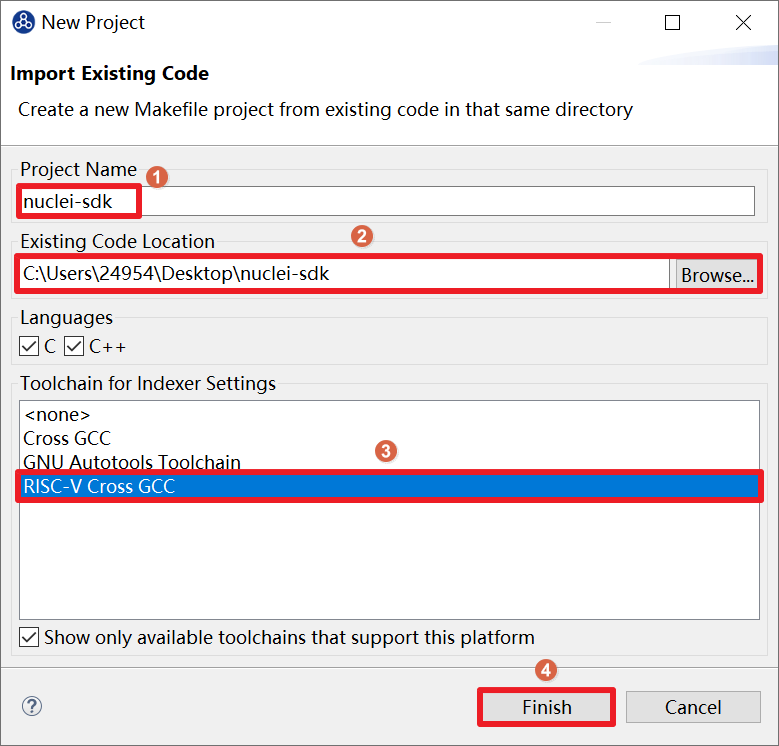
Enter the project name at icon 1; here we name it nuclei-sdk. Enter the actual path of the SDK at icon 2. Select RISC-V Cross GCC at icon 3. Click icon 4 to finish creating the project.
2.7.5.2. Set the Makefile Path and Build Options
Right-click the newly created project and select Properties to open the settings page. Select C/C++ Build, and select Workspace in Build Location. In the pop-up dialog, select application -> baremetal -> helloworld, click OK, and then click Apply to save.

Select the Behavior tab in C/C++ Build, make sure the Build (Incremental Build) option is checked, and enter all CORE=n307 DOWNLOAD=ilm. The CORE option changes according to the actual core; here n307 is used as an example. The DOWNLOAD option can be changed to a different download mode; see Section 5.1 for details. Here, ilm mode is used as an example. Because the example uses the HummingBird Evaluation Board, SoC and Board do not need to be modified. If you use another board — taking RVSTAR as an example — add SOC=gd32vf103 BOARD=gd32vf103v_rvstar here, and because RVSTAR only supports FLASHXIP mode, set DOWNLOAD to flashxip and change CORE to n205. When finished, click Apply to save the changes.

After completing the above steps, open the toolchain configuration page and click Apply to save the changes.
