4.3. How to develop with HBird SDK
This chapter will introduce how to run Hello World demo on HBirdv2 E203 SoC with HBird SDK.
4.3.1. HBird SDK introduction
HBird SDK is a software platform built based on Makefile, which supports running in Windows/Linux system. As an intermediate platform that connect the upper-level application and underlying hardware, HBird SDK provides the application interface(API) required to operate the underlying hardware platform, so that users don’t need to face cumbersome register configuration when developing applications, thereby improving development efficiency.
The architecture of HBird SDK is shown in the figure below.
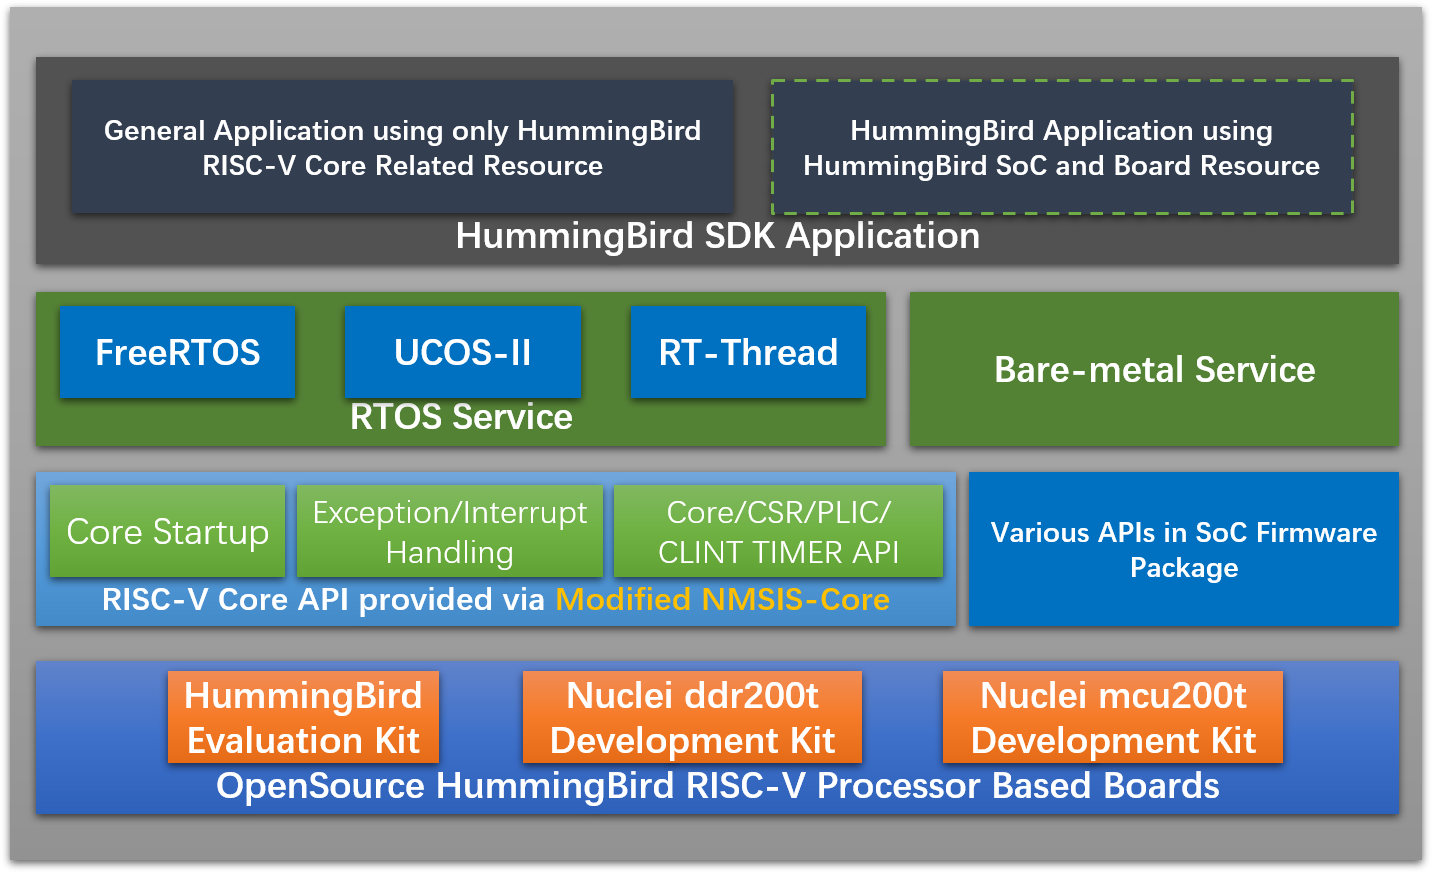
Fig. 4.14 HBird SDK Architecture
4.3.2. Setup tools and environment
4.3.2.1. Install and setup tools in Windows
1. Preparation
Create a folder in your Windows Environment, which is used to store development tools.
Note
Assuming that the directory is <nuclei-tools>, the abbreviation will be used in the following text.
2. Tools download
Download the following tools from Nuclei Download Center.
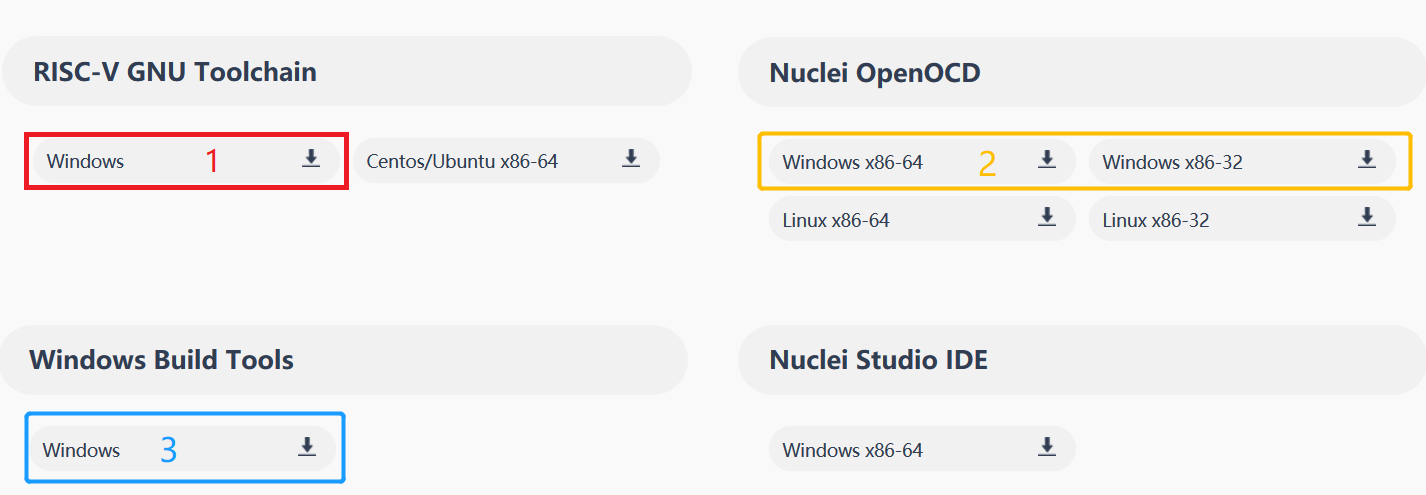
Fig. 4.15 Nuclei tools need to be downloaded for Windows
3. Tools setup
Create gcc, openocd, build-tools folders under <nuclei-tools> directory.
Extract the downloaded gnu toolchain into a temp folder, then copy the files into gcc folder, and make sure the structure of gcc directory looks the same as the figure below.
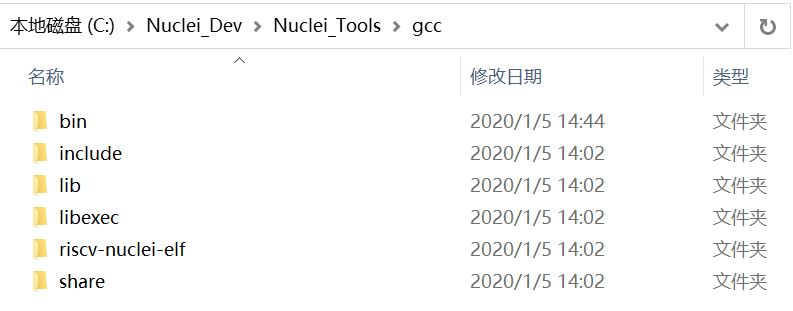
Fig. 4.16 The structure of Nuclei RISC-V GCC Toolchain directory
Extract the downloaded openocd into a temp folder, then copy the files into openocd folder, and make sure the structure of openocd directory looks the same as the figure below.
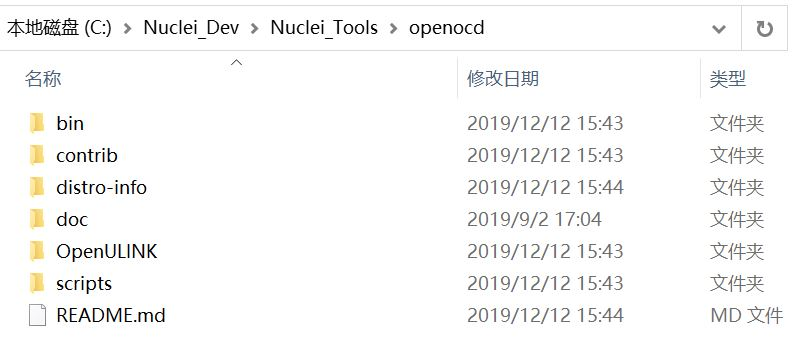
Fig. 4.17 The structure of Nuclei OpenOCD directory
Extract the downloaded build-tools into a temp folder, then copy the files into build-tools folder, and make sure the structure of build-tools directory looks the same as the figure below.
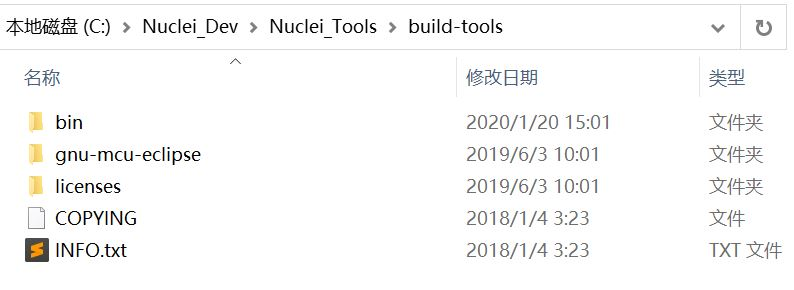
Fig. 4.18 The structure of Nuclei Windows Build Tools directory
4.3.2.2. Install and setup tools in Linux
1. Preparation
Create a folder in your Linux Environment, which is used to store development tools.
Note
Assuming that the directory is <nuclei-tools>, the abbreviation will be used in the following text.
2. Tools download
Download the following tools from Nuclei Download Center.
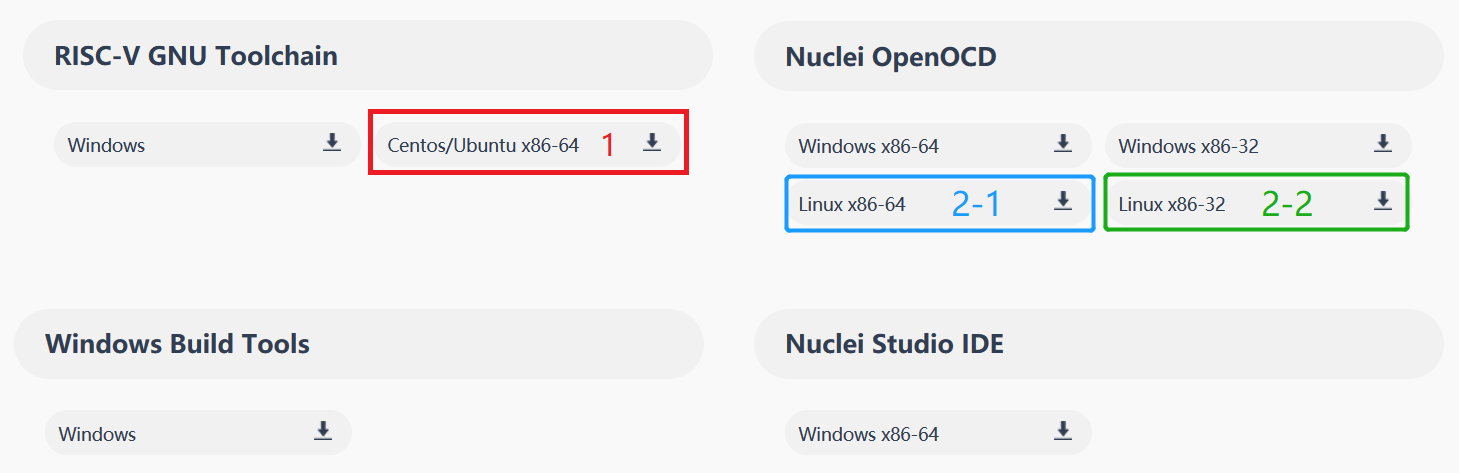
Fig. 4.19 Nuclei tools need to be downloaded for Linux
3. Tools setup
Create gcc, openocd folders under <nuclei-tools> directory.
Then please follow the similar steps described in Step3 in Install and setup tools in Windows to extract and copy necessary files.
Note
Only gcc and openocd are required for Linux.
Extract the downloaded Linux tools, not the Windows version.
4.3.2.3. Get and setup HBird SDK
1. HBird SDK download
git clone https://github.com/riscv-mcu/hbird-sdk.git
or
git clone https://gitee.com/riscv-mcu/hbird-sdk.git
Note
Make sure Git tool has been installed in your working machine.
After this step, the project is cloned, and the complete hbird-sdk directory is available on this machine. Assuming that the directory is <hbird-sdk>, the abbreviation will be used in the following text.
2. Build environment setting for HBird SDK
Windows
Creat setup_config.bat in <hbird-sdk> folder, and open this file with your editor, then paste the following content.
set NUCLEI_TOOL_ROOT=<nuclei-tools>
Note
The <nuclei-tools> here indicates the path where the tools are stored as mentioned above, which should be subject to the actual situation of the user.
Open Windows command terminal and cd to <hbird-sdk> folder, then run the following commands to setup build environment for HBird SDK, the output will be similar as the figure below.
setup.bat
echo $PATH
which riscv-nuclei-elf-gcc openocd make rm
make help
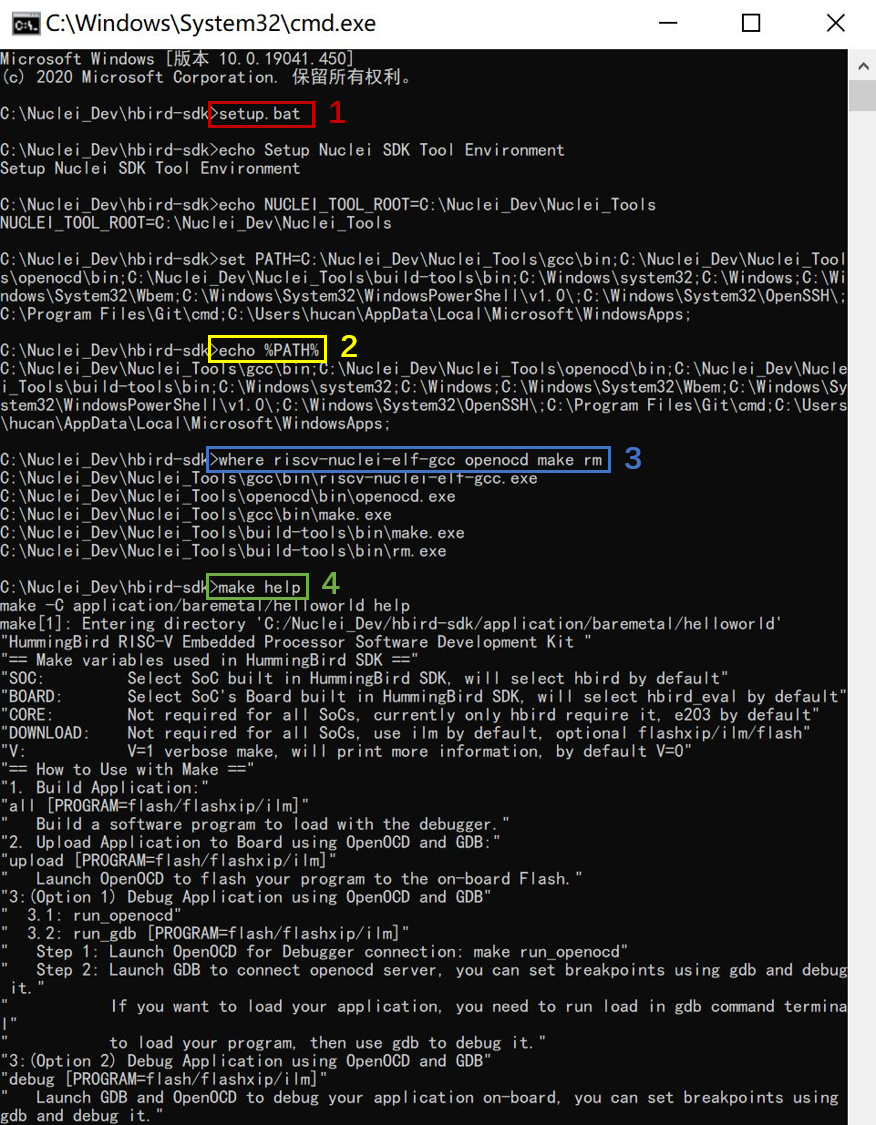
Fig. 4.20 Setup Build Environment for HBird SDK in Windows Command Line
Linux
Creat setup_config.sh in <hbird-sdk> folder, and open this file with your editor, then paste the following content.
NUCLEI_TOOL_ROOT=<nuclei-tools>
Note
The <nuclei-tools> here indicates the path where the tools are stored as mentioned above, which should be subject to the actual situation of the user.
Open Linux bash terminal and cd to <hbird-sdk> folder, then run the following commands to setup build environment for HBird SDK, the output will be similar as the figure below.
source setup.sh
echo $PATH
which riscv-nuclei-elf-gcc openocd make rm
make help
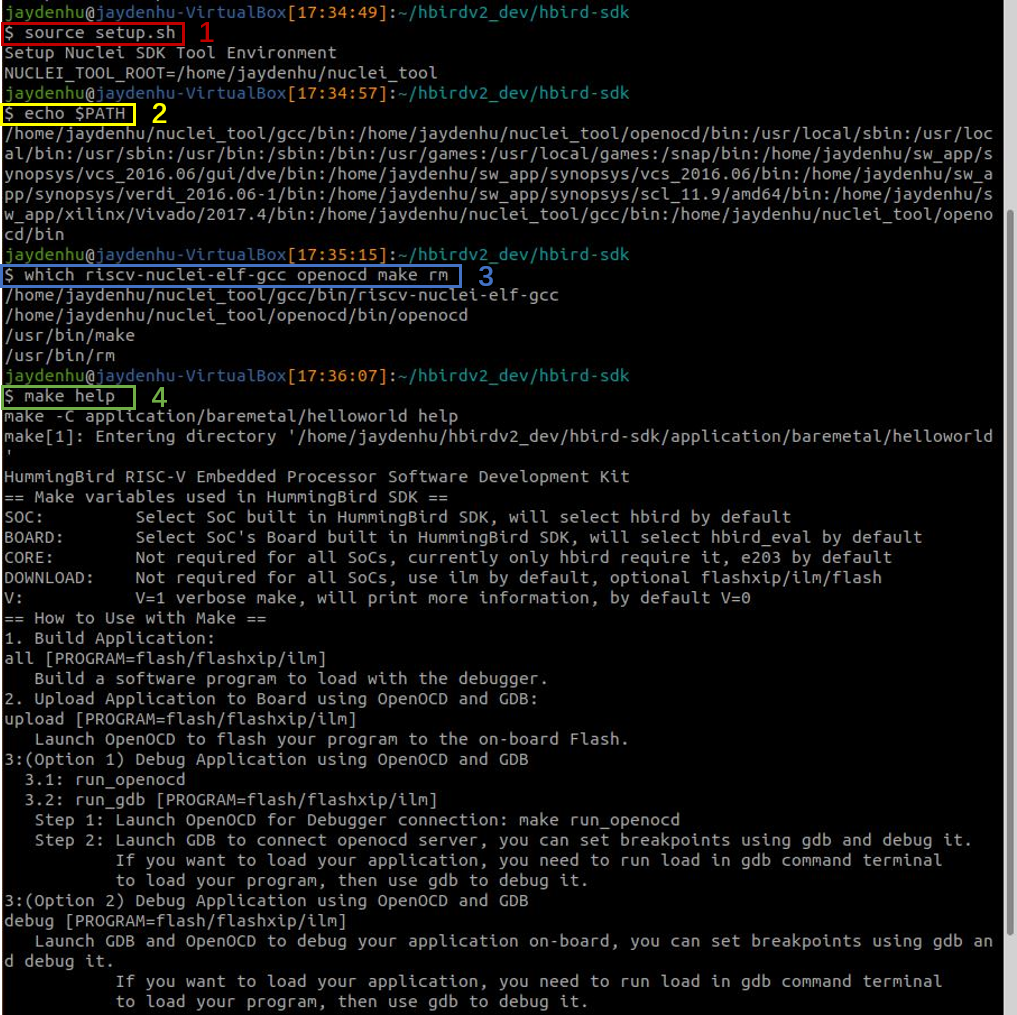
Fig. 4.21 Setup Build Environment for HBird SDK in Linux Bash
4.3.3. Compile Hello World demo
Enter Hello World demo folder
cd <hbird-sdk>/application/baremetal/helloworldCompile Hello World demo
make dasm SOC=hbirdv2 BOARD=ddr200t CORE=e203 DOWNLOAD=flashxip
Note
dasm, this Makefile target means to compile the application, and the function of other Makefile variables are shown in the table below.
Table 4.2 Function of Makefile variables in HBird SDK build system¶ Parameter
Options
Default Value
Description
SOC
hbirdv2
hbirdv2
Declare which SoC is used in application during compiling
hbird
BOARD
ddr200t
ddr200t
Declare which Board is used in application during compiling
mcu200t
hbird_eval
CORE
e203
e203
Declare which Core is used in application during comiling
DOWNLOAD
ilm
ilm
Declare the download mode of the application
ilm: Program will be downloaded into ilm(itcm) and run directly in ilm
flash: Program will be downloaded into flash, and will be copied to ilm when running
flashxip: Program will be downloaded into flash, and run directly in flash
flash
flashxip
V
1
NA
If V=1, it will display compiling message in verbose including compiling options
SILENT
1
NA
If SILENT=1, it will not display any compiling message
4.3.4. Run Hello World demo
1. Hardware connection
Connect Nuclei ddr200t development board and your computer with HBird Debugger.
Connect power supply and turn on the power switch on Nuclei dde200t development board.
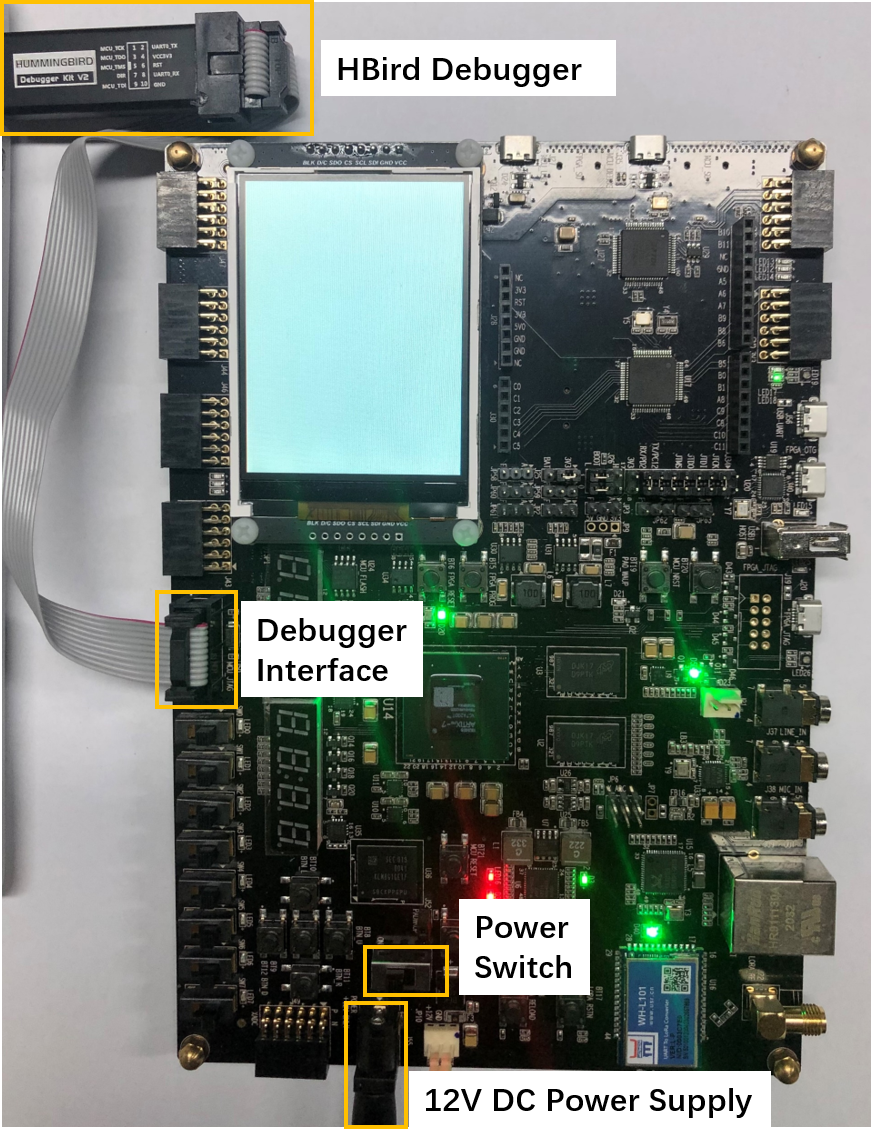
Fig. 4.22 Connect with PC and power supply
2. Debugger driver install
Windows
HBird Debugger could be used without any driver installation in Windows.
Since HBird Debugger has the functionality that “convert the UART to USB”, so if you have completed hardware connection as described in Step1, then you will be able to see a USB Serial Port (e.g., COM8) show up in your Windows Device Manager.
Linux
After hardware connection as described in Step1 completed, you can use the following command to check the USB status.
lsusb   // The example information displayed as below
...
Bus 001 Device 010: ID 0403:6010 Future Technology Devices International, Ltd FT2232xxxx
Use the following command to set udev rules, to make this USB can be accessed by plugdev group.
sudo vi /etc/udev/rules.d/99-openocd.rules
// Use vi command to edit the file, and add the following lines
SUBSYSTEM=="usb", ATTR{idVendor}=="0403",
ATTR{idProduct}=="6010", MODE="664", GROUP="plugdev"
SUBSYSTEM=="tty", ATTRS{idVendor}=="0403",
ATTRS{idProduct}=="6010", MODE="664", GROUP="plugdev"
Add your user name into the plugdev group.
whoami
// Use above command to check your user name, assuming it is your_user_name
// Use below command to add your_user_name into plugdev group
sudo usermod -a -G plugdev your_user_name
Double check if your user name is really belong to plugdev group.
groups      // The example information showed as below after this command
... plugdev ...
// As long as you can see plugdev in groups, then means it is really belong to.
3. Download and run
Use the following commands to compile and download application program.
cd <hbird-sdk>/application/baremetal/helloworld
make upload SOC=hbirdv2 BOARD=ddr200t CORE=e203 DOWNLOAD=flash
Note
The <hbird-sdk> here indicates the path where the HBird SDK project is stored as mentioned above, which should be subject to the actual situation of the user.
upload, this Makefile target means to compile and upload the application, and the function of other Makefile variables are shown in this table Function of Makefile variables in HBird SDK build system.
3. Run result
The function of Hello World demo is to print some info in the screen of PC through UART, so the serial port display terminal should be ready first.
In Windows, there are so many serial port display terminals that can be used, such as Tera Term, PuTTY, etc. You can choose one you like, and install it, then using the following parameters to setup the UART terminal.
115200 baud, 8 bits data, no parity, 1 stop bit (115200-8-N-1)
The port number depends on your device.
In Linux, taking Ubuntu 18.04 as an example, you can use the following command to open UART terminal.
sudo screen /dev/ttyUSB1 115200After UART terminal opened, you can press the MCU_RESET button on Nuclei ddr200t development board to reset MCU and the Hello World program will be executed again, the result is shown in the figure below.
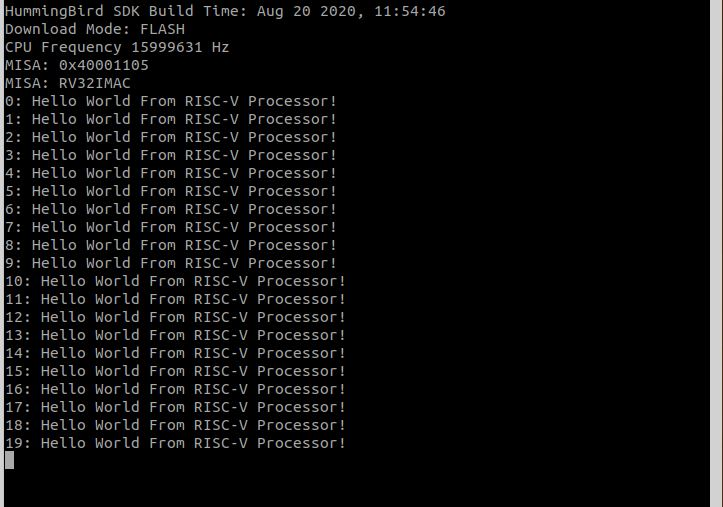
Fig. 4.23 Hello World demo output
Note
Since the application program is uploaded to MCU Flash, so you can re-execute the program by re-powering or pressing MCU_RESET button.
4.3.5. Debug Hello World demo
1. Hardward connection
Same as Step1 in Run Hello World demo.
2. Debugger driver install
Same as Step2 in Run Hello World demo.
Note
If the Debugger driver has been installed successfully, don’t need to install it again.
3. Debug
Use the following commands to compile application program and enter debug mode.
cd <hbird-sdk>/application/baremetal/helloworld
make debug SOC=hbirdv2 BOARD=ddr200t CORE=e203
Note
The <hbird-sdk> here indicates the path where the HBird SDK project is stored as mentioned above, which should be subject to the actual situation of the user.
debug, this Makefile target means to compile application and enter debug mode, the function of other Makefile variables are shown in this table Function of Makefile variables in HBird SDK build system.
After entering debug mode, using the following GDB command, the compiled program will be uploaded, shown in the figure below.
load

Fig. 4.24 Program download
Some commonly used GDB debugging commands are shown as following.
Set breakpoint
b main
Check breakpoint info, result shown in the figure below
info b

Fig. 4.25 Breakpoint info
Read memory data, result shown in the figure below
x 0x80000000
x 0x80000004
x 0x80000008

Fig. 4.26 Memory data
Read register value, result shown in the figure below
info reg
info reg mstatus
info reg csr768
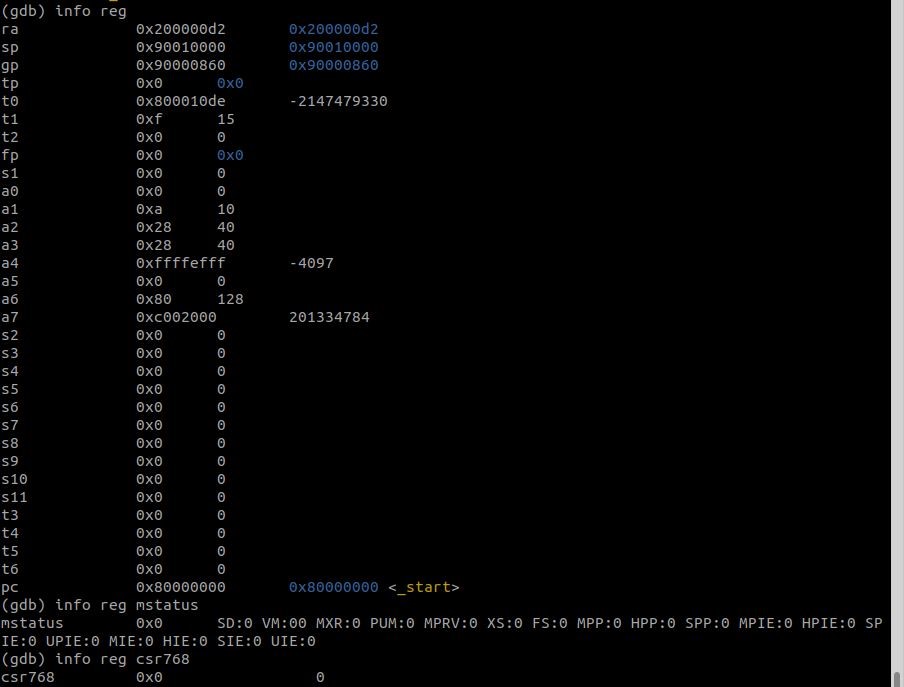
Fig. 4.27 Register value
Continue execution, stop at the breakpoint, result shown in the figure below
continue
Fig. 4.28 Stop at breakpoint
Single step, result shown in the figure below
ni

Fig. 4.29 Single step