4.1.1.3. Core feature: Interrupt
Purpose
To get familiar with the interrupt handling in Nuclei N Class Processors
To know how to use external interrupt
Requirements
The following hardware and source codes are required:
PC host
Nuclei board (RV-STAR Development Board)
USB Type-C cable
nuclei-sdk/board-labs/rvstar/exti_key_interrupt
Content
Through learning the Chapter 6 of Nuclei RISCV ISA Spec and Interrupt and Exception Handling File in NMSIS to get familar with interrput handling in Nuclei N Class Processors.
Through learning the Chapter 6 EXTI of GD32VF103 MCU User Mannual to get familar with the usage of EXTI.
Programming the EXTI peripheral registers of SoC and ECLIC registers of Core to setup an external interrupt which is triggered by pressing the on-board user key. Set this interrupt to non-vectored processing mode, and the corresponding interrupt service routine can change the status of on-board RGB LED.
Principles
Interrupt mechanism, that is, the core is suddenly interrupted by other requests during the execution of current program, and current program is stopped, then the core turns to handle other requests. After handling other requests, the core goes back and continue to execute the previous program.
About interrupts processing, it’s an important part in processor design. The RISC-V processor in GD32VF103 MCU is Bumblebee Core, it integrates the Enhancement Core-Local Interrupt Controller (ECLIC) for efficient interrupts processing.
The ECLIC is designed to provide low-latency, vectored, pre-emptive interrupts for RISC-V systems. It can be used to manage multiple interrupt sources.
Note
In Nuclei processor core, ECLIC supports interrupt preemption, non-vectored and vectored processing mode. Please see (CLIC mode) Interrupt Preemption for more details about interrupt preemption, and see (CLIC mode) Vectored and Non-Vectored Processing Mode of Interrupts for more details about non-vectored and vectored processing mode.
In this lab, we just show how to implement single non-vectored interrupt handling. About how to implement interrupt preemption, please refer to Core feature: Nesting of Interrupts. About how to deal with vectored interrupt, please refer to Core feature: Vectored Interrupt.
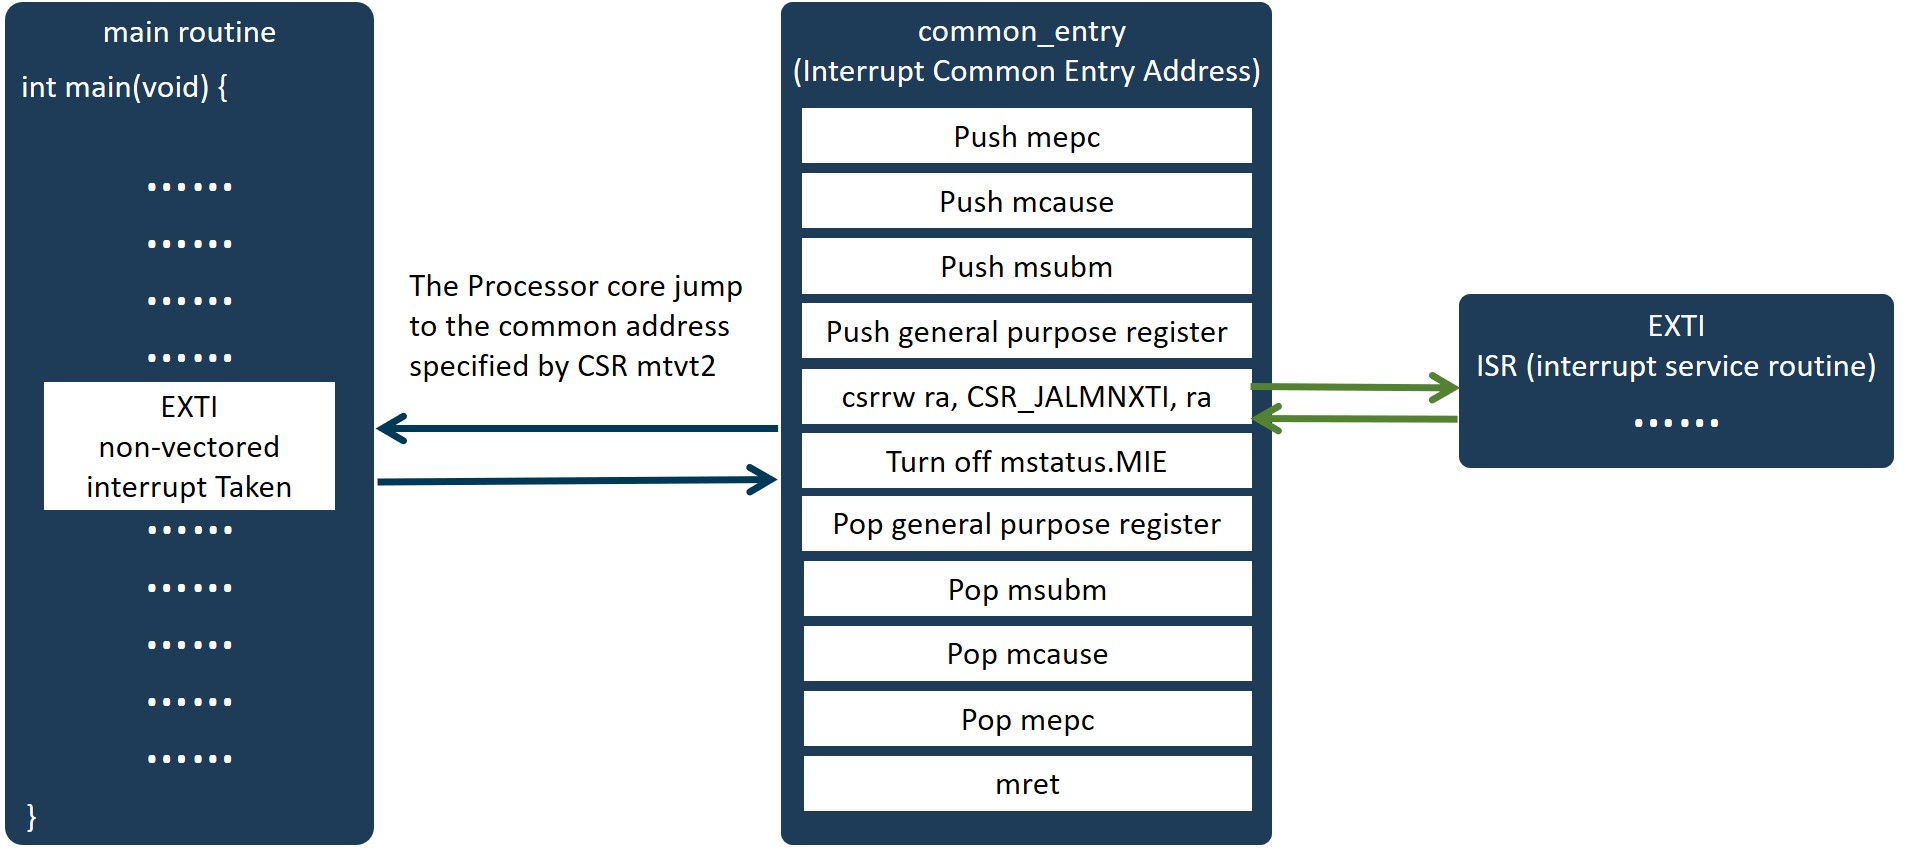
If the interrupt is set to non-vectored processing mode, once it is taken, the core will jump to the common base entry shared by all non-vectored interrupts, and the processing flow is as the figure below.
The types of interrupts supported by the Bumblebee Core are shown in following figure.
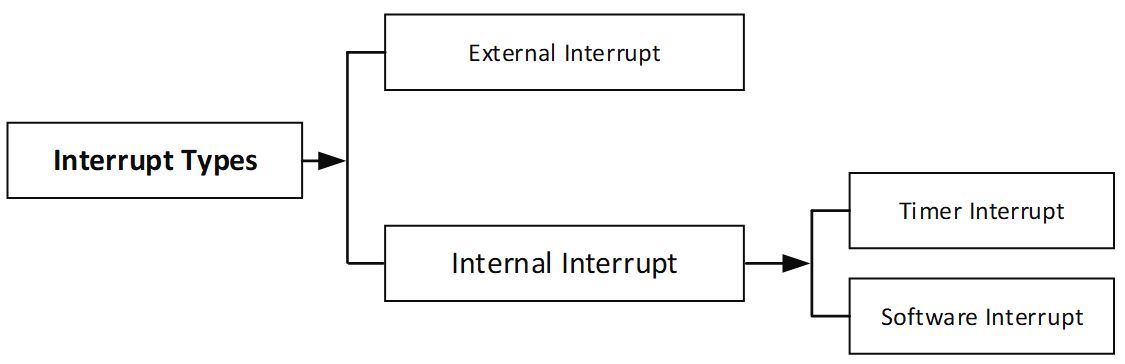
Fig. 4.10 Interrupt types
External interrupt is an interrupt initiated from outside the core (other peripherals in SoC). External interrupts allow user to connect to an external interrupt source, such as an interrupt generated by an external device like UART, GPIO and so on.
In SoC level, EXTI (interrupt/event controller) of GD32VF103 MCU contains up to 19 independent edge detectors and generates interrupt requests or events to the processer. It’s used to manage these trigger sources: 16 external lines from GPIO pins and 3 lines from internal modules (including LVD, RTC Alarm, USB Wakeup).
The EXTI has three trigger types: rising edge, falling edge and both edges. Each edge detector in the EXTI can be configured and masked independently.
The architecture of EXTI module is shown in following figure.
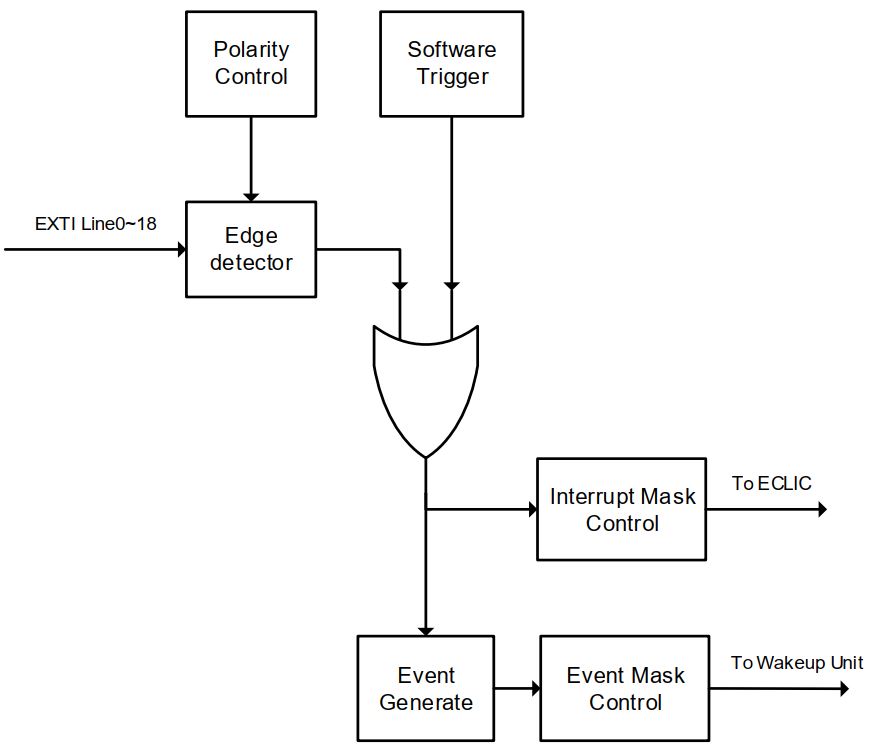
Fig. 4.11 Block diagram of EXTI
In Nuclei SDK, gd32vf103_rvstar.h provides API to operate the on-board peripherals, gd32vf103_exti.h provides API to operate the SoC EXTI, core_feature_eclic.h provides API to config ECLIC feature for Nuclei Processor Core.
The code for this lab is located in nuclei-sdk/board-labs/rvstar/exti_key_interrupt. You can see it in the appendix.
It can be divided into 4 parts:
Part1 : Board config, initialize on-board RGB LED and user key
Part2 : EXTI config, set PA0 to used as EXTI source and enable EXTI interrupt in SoC level
Part3 : ECLIC config, interrupt config in Processor level for specified interrupt source (interrupt enable, level and priority, non-vectored or vectored)
Part4 : EXTI interrupt service routine, change the status of on-board RGB LED (Red-Off or Off-Red)
The program flow is shown below:
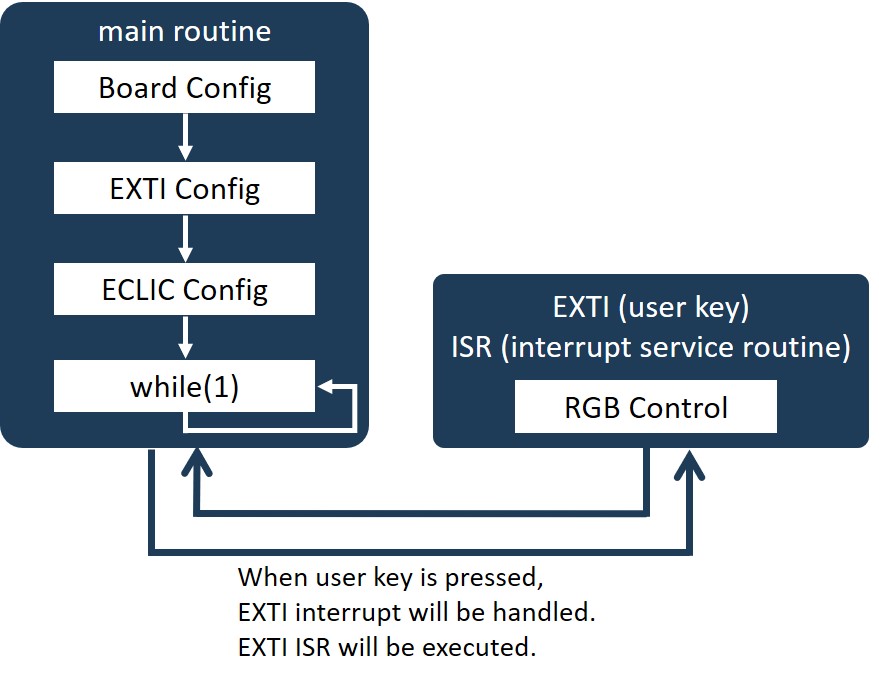
Fig. 4.12 Programming flow of extern interrupt
Steps
Connect RV-STAR Development Board and your computer with the USB Type-C cable.
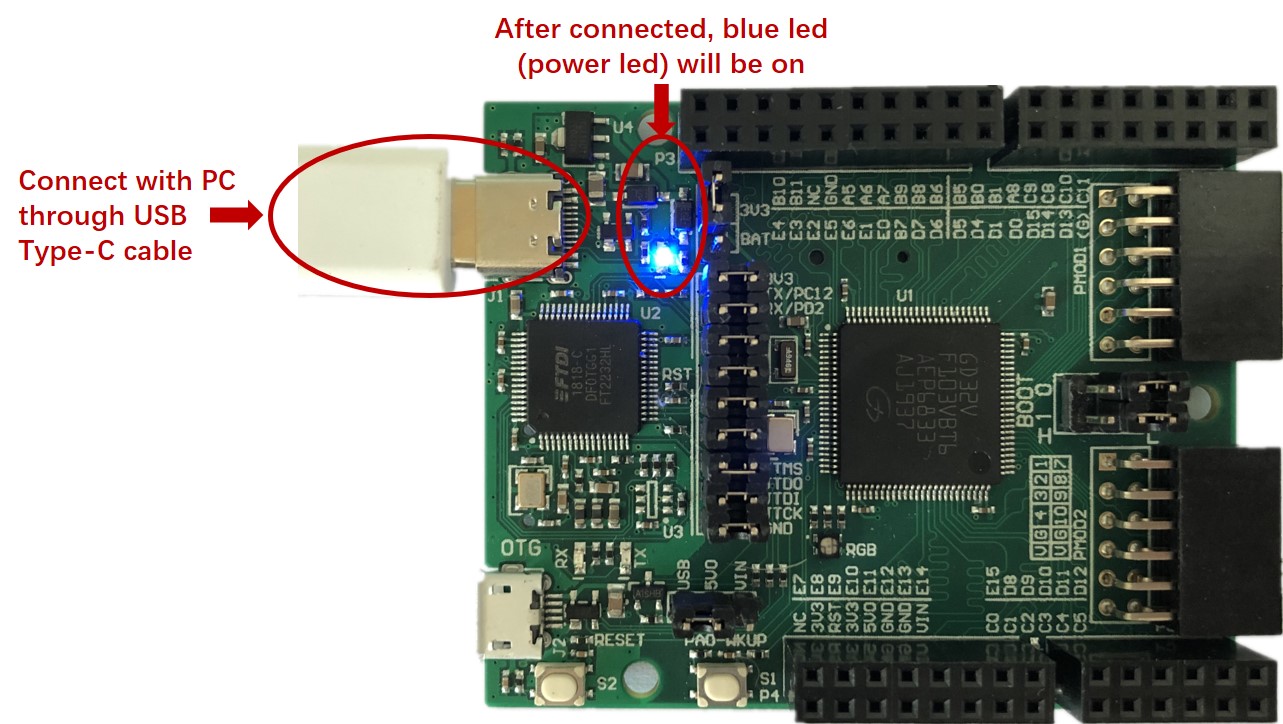
Fig. 4.13 Connect with PC
Note
When connect your board with the PC, just keep the on-board jumpers as default. About on-board jumpers’ function, please refer to Jumper Section.
Compile and run the
nuclei-sdk/board-labs/rvstar/exti_key_interruptexample. About the develop environment, you can choose Nuclei SDK or Segger Embedded Studio.
Nuclei SDK
Using the following commands:
cd /nuclei-sdk/board-labs/rvstar/exti_key_interrupt
make SOC=gd32vf103 BOARD=gd32vf103v_rvstar upload
Note
About the acquisition of source codes, please refer to Software Source Codes.
About the detailed usage of Nuclei SDK, please refer to How to develop with Nuclei SDK.
Segger Embedded Studio
Using the following actions:

Fig. 4.14 Operations in Embedded Studio
Note
About the acquisition of Segger Embedded Studio solutions, please refer to Software Source Codes.
About the detailed usage of Segger Embedded Studio, please refer to How to develop with Segger Embedded Studio.
Press the on-board User Key(PA0-WKUP), then check the status of on-board RGB LED.
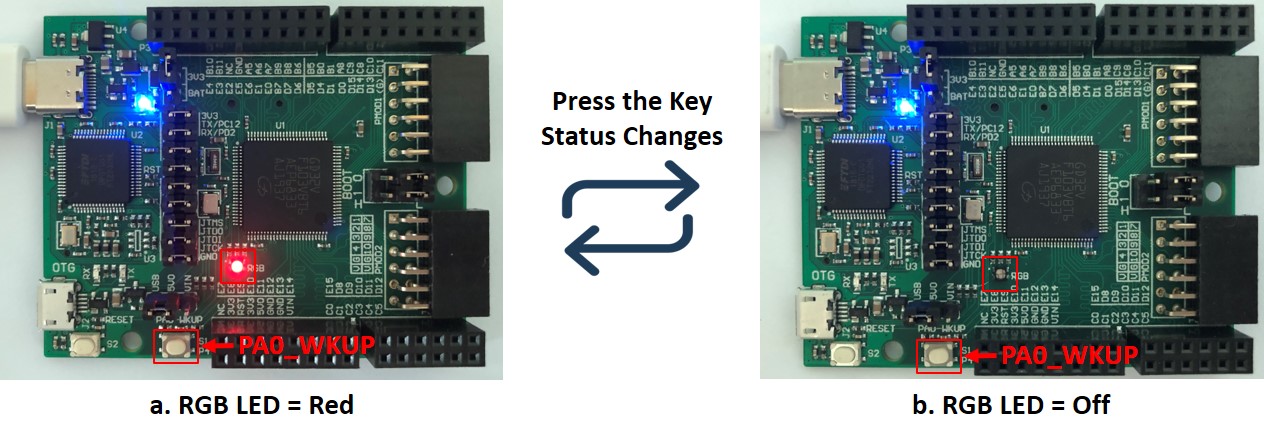
Fig. 4.15 Experimental results
Exercises
Try to create you own application to use the internal interrupt of Nuclei N Class Processors with non-vectored processing mode.
Appendix
rvstar/exti_key_interrupt/main.c
/**
    \brief      main function
    \param[in]  none
    \param[out] none
    \retval     none
*/
int main(void)
{
    int32_t returnCode;

    /* Board Config */
    gd_rvstar_led_init(LED3);
    gd_rvstar_key_init(WAKEUP_KEY_GPIO_PORT,KEY_MODE_EXTI);

    /* EXIT config */
    key_exti_init();

    /* ECLIC config */
    returnCode = ECLIC_Register_IRQ(EXTI0_IRQn, ECLIC_NON_VECTOR_INTERRUPT,
                    ECLIC_LEVEL_TRIGGER, 1, 0, NULL);

    /* Enable interrupts in general */
    __enable_irq();

    while(1);
    return 0;
}

/**
    \brief      initialize the EXTI configuration of the key
    \param[in]  none
    \param[out] none
    \retval     none
*/
void key_exti_init(void)
{
    /* enable the AF clock */
    rcu_periph_clock_enable(RCU_AF);

    /* connect key EXTI line to key GPIO pin */
    gpio_exti_source_select(WAKEUP_KEY_EXTI_PORT_SOURCE, WAKEUP_KEY_EXTI_PIN_SOURCE);

    /* configure key EXTI line */
    exti_init(EXTI_0, EXTI_INTERRUPT, EXTI_TRIG_FALLING);
    exti_interrupt_flag_clear(EXTI_0);
}

/**
    \brief      EXTI line0 interrupt service routine
    \param[in]  none
    \param[out] none
    \retval     none
*/
void EXTI0_IRQHandler(void)
{
    if (RESET != exti_interrupt_flag_get(WAKEUP_KEY_PIN)){

        if(RESET == gd_rvstar_key_state_get(KEY_WAKEUP)){
            /* toggle RED led */
            gd_rvstar_led_toggle(LED3);
        }
    }
    /* clear EXTI lines pending flag */
    exti_interrupt_flag_clear(WAKEUP_KEY_PIN);
}