4.1.1.1. How to use Nuclei board
Purpose
To get familiar with the usage of Nuclei board and on-board peripherals
To know how to program and debug the Nuclei board and on-board peripherals
Requirements
The following hardware and source codes are required:
PC host
Nuclei board (RV-STAR Development Board)
USB Type-C cable
nuclei-sdk/board-labs/rvstar/running_led
Content
A brief introduction of Nuclei board and on-board peripherals.
Based on Nuclei SDK and Segger Embedded Studio individually, program the GPIO to control some on-board peripherals and send message to PC through UART then printf that in the terminal.
Principles
About the brief introduction of RV-STAR Development Board, please refer to this online docs.
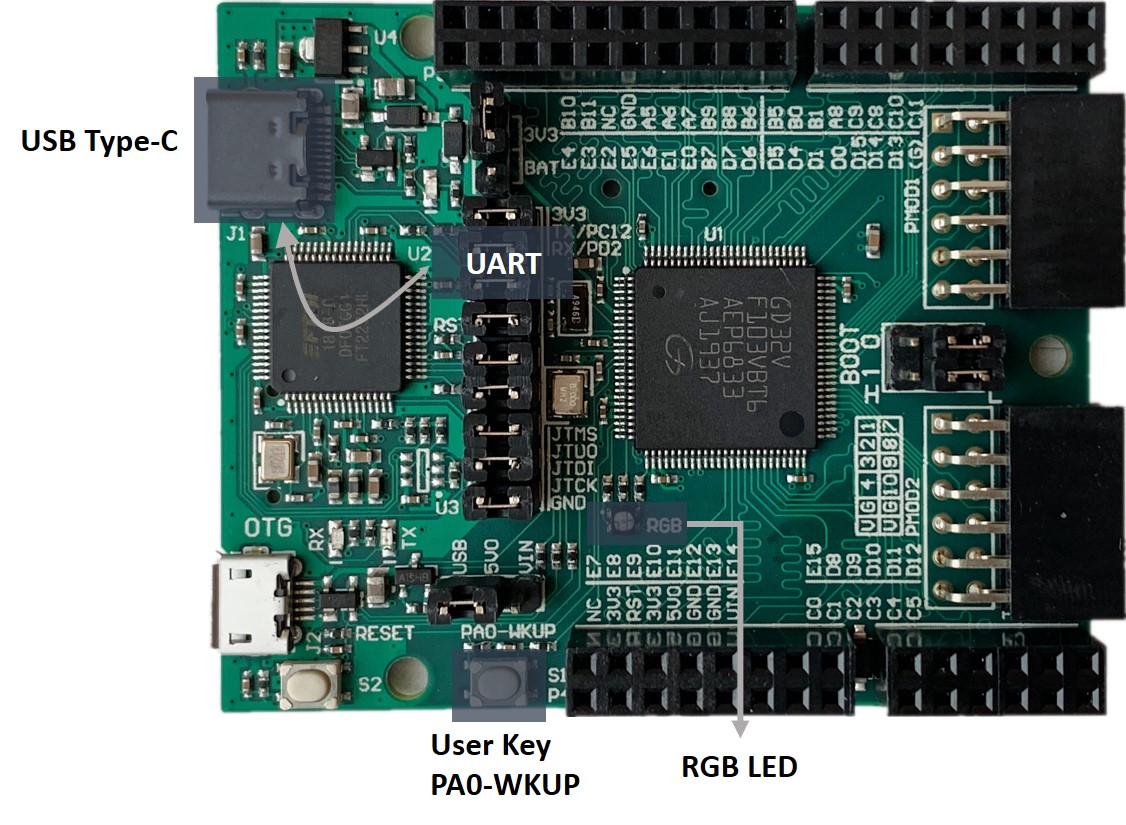
Fig. 4.1 RV-STAR Development Board
There are RGB LED, UART(to USB), and User Keys on RV-STAR Development Board, this lab shows how to program the GPIO to control these on-board peripherals of RV-STAR Development Board, and send message to PC through UART.
In Nuclei SDK, gd32vf103_rvstar.h provides API to operate these on-board peripherals.
The code for this lab is located in nuclei-sdk/board-labs/rvstar/running_led. You can see it in the appendix.
In the code, the number of on-board User Key(PA0-WKUP) pressed is counted, the status of RGB LED changes according to this number, and this info is displayed in the UART teminal.
Steps
Connect RV-STAR Development Board and your computer with the USB Type-C cable, and open UART terminal.
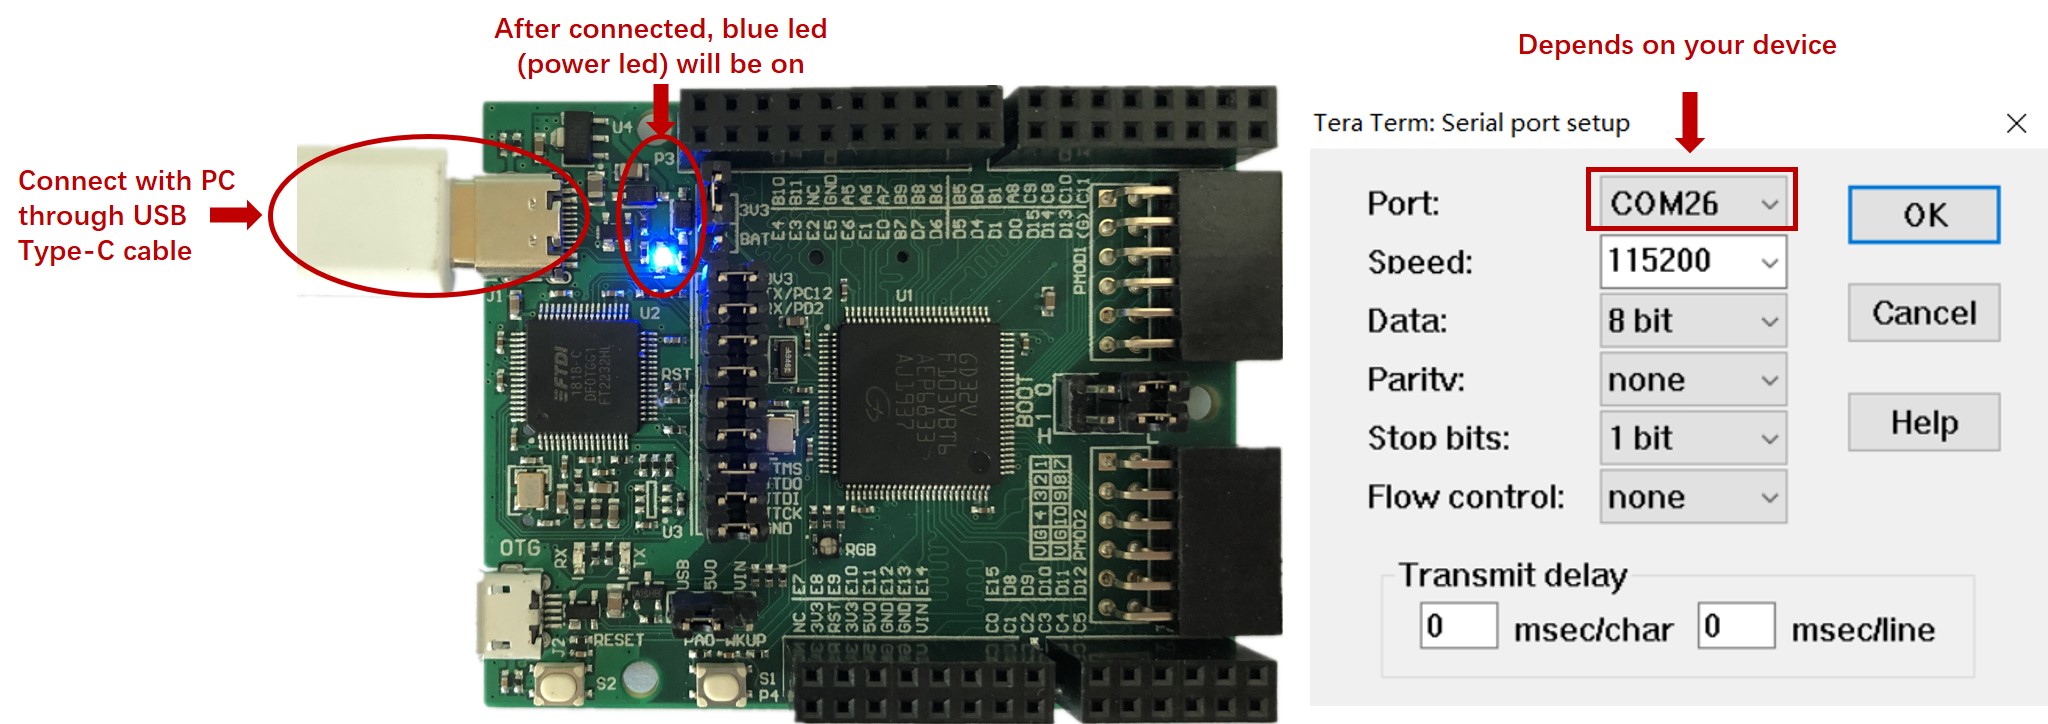
Fig. 4.2 Connect with PC
Note
When connect your board with the PC, just keep the on-board jumpers as default. About on-board jumpers’ function, please refer to Jumper Section.
The UART terminal configurations are 115200 baud, 8 bits data, no parity, and 1 stop bit (115200-8-N-1), and the COM port number can be get from device manager on the computer. About recommanded UART terminal tools, please refer to Tools Requirement Section.
Compile and run the
nuclei-sdk/board-labs/rvstar/running_ledexample. About the develop environment, you can choose Nuclei SDK or Segger Embedded Studio.
Nuclei SDK
Using the following commands:
cd /nuclei-sdk/board-labs/rvstar/running_led
make SOC=gd32vf103 BOARD=gd32vf103v_rvstar upload
Note
About the acquisition of source codes, please refer to Software Source Codes.
About the detailed usage of Nuclei SDK, please refer to How to develop with Nuclei SDK.
Segger Embedded Studio
Using the following actions:
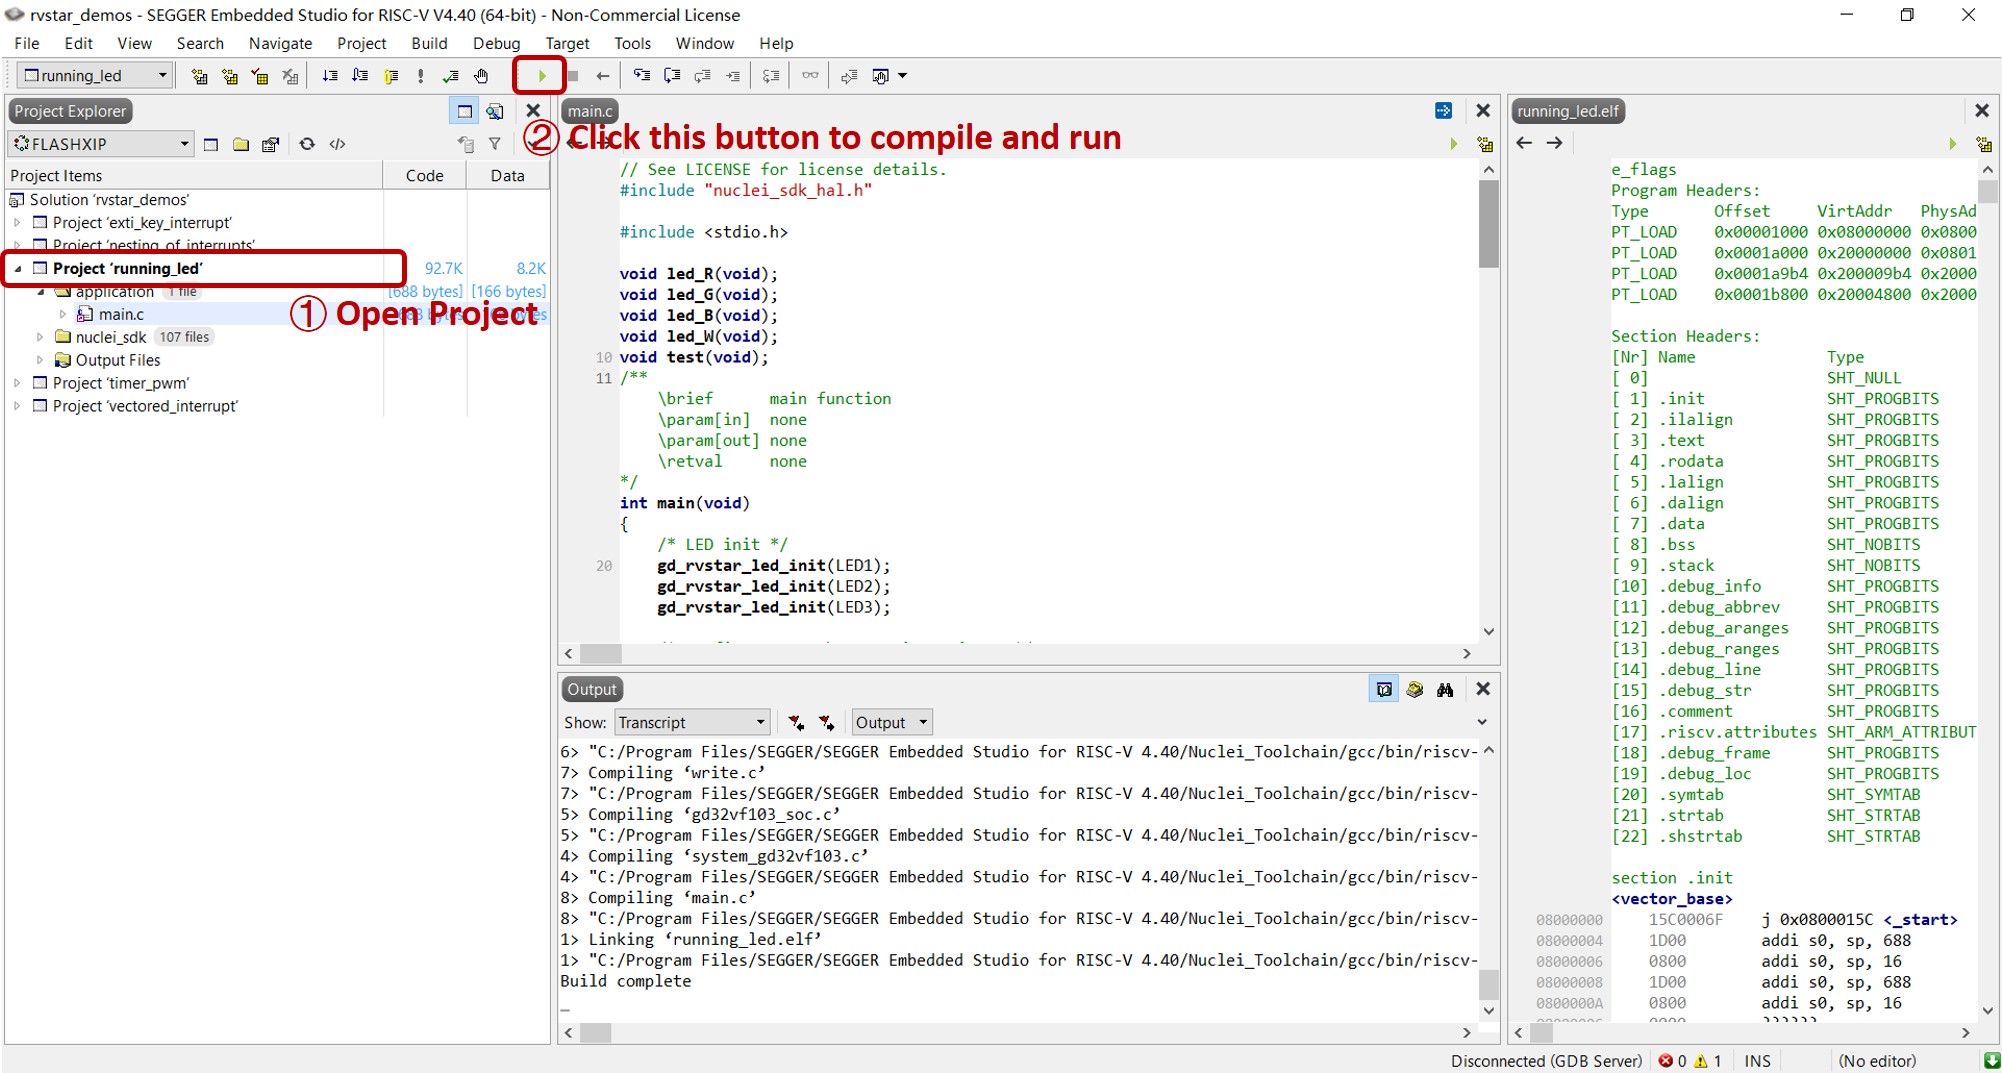
Fig. 4.3 Operations in Embedded Studio
Note
About the acquisition of Segger Embedded Studio solutions, please refer to Software Source Codes.
About the detailed usage of Segger Embedded Studio, please refer to How to develop with Segger Embedded Studio.
Press the on-board User Key(PA0-WKUP), then check the result in UART terminal, and watch the changes of on-board RGB LED.
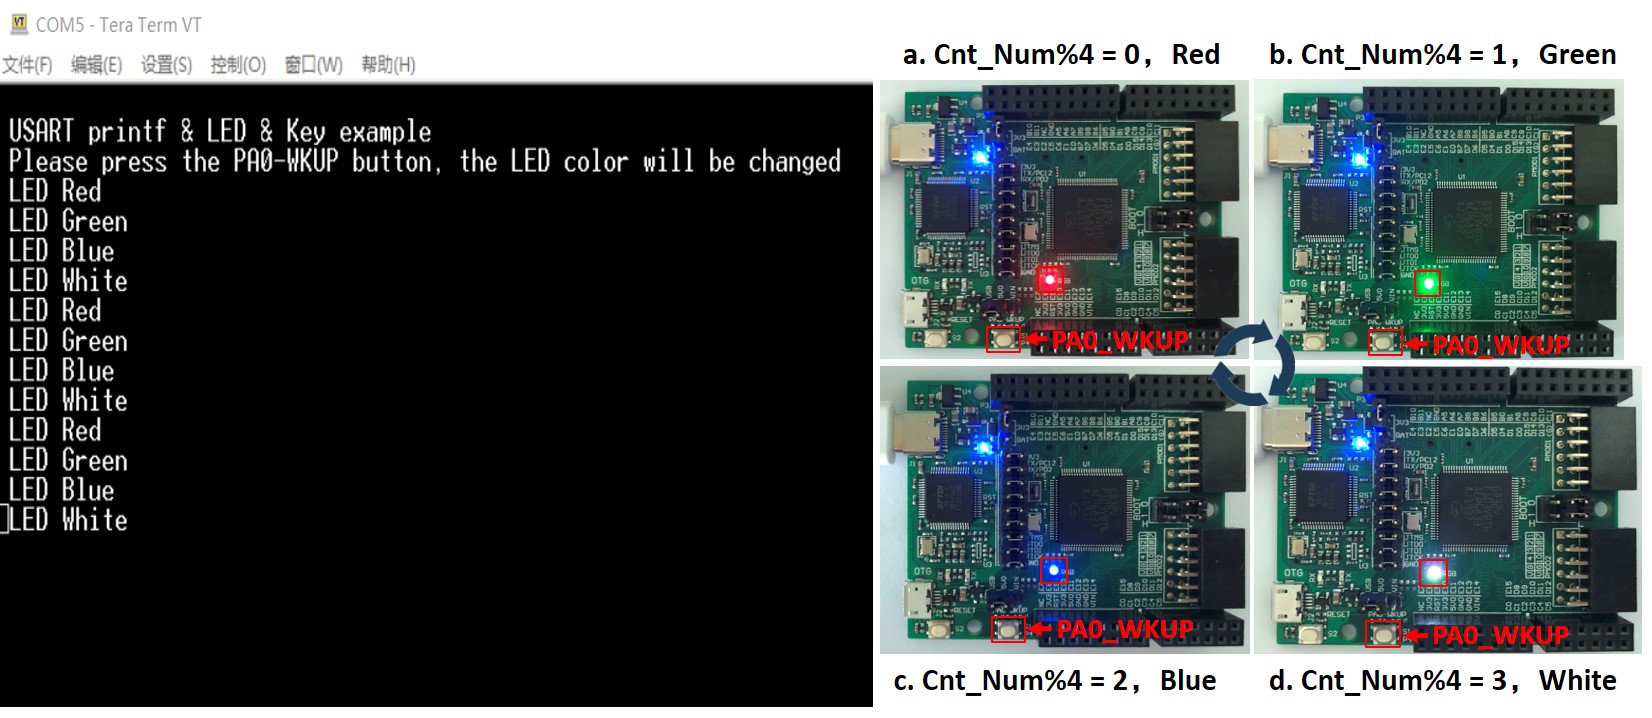
Fig. 4.4 Experimental results
Exercises
Try to create you own application to control the peripherals of RV-STAR Development Board in other mode.
Appendix
rvstar/running_led/main.c
/**
    \brief      main function
    \param[in]  none
    \param[out] none
    \retval     none
*/
int main(void)
{
    /* LED init */
    gd_rvstar_led_init(LED1);
    gd_rvstar_led_init(LED2);
    gd_rvstar_led_init(LED3);

    /* configure WKUP button pin as input */
    gd_rvstar_key_init(WAKEUP_KEY_GPIO_PORT,KEY_MODE_GPIO);

    test();

    return 0;
}

/**
    \brief      start to read key status and change led
    \param[in]  none
    \param[out] none
    \retval     none
*/
void test(void)
{

    uint16_t cnt = 0;

    printf("\r\n USART printf & LED & Key example \r\n");
    printf("\r\n Please press the PA0-WKUP button, the LED color will be changed\r\n");

    while(1){

      /* check whether the button is pressed */
        if(SET ==  gd_rvstar_key_state_get(KEY_WAKEUP)){
            switch((cnt%4)){
                case 0: led_R(); break;
                case 1: led_G(); break;
                case 2: led_B(); break;
                case 3: led_W(); break;
            }

            if(cnt!=3) cnt++; else cnt=0;
            delay_1ms(500);
        }

    }

}

/**
    \brief      turn on green light
    \param[in]  none
    \param[out] none
    \retval     none
*/
void led_G(void)
{
    gd_rvstar_led_off(LED2);
    gd_rvstar_led_off(LED3);
    gd_rvstar_led_on(LED1);
    printf("\r\n LED Green\r\n");
}

/**
    \brief      turn on blue light
    \param[in]  none
    \param[out] none
    \retval     none
*/
void led_B(void)
{
    gd_rvstar_led_off(LED1);
    gd_rvstar_led_off(LED3);
    gd_rvstar_led_on(LED2);
    printf("\r\n LED Blue\r\n");
}

/**
    \brief      turn on red light
    \param[in]  none
    \param[out] none
    \retval     none
*/
void led_R(void)
{
    gd_rvstar_led_off(LED2);
    gd_rvstar_led_off(LED1);
    gd_rvstar_led_on(LED3);
    printf("\r\n LED Red\r\n");
}

/**
    \brief      turn on white light
    \param[in]  none
    \param[out] none
    \retval     none
*/
void led_W(void)
{
    gd_rvstar_led_on(LED3);
    gd_rvstar_led_on(LED2);
    gd_rvstar_led_on(LED1);
    printf("\r\n LED White\r\n");
}