Quick Startup
Caution
This Nuclei N100 SDK is only for Nuclei N100 with IRQC interrupt controller, if you are using Nuclei N100 CPU with ECLIC, please switch to Nuclei SDK >= 0.9.0
Use Nuclei N100 SDK in Nuclei Studio
You can download Nuclei Studio IDE >= 2025.10 from Nuclei Download Center, and follow Nuclei Studio and Nuclei Tools User Guide to learn how to use it.
But if you want to use latest source code of Nuclei N100 SDK, please follow the rest part of this guide to build and run using Nuclei N100 SDK Build System in Makefile.
Setup Tools and Environment
To start to use Nuclei N100 SDK, you need to install the following tools:
Use Prebuilt Tools in Nuclei Studio
Since 2020.10 release version of Nuclei Studio, you just need to download the Nuclei Studio IDE from Nuclei Download Center for your development OS, and no need to do the following steps below, the prebuilt tools are already included.
For example:
In Windows, if you have extracted the Nuclei Studio IDE to
D:\Software\NucleiStudio_IDE_202510, then you can find the prebuilt tools inD:\Software\NucleiStudio_IDE_202510\NucleiStudio\toolchain.In Linux, if you have extracted the Nuclei Studio IDE to
/home/labdev/NucleiStudio_IDE_202510, then you can find the prebuilt tools in/home/labdev/NucleiStudio_IDE_202510/NucleiStudio/toolchain.
You can also update tools located in the Nuclei Studio prebuilt tools toolchain by downloading newer version
from Nuclei Tools and replace it.
If you have downloaded and extracted the Nuclei Studio, then you can jump to Get and Setup Nuclei N100 SDK and ignore below steps.
Get and Setup Nuclei N100 SDK
The source code of Nuclei N100 SDK is maintained in Github and Gitee.
We mainly maintained github version, and gitee version is mirrored, just for fast access in China.
Check source code in Nuclei N100 SDK in Github or Nuclei N100 SDK in Gitee according to your network status.
Stable version of Nuclei N100 SDK is maintained in master version, if you want release version of Nuclei N100 SDK, please check in Nuclei N100 SDK Release in Github.
Here are the steps to clone the latest source code from Github:
Make sure you have installed Git tool, see https://git-scm.com/download/
Then open your terminal, and make sure git command can be accessed
Run
git clone -b master_n100 https://github.com/Nuclei-Software/nuclei-sdk nuclei-n100-sdkto clone source code intonuclei-n100-sdkfolderNote
develop_n100 branch is develop branch for Nuclei 100 series RISC-V CPU support.
master_n100 branch is stable branch for Nuclei 100 series RISC-V CPU support.
If you have no access to github.com, you can also use command
git clone -b master_n100 https://gitee.com/Nuclei-Software/nuclei-sdk nuclei-n100-sdkto clone from gitee.If you have no internet access, you can also use pre-downloaded
nuclei-n100-sdkcode, and use it.If the backup repo is not up to date, you can import github repo in gitee by yourself, see https://gitee.com/projects/import/url
Create tool environment config file for Nuclei N100 SDK
Note
If you want to use Terapines ZCC toolchain, you can download it from https://www.terapines.com/, or use Nuclei Studio >= 2025.02, a Terapines ZCC Lite version is integrated in <NucleiStudio>/toolchain/zcc folder, and you also need to add extra PATH into your environment, like this:
Windows: execute
set PATH=\path\to\zcc\bin;%PATH%in windows cmd terminal before run Nuclei SDKLinux: execute
set PATH=/path/to/zcc/bin:$PATHin linux shell terminal before build Nuclei SDK
- Windows
If you want to use Nuclei N100 SDK in Windows Command Prompt terminal, you need to create
setup_config.batinnuclei-n100-sdkfolder, and open this file your editor, and paste the following content, assuming you followed Setup Tools and Environment, and prebuilt tools located inD:\Software\NucleiStudio_IDE_202510\NucleiStudio\toolchain, otherwise please use your correct tool root path.set NUCLEI_TOOL_ROOT=D:\Software\NucleiStudio_IDE_202510\NucleiStudio\toolchain
If you want to use Nuclei N100 SDK in Windows PowerShell terminal, you need to create a
setup_config.ps1innuclei-n100-sdkfolder, and edit this file with content below if your prebuilt tools are located inD:\Software\NucleiStudio_IDE_202510\NucleiStudio\toolchain:$NUCLEI_TOOL_ROOT="D:\Software\NucleiStudio_IDE_202510\NucleiStudio\toolchain"
- Linux
Create
setup_config.shinnuclei-n100-sdkfolder, and open this file your editor, and paste the following content, assuming you followed Setup Tools and Environment and prebuilt tools located in/home/labdev/NucleiStudio_IDE_202510/NucleiStudio/toolchain, otherwise please use your correct tool root path.NUCLEI_TOOL_ROOT=/home/labdev/NucleiStudio_IDE_202510/NucleiStudio/toolchain
Build, Run and Debug Sample Application
Assume you have followed steps in Get and Setup Nuclei N100 SDK to clone source code and create files below:
setup_config.batfor run in Windows Command Prompt terminalsetup_config.ps1for run in Windows PowerShell terminalsetup_config.shfor run in Linux Bash terminal
To build, run and debug application, you need to open command terminal in nuclei-n100-sdk
folder.
For Windows users, you can open Windows Command Prompt terminal and cd to
nuclei-n100-sdkfolder, then run the following commands to setup build environment for Nuclei N100 SDK, the output will be similar as this screenshot Setup Build Environment for Nuclei N100 SDK in Windows Command Prompt:1setup.bat 2echo %PATH% 3where riscv64-unknown-elf-gcc openocd make rm 4make help

Setup Build Environment for Nuclei N100 SDK in Windows Command Prompt
For Linux users, you can open Linux Bash terminal and cd to
nuclei-n100-sdkfolder, then run the following commands to setup build environment for Nuclei N100 SDK, the output will be similar as this screenshot Setup Build Environment for Nuclei N100 SDK in Linux Bash:1source setup.sh 2echo $PATH 3which riscv64-unknown-elf-gcc openocd make rm 4make help

Setup Build Environment for Nuclei N100 SDK in Linux Bash
Note
Only first line
setup.batorsource setup.share required before build, run or debug application. Thesetup.batandsetup.share just used to append Nuclei RISC-V GCC Toolchain, OpenOCD and Build-Tools binary paths into environment variable PATHline 2-4 are just used to check whether build environment is setup correctly, especially the PATH of Nuclei Tools are setup correctly, so we can use the
riscv64-unknown-elf-xxx,openocd,makeandrmtoolsIf you know how to append Nuclei RISC-V GCC Toolchain, OpenOCD and Build-Tools binary paths to PATH variable in your OS environment, you can also put the downloaded Nuclei Tools as you like, and no need to run
setup.batorsource setup.shIf you want to run in Windows PowerShell, please run
. .\setup.ps1instead ofsetup.bat, andsetup_config.ps1must be created as described in Get and Setup Nuclei N100 SDK.
Here for a quick startup, this guide will take board Nuclei FPGA Evaluation Kit for example to demostrate how to setup hardware, build run and debug application in Windows.
The demo application, we will take application/baremetal/helloworld for example.
First of all, please reuse previously build environment command terminal.
Run cd application/baremetal/helloworld to cd the helloworld example folder.
Hardware Preparation
Please check Board and find your board’s page, and follow Setup section to setup your hardware, mainly JTAG debugger driver setup and on-board connection setup.
Power on the Nuclei FPGA Evaluation Kit board, and use USB Type-C data cable to connect the board and your PC, make sure you have setup the JTAG driver correctly, and you can see JTAG port and serial port.
Open a UART terminal tool such as TeraTerm in Windows or Minicom in Linux, and minitor the serial port of the Board, the UART baudrate is 115200 bps
If you are building example for your own SoC and Board, please pass correct SOC and BOARD make variable. eg. If you SoC is
evalsocand Board isnuclei_fpga_eval, just passSOC=evalsoc BOARD=nuclei_fpga_evalto make instead of the one mentioned below. If your default board for thisevalsocisnuclei_fpga_eval, then you don’t need to passBOARD=nuclei_fpga_eval.If you don’t pass any SOC or BOARD via make,
evalsocandnuclei_fpga_evalare default SoC and Board.
Build Application
We need to build application for this board Nuclei FPGA Evaluation Kit using this command line:
Note
Since below steps are taking evalsoc SoC based board nuclei_fpga_eval to do demostration, and when you pass
SOC=evalsoc, the default BOARD will benuclei_fpga_eval, so do you don’t need to passBOARD=nuclei_fpga_evalYou can check default SOC/BOARD/CORE information passed by using make target
info, eg.make SOC=evalsoc info, for more information, please check Makefile targets of make command.
# clean application if build in other application before or build for other board
make SOC=evalsoc clean
# first build choice: using full command line
make SOC=evalsoc all
# second build choice: using simple command line, since when SOC=evalsoc, default BOARD is nuclei_fpga_eval
make SOC=evalsoc all
Here is the sample output of this command:
# NOTICE: You can check this configuration whether it matched your desired configuration
Current Configuration: TOOLCHAIN=nuclei_gnu RISCV_ARCH=rv32ic RISCV_ABI=ilp32 RISCV_TUNE=nuclei-100-series RISCV_CMODEL=medlow SOC=evalsoc BOARD=nuclei_fpga_eval CORE=n100 ARCH_EXT= DOWNLOAD=ilm STDCLIB=newlib_nano SMP= BOOT_HARTID=
"Assembling : " ../../../SoC/evalsoc/Common/Source/GCC/intexc_evalsoc.S
"Assembling : " ../../../SoC/evalsoc/Common/Source/GCC/startup_evalsoc.S
... ...
"Compiling  : " ../../../SoC/evalsoc/Common/Source/Stubs/write.c
"Compiling  : " ../../../SoC/evalsoc/Common/Source/evalsoc_soc.c
"Compiling  : " ../../../SoC/evalsoc/Common/Source/system_evalsoc.c
"Compiling  : " main.c
"Linking    : " helloworld.elf
text    data     bss     dec     hex filename
13022     112    2290   15424    3c40 helloworld.elf
As you can see, that when the application is built successfully, the elf will be generated
and will also print the size information of the helloworld.elf.
Note
In order to make sure that there is no application build before, you can run
make SOC=evalsoc cleanto clean previously built objects and build dependency files.About the make variable or option(SOC, BOARD) passed to make command, please refer to Build System based on Makefile.
Run Application
If the application is built successfully for this board Nuclei FPGA Evaluation Kit, then you can run it using this command line:
make SOC=evalsoc upload
Here is the sample output of this command:
"Download and run helloworld.elf"
riscv64-unknown-elf-gdb helloworld.elf -ex "set remotetimeout 240" \
        -ex "target remote | openocd -c \"gdb_port pipe; log_output openocd.log\" -f ../../../SoC/evalsoc/Board/nuclei_fpga_eval/openocd_evalsoc.cfg" \
        --batch -ex "monitor halt" -ex "monitor halt" -ex "monitor flash protect 0 0 last off" -ex "load" -ex "monitor resume" -ex "monitor shutdown" -ex "quit"
D:\Software\Nuclei\gcc\bin\riscv64-unknown-elf-gdb.exe: warning: Couldn't determine a path for the index cache directory.
Nuclei OpenOCD, 64-bit Open On-Chip Debugger 0.10.0+dev-00014-g0eae03214 (2019-12-12-07:43)
Licensed under GNU GPL v2
For bug reports, read
        http://openocd.org/doc/doxygen/bugs.html
_start0800 () at ../../../SoC/evalsoc/Common/Source/GCC/startup_evalsoc.S:359
359         j 1b
cleared protection for sectors 0 through 127 on flash bank 0

Loading section .init, size 0x266 lma 0x8000000
Loading section .text, size 0x2e9c lma 0x8000280
Loading section .rodata, size 0x1f0 lma 0x8003120
Loading section .data, size 0x70 lma 0x8003310
Start address 0x800015c, load size 13154
Transfer rate: 7 KB/sec, 3288 bytes/write.
shutdown command invoked
A debugging session is active.

        Inferior 1 [Remote target] will be detached.

Quit anyway? (y or n) [answered Y; input not from terminal]
[Inferior 1 (Remote target) detached]
As you can see the application is uploaded successfully using openocd and gdb,
then you can check the output in your UART terminal, see Nuclei N100 SDK Hello World Application UART Output.
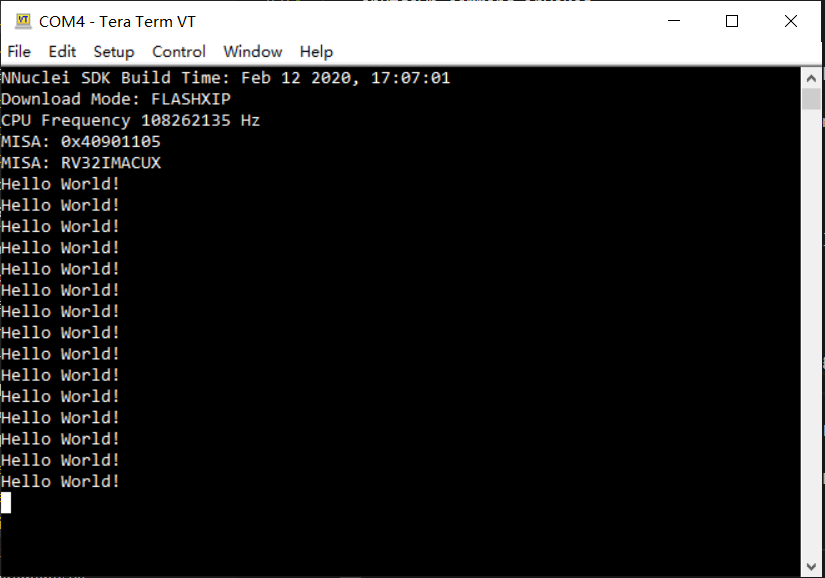
Nuclei N100 SDK Hello World Application UART Output
Debug Application
If the application is built successfully for this board Nuclei FPGA Evaluation Kit, then you can debug it using this command line:
make SOC=evalsoc debug
The program is not loaded automatically when you enter to debug state, just in case you want to debug the program running on the board.
"Download and debug helloworld.elf"
riscv64-unknown-elf-gdb helloworld.elf -ex "set remotetimeout 240" \
        -ex "target remote | openocd -c \"gdb_port pipe; log_output openocd.log\" -f ../../../SoC/evalsoc/Board/nuclei_fpga_eval/openocd_evalsoc.cfg"
D:\Software\Nuclei\gcc\bin\riscv64-unknown-elf-gdb.exe: warning: Couldn't determine a path for the index cache directory.
GNU gdb (GDB) 8.3.0.20190516-git
Copyright (C) 2019 Free Software Foundation, Inc.
License GPLv3+: GNU GPL version 3 or later <http://gnu.org/licenses/gpl.html>
This is free software: you are free to change and redistribute it.
There is NO WARRANTY, to the extent permitted by law.
Type "show copying" and "show warranty" for details.
This GDB was configured as "--host=i686-w64-mingw32 --target=riscv64-unknown-elf".
Type "show configuration" for configuration details.
For bug reporting instructions, please see:
<http://www.gnu.org/software/gdb/bugs/>.
Find the GDB manual and other documentation resources online at:
    <http://www.gnu.org/software/gdb/documentation/>.
--Type <RET> for more, q to quit, c to continue without paging--

For help, type "help".
Type "apropos word" to search for commands related to "word"...
Reading symbols from helloworld.elf...
Remote debugging using | openocd -c \"gdb_port pipe; log_output openocd.log\" -f ../../../SoC/evalsoc/Board/nuclei_fpga_eval/openocd_evalsoc.cfg
Nuclei OpenOCD, 64-bit Open On-Chip Debugger 0.10.0+dev-00014-g0eae03214 (2019-12-12-07:43)
Licensed under GNU GPL v2
For bug reports, read
        http://openocd.org/doc/doxygen/bugs.html
_start0800 () at ../../../SoC/evalsoc/Common/Source/GCC/startup_evalsoc.S:359
359         j 1b
If you want to load the built application, you can type
loadto load the application.(gdb) load Loading section .init, size 0x266 lma 0x8000000 Loading section .text, size 0x2e9c lma 0x8000280 Loading section .rodata, size 0x1f0 lma 0x8003120 Loading section .data, size 0x70 lma 0x8003310 Start address 0x800015c, load size 13154 Transfer rate: 7 KB/sec, 3288 bytes/write.
If you want to set a breakpoint at main, then you can type
b mainto set a breakpoint.(gdb) b main Breakpoint 1 at 0x8001b04: file helloworld.c, line 85.
If you want to set more breakpoints, you can do as you like.
Then you can type
c, then the program will stop at main(gdb) c Continuing. Note: automatically using hardware breakpoints for read-only addresses. Breakpoint 1, main () at helloworld.c:85 85 srand(__get_rv_cycle() | __get_rv_instret() | __RV_CSR_READ(CSR_MCYCLE));
Then you can step it using
n(short of next) ors(short of step)(gdb) n 86 uint32_t rval = rand(); (gdb) n 87 rv_csr_t misa = __RV_CSR_READ(CSR_MISA); (gdb) s 89 printf("MISA: 0x%lx\r\n", misa); (gdb) n 90 print_misa(); (gdb) n 92 printf("Hello World!\r\n"); (gdb) n 93 printf("Hello World!\r\n");
If you want to quit debugging, then you can press
CTRL - c, and typeqto quit debugging.(gdb) Quit (gdb) q A debugging session is active. Inferior 1 [Remote target] will be detached. Quit anyway? (y or n) y Detaching from program: D:\workspace\Sourcecode\nuclei-n100-sdk\application\baremetal\helloworld\helloworld.elf, Remote target Ending remote debugging. [Inferior 1 (Remote target) detached]
Note
More about how to debug using gdb, you can refer to the GDB User Manual.
If you want to debug using Nuclei Studio, you can open Nuclei Studio, and create a debug configuration, and choose the application elf, and download and debug in IDE.
Create helloworld Application
If you want to create your own helloworld application, it is also very easy.
There are several ways to achieve it, see as below:
Method 1: You can find a most similar sample application folder and copy it, such as
application/baremetal/helloworld, you can copy and rename it asapplication/baremetal/helloOpen the
Makefileinapplication/baremetal/helloChange
TARGET = helloworldtoTARGET = hello
Open the
helloworld.cinapplication/baremetal/hello, and replace the content using code below:1// See LICENSE for license details. 2#include <stdio.h> 3#include <time.h> 4#include <stdlib.h> 5#include "nuclei_sdk_soc.h" 6 7int main(void) 8{ 9 printf("Hello World from Nuclei RISC-V Processor!\r\n"); 10 return 0; 11}
Save all the changes, and then you can follow the steps described in Build, Run and Debug Sample Application to run or debug this new application.
Method 2: You can also do it from scratch, with just create simple
Makefileandmain.cCreate new folder named
helloinapplication/baremetalCreate two files named
Makefileandmain.cOpen
Makefileand edit the content as below:1TARGET = hello 2 3NUCLEI_SDK_ROOT = ../../.. 4 5SRCDIRS = . 6 7INCDIRS = . 8 9include $(NUCLEI_SDK_ROOT)/Build/Makefile.base
Open
main.cand edit the content as below:1// See LICENSE for license details. 2#include <stdio.h> 3#include <time.h> 4#include <stdlib.h> 5#include "nuclei_sdk_soc.h" 6 7int main(void) 8{ 9 printf("Hello World from Nuclei RISC-V Processor!\r\n"); 10 return 0; 11}
Save all the changes, and then you can follow the steps described in Build, Run and Debug Sample Application to run or debug this new application.
Note
If your are looking for how to run for other boards, please ref to Board.
Please refer to Application Development and Build System based on Makefile for more information.
If you want to access SoC related APIs, please use
nuclei_sdk_soc.hheader file.If you want to access SoC and board related APIs, please use
nuclei_sdk_hal.hheader file.For simplified application development, you can use
nuclei_sdk_hal.hdirectly.
Advanced Usage
For more advanced usage, please follow the items as below:
Click Design and Architecture to learn about Nuclei N100 SDK Design and Architecture, Board and SoC support documentation.
Click Developer Guide to learn about Nuclei N100 SDK Build System and Application Development.
Click Application to learn about each application usage and expected output.
Note
If you met some issues in using this guide, please check FAQ, if still not solved, please Submit your issue.
If you are trying to develop Nuclei N100 SDK application in IDE, now you have three choices:
Recommended: Since Nuclei Studio 2025.02, Nuclei N100 SDK will be deeply integrated with Nuclei Studio IDE, you can easily create a Nuclei N100 SDK Project in Nuclei Studio through IDE Project Wizard, and easily configure selected Nuclei N100 SDK project using SDK Configuration Tool, for more details, please click Nuclei Tools to download Nuclei Studio IDE, and refer to the Nuclei Studio and Nuclei Tools User Guide for how to use it.
You can take a try using IAR workbench, we provided prebuilt projects directly in Nuclei N100 SDK, just check the
ideprojects/iarfolder to learn about it.